
Understanding Plumbing Service Costs in Michigan
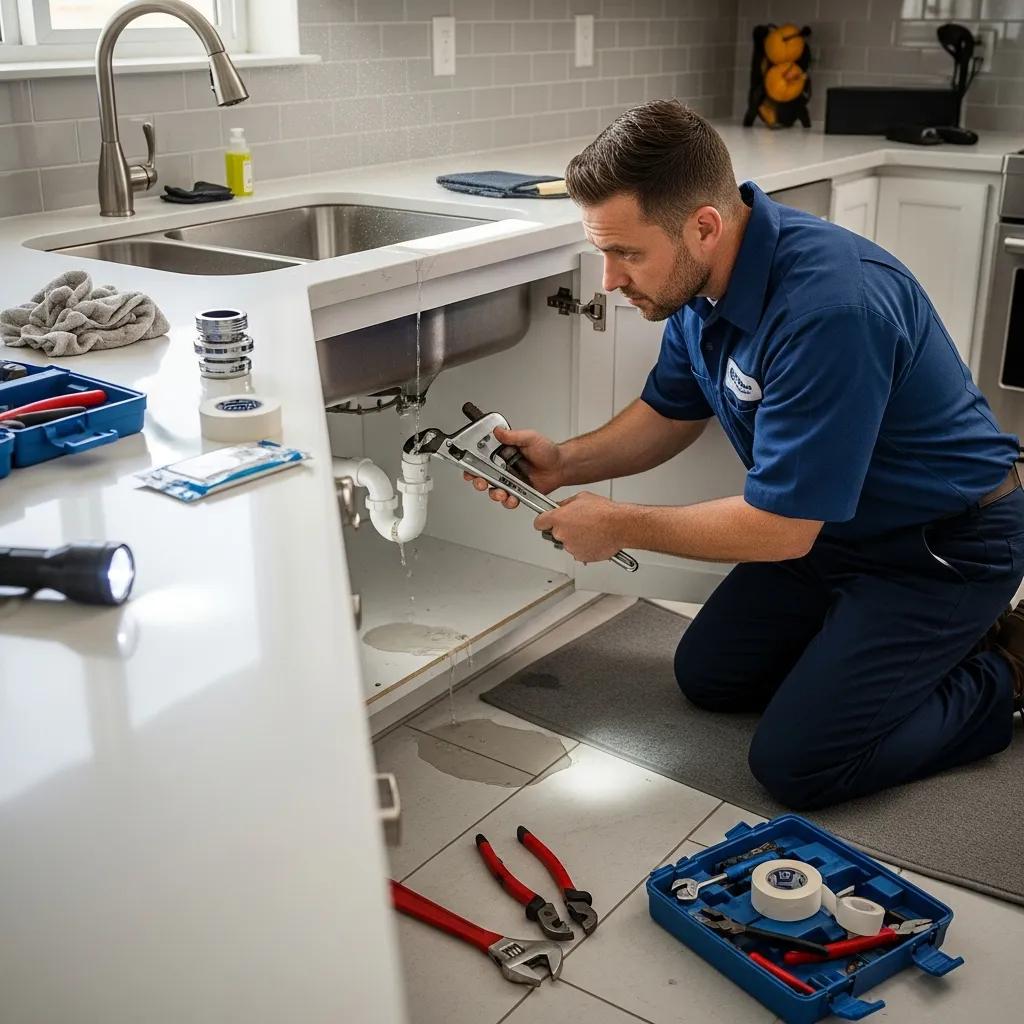
Michigan Plumbing Costs Explained — Your Clear Guide to Pricing & Estimates Plumbing costs in Michigan can range from hourly service calls to full project prices for installations and major repairs. This guide helps homeowners and business owners read those numbers with confidence. You’ll find typical hourly rates, common project cost ranges, what drives price differences across Macomb, Oakland, and Wayne counties, and practical tips for getting clear, accurate estimates. We break down how labor, materials, permits, and emergency fees add up, and when an hourly rate makes sense versus a flat project quote. Read the tables, checklists, and examples below to compare estimates, spot red flags, and ask local plumbers the right questions. Average Plumbing Costs and Rates in Michigan In Michigan, plumbing pricing usually falls into two buckets: hourly/service-call rates and project-based quotes. Hourly charges cover diagnostics and small repairs; project pricing bundles labor, parts, permits, and disposal into a single price for larger jobs. The ranges below assume basic materials are included in average quotes; specialty parts, permit costs, and difficult access push estimates higher. These figures help you decide whether a phone or virtual quote is reasonable or if an in-person estimate is necessary. Common Michigan plumbing cost ranges for quick reference: Service Type Typical Cost Range (USD) What’s Included Service call / small repair (hourly) $75 – $150 per hour Technician time, basic diagnostics, minor parts Drain cleaning (basic) $125 – $350 Snaking, minor root clearing, labor Water heater replacement (tank) $900 – $2,500 New unit (mid-range), labor, basic venting Water heater replacement (tankless/HP) $1,500 – $5,000+ Unit cost, more complex install, permits Sewer line repair (traditional) $3,000 – $10,000+ Excavation, pipe, labor, disposal Camera inspection $200 – $600 Diagnostic inspection and report Use this table as a baseline: small repairs and service calls sit at the lower end, while installations and underground work require permits and more labor, which raises costs. Knowing what a price typically covers makes it easier to compare bids fairly. How Much Does a Plumber Cost Per Hour in Michigan? Expect plumber hourly rates in Michigan to fall roughly between $75 and $150 per hour, depending on experience, company size, and job complexity. Hourly billing usually covers the technician’s time and basic tools; parts and special equipment are often billed separately or added to a flat fee. Emergency or after-hours service typically comes with a surcharge, and long travel times can raise the effective hourly cost. Hourly pricing is usually best for short repairs; for larger jobs, a flat project price can offer better predictability. Understanding hourly rates helps you decide whether to request a time-and-materials visit or a fixed-price quote for a bigger project. Typical Project-Based Plumbing Costs Project-based pricing covers full jobs such as water heater swaps, partial repiping, sewer fixes, and complete fixture installs. These quotes reflect materials, labor, permits, and disposal. Project pricing transfers more risk to the contractor by bundling expected costs, but unexpected issues—old pipes, difficult access, or structural repairs—can still increase the final bill. Below are common project examples and their usual ranges, with notes on what pushes a job toward the higher end. Water heater replacement (tank): $900–$2,500 depending on unit size and complexity. Tankless or heat-pump water heater installs: $1,500–$5,000+ for additional venting or electrical/gas work. Sectional repiping (per room or area): $1,000–$4,000 based on access and materials. Trenchless sewer repair: $3,000–$8,000+ depending on length and site access. Project complexity—permit fees, wall or slab access, and specialty parts—explains why similar jobs can have very different quotes. Always ask for a written scope that lists included parts, permit handling, and what triggers a change order. Which Factors Affect Plumbing Service Costs in Michigan? Multiple factors combine to form a plumbing price: labor, materials, permits, job complexity, location, and urgency. Labor reflects skill level and local wages; materials range from budget to premium; permits add fixed costs and time; and difficult access or older systems increase labor hours. Michigan’s freeze-thaw seasons also drive demand for emergency work, which affects market pricing. Knowing these drivers helps you spot negotiable items on a bid and those you’ll likely have to pay for. Below is a quick breakdown of how key factors affect price: Cost Factor How It Impacts Price Example (Michigan-specific) Labor skill & availability Higher-skilled, licensed plumbers cost more per hour Urban areas or specialized techs for sewer work increase rates Materials & parts Premium fixtures and OEM parts raise totals Corrosion-resistant piping choices add to material cost Permit & inspection fees Adds fixed costs and time for compliance Water heater or repiping often requires municipal permits Access & complexity More demolition or confined access increases labor hours Frozen slab or hard-to-reach lines in older homes Emergency/after-hours Premiums for rapid response Burst pipes in winter requiring immediate mitigation This table ties each cost factor to a practical Michigan example so you can see why one estimate might be higher than another. Use it to prioritize which details to share with contractors when requesting a quote. How Do Labor, Materials, and Job Complexity Shape Pricing? Labor, parts, and complexity usually make up most of your plumbing bill. Labor covers technician time and expertise; materials are the parts installed; and complexity multiplies both when jobs need extra hours or special tools. A water heater swap in a utility room is straightforward, but doing the same swap behind finished walls with electrical or venting changes adds labor and sometimes subcontractors. Choices like copper versus PEX affect both upfront cost and long-term value—ask to see material line items so you can compare lifecycle costs. Transparent estimates break out labor hours, material costs, and known unknowns so you can compare offers fairly. That transparency makes it easier to understand emergency pricing and when surcharges apply. Why Emergency Plumbing Services Cost More in Michigan Emergency pricing reflects urgency, staffing, and logistics. Technicians on call must be available on short notice, after-hours work disrupts schedules, and urgent mitigation often requires immediate parts and equipment. Common Michigan emergencies—frozen or burst pipes
First Steps for Water Damage Cleanup

First Steps for Water Damage Cleanup: Immediate Actions and Expert Guidance Unwanted water in a home or business can damage structures, create electrical hazards, and let mold take hold within 24–48 hours. This practical guide walks you through what to do first: how to stay safe, stop the leak if you can, remove standing water, and begin drying to limit further damage. You’ll get straightforward steps for shutting off utilities, choosing and using personal protective equipment, deciding when to keep working and when to call a pro, plus checklists and equipment comparisons to document your actions for insurance or restoration teams. Read on for clear, actionable steps you can take now to reduce loss before help arrives. What Safety Precautions Should You Take Immediately After Water Damage? Safety comes first. Water can interact with electricity, sewage, and building materials to create hidden dangers. From a safe spot, scan for risks like exposed outlets, sagging ceilings, or dark—potentially contaminated—water. These observations tell you whether it’s safe to do initial mitigation. Keep people and pets out of affected areas until hazards are removed or a professional says it’s safe. Take photos and notes from a safe distance—those records help insurers and restoration teams later. If you smell gas, see damaged electrical panels, or notice structural collapse, don’t go back inside. Contact emergency services or a licensed technician and wait for help. The next section explains how to shut off utilities safely and what to avoid when water and electricity are both involved. How Do You Turn Off Utilities to Prevent Electrical Hazards? Shutting off power and gas can stop further damage, but never at the cost of your safety. If water is within a few feet of electrical panels, outlets, or appliances, do not touch breakers—call a pro. If the breaker panel is dry and reachable, turn off the main breaker to cut power to the property. Only shut off the gas at the meter if you know how and can do so safely. Use insulated tools and rubber-soled shoes when working near utilities, and if you have any doubt, wait for licensed technicians. If you can’t access shut-offs safely, document their location and condition and evacuate until help arrives. Once utilities are controlled, you can plan PPE and cleanup steps. What Personal Protective Equipment Is Essential During Cleanup? PPE limits exposure to contaminants, sharp objects, and chemical cleaners during mitigation. At minimum, wear chemical-resistant gloves, sturdy rubber boots, eye protection, and an N95 respirator when mold or dust may be present. For sewage or black-water incidents, upgrade to full-face protection and disposable coveralls. Remove and bag disposable gear carefully, and wash reusable items separately in hot water to avoid spreading contamination. Pick PPE based on the contamination level and task. Inspect gear before use and replace anything damaged. With PPE on, you can safely move to finding and stopping the water source. Common PPE to have on hand: Chemical- and puncture-resistant gloves.Slip-resistant rubber boots.Respirators (N95 or better) for airborne spores and dust. How Can You Locate and Stop the Water Source Quickly? Stopping the flow limits damage and makes mitigation easier. Do a quick perimeter check: look at plumbing fixtures, appliance lines, water heater connections, and under sinks. At the same time, inspect the roof, exterior walls, and foundation for signs of outside intrusion. When possible, shut a valve, clamp a leaking pipe, or isolate the appliance to halt incoming water. Identifying and stopping the source also speeds the restoration assessment once pros arrive. If the leak is plumbing-related, use the main shut-off as described below. If the problem is from the roof or foundation, apply temporary patches and divert water away until repairs can be made by a professional. Where Is the Main Water Shut-Off Valve and How Do You Use It? The main shut-off is usually where the water line enters the building—basement, crawlspace, utility room, or an exterior wall near the foundation. Know your valve type: a round gate valve needs several turns to close; a ball valve has a lever that turns 90 degrees. Turn a gate valve clockwise to close it, or move a ball valve lever perpendicular to the pipe. If the valve is stuck, corroded, or unreachable, don’t force it—document the condition and call a plumber. After shutting off the main, open faucets at the highest and lowest points to drain water and relieve pressure. Mark shut-off locations ahead of time for quicker access in an emergency. What Are Common Leak Points to Identify in Your Home or Business? Check the most likely spots first to narrow your response: appliance supply lines (dishwashers, washing machines), refrigerator water lines, toilet and sink connections, water heater fittings, visible pipe joints, and irrigation lines. Outside, inspect roof flashings, window seals, and foundation cracks. Hidden leaks often show up as soft drywall, discolored paint, bulging baseboards, or an unexplained jump in your water bill—use those clues to prioritize inspections. Photograph and note every suspected leak for insurance and restoration teams. With the source contained, you can move on to removing standing water and limiting saturation. What Are the Best Methods for Immediate Water Removal and Extraction? Removing standing water quickly lowers saturation and the chance mold will grow. The method depends on depth and contamination. Small spills are manageable with mops, towels, and buckets; larger or deeper floods need powered gear like wet/dry vacuums, submersible pumps, or truck-mounted extractors. Equipment choice matters—pumps move big volumes fast, while air movers and dehumidifiers tackle moisture left inside materials. Match the tool to the job to speed drying and reduce secondary damage. Use DIY extraction only for clean-water incidents and small areas. Gray- and black-water situations (sewage) require trained crews and containment. The next section covers safe manual removal you can do right away. How Do You Manually Remove Standing Water Safely? For small incidents, manual removal helps stabilize the situation but do it carefully to avoid injury or contamination spread. Put on PPE, bail water with buckets, and use
Maintaining Outdoor Drains & Gutters in Summer
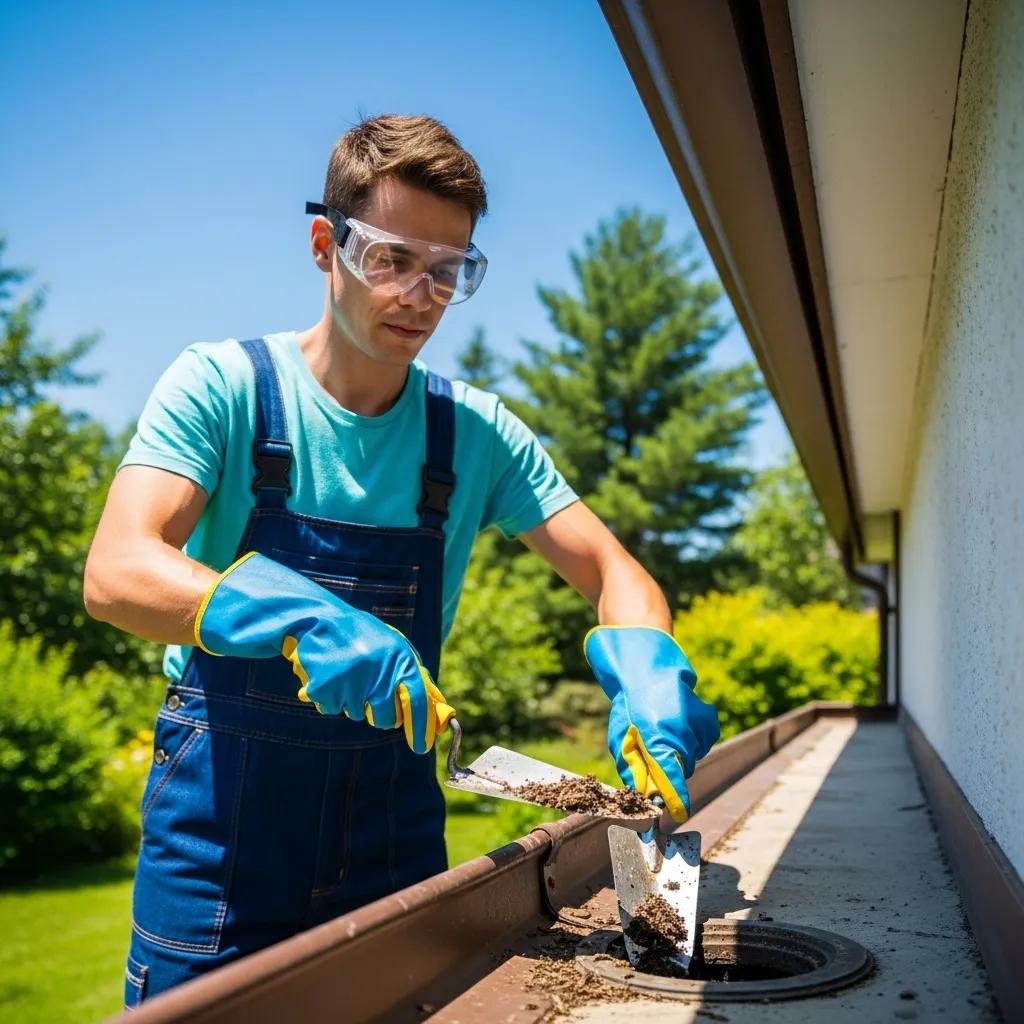
Summer Care for Outdoor Drains & Gutters: Practical Tips to Keep Water Moving Summer storms, falling seed pods, and extra yard work can quickly clog drains and gutters if you don’t stay on top of them. This guide walks through what outdoor drains and gutters do, why summer is a critical season for upkeep, and how routine care prevents costly water damage to foundations, basements, and siding. You’ll get straightforward DIY steps for storm and yard drains, safe inspection and gutter-cleaning techniques, and clear signs that mean it’s time to call a pro. We also cover advanced repairs used in Michigan — camera inspections, hydro-jetting, and excavation — plus practical tips for homeowners in Macomb, Oakland, and Wayne counties. Read on for step-by-step procedures, checklists, simple maintenance schedules, and where to go for emergency help if prevention isn’t enough. Why summer matters for outdoor drains and gutters Drains and gutters handle roof runoff, yard runoff, and stormwater — and in summer they face more stress from sudden downpours and seasonal debris. Heavy, short-lived storms boost runoff while leaves, seed pods, and grass clippings raise the chance of blockages. Faster vegetation growth and more insect activity add organic material that clogs lines and traps moisture. Regular summer maintenance reduces erosion, stops basement seepage, and keeps storm drain cleaning from becoming an emergency. Summer creates a few predictable pressures on drainage systems: Heavy, intense thunderstorms that can exceed system capacity. More organic debris from trees, lawn work, and gardens. Frequent quick storms that send fast surges of water. Together, these factors put gutters and storm drains under strain — which is why timely inspection and clearing matter. How summer storms and heavy rain affect drainage Summer storms often dump a lot of rain in a short time, producing peak flows that can overwhelm gutters, downspouts and catch basins. When those parts can’t keep up, water spills over eaves, sidewalks, and the soil next to your foundation. Concentrated flow erodes topsoil near footings and creates pooling that raises the risk of basement seepage during the next heavy event. In Michigan, late-summer convective storms are common and can produce sudden surges — so inspect and clear systems before forecasted storm windows when possible. That’s why quick debris removal and correct downspout routing are essential; we’ll cover both in the cleaning and maintenance sections below. What clogged gutters and drains can do to your home Left unattended, clogged gutters and drains lead to a chain of problems. Water directed toward the house can weaken foundation soils and change grading around footings. Basements and lower floors become susceptible to flooding and mold from repeated seepage and the hydrostatic pressure on walls — repairs that get costly fast. Roof edges and siding suffer from trapped water, and clogged systems invite pests and speed up rot in fascia and soffits. Routine inspections are a small expense that prevent much larger structural repairs. With those risks in mind, the next section shows practical cleaning steps you can take safely this summer. How to clean outdoor drains effectively this summer Good outdoor drain cleaning blends safety prep, manual debris removal, and flushing to confirm flow — plus photos or notes if you need to bring in a pro. Start with basic PPE and the right tools, clear visible blockages, flush the line, and run a controlled water test. Use visual checks and a hose test to verify capacity, and photograph persistent issues for professional diagnosis. These steps prioritize safety and documentation before moving to more invasive methods or calling a contractor. Follow this practical sequence for typical storm and yard drains: Prepare safely: Wear gloves, eye protection, and slip‑resistant shoes; set ladders securely if needed. Remove surface debris: Lift grates, scoop leaves and trash with a trowel or gloved hand, and bag the waste. Flush the line: Use a garden hose with steady pressure to push sediment through the drain, watching the outlet for clear flow. Inspect and test: Run extra water to confirm continuous flow; take photos of any backflow or pooling. Stop and document: If flushing doesn’t restore flow, pause and collect photos and notes for a professional inspection. These steps keep the job safe and set the stage for deciding whether you can handle repairs yourself or need a pro. Here’s a quick comparison of DIY methods versus professional approaches to help you choose the right option. Approach Effectiveness / Risk Typical Cost / When to Use DIY debris removal & flushing Solid for surface clogs; low safety risk with PPE Low cost; use for visible trough clogs and routine maintenance Plumbing snake (basic auger) Good for soft clogs; more risk with deep or brittle lines Low–medium cost; try when hose flushing fails and line is reachable Professional camera inspection High diagnostic value; minimal system risk Medium cost; use when cause is unclear or clogs recur Hydro-jetting (pro) Very effective for roots and compacted debris; requires trained operator Higher cost; use for severe or persistent blockages Step-by-step DIY tips for storm and yard drains Start with safety gear and basic tools: gloves, safety glasses, a bucket, and a hose with a spray nozzle. Remove surface debris from grates and catch basins, carefully lift covers, and scoop out leaves and sediment with a small trowel. Flush the drain from the upstream side so water pushes debris toward the outlet; keep pressure steady and watch the outflow. Photograph any recurring backups or suspect pipe sections and avoid harsh chemical cleaners on outdoor storm lines — they can damage soil and plants. These DIY steps often clear immediate problems and give you useful documentation if you later need professional help. When to call professional outdoor drainage services Call a professional if backups persist after safe DIY attempts, if you notice visible pipe damage, foul sewage odors, or standing water near your foundation. Recurring clogs often point to deeper issues like root intrusion, collapsed sections, or misaligned pipes that flushing won’t fix. Signs such as soil depressions, sinkhole formation, or
Summer Plumbing Maintenance: Outdoor & Indoor Tips
Summer Plumbing Maintenance: Outdoor & Indoor Tips for Grosse Pointe Homes and Businesses Summer puts extra strain on pipes, fixtures and drains. This practical guide explains why seasonal plumbing care matters for Grosse Pointe homes and businesses, how irrigation, pool fills and summer storms raise risk, and what to inspect before a small problem becomes an expensive repair. You’ll find hands‑on outdoor checks for hose bibs, sprinkler systems and yard drains plus indoor steps like flushing your water heater, testing the sump pump and adopting drain‑safe habits. There’s also a short pre‑vacation checklist to reduce hidden leaks while you’re away and clear rules for when to call a pro. Concise checklists, comparison tables and prioritized steps make it easy to act now and avoid surprise costs later. Why Is Summer Plumbing Maintenance Essential for Your Home or Business? Summer maintenance is simple, seasonal plumbing work that prevents failures and helps systems last longer. Higher outdoor water use and hot weather increase wear on seals and joints, while heavy storms can overload drains and sump pumps. The result of proactive care: fewer emergency calls, less wasted water and steadier utility bills during peak use. Addressing small issues — a dripping hose bib or a slow yard drain — keeps them from turning into structural, sanitary or business‑interruption problems. Knowing these drivers helps you focus inspections and do the simple tasks described below. Summer risks tend to show up as a few common problems: Extra outdoor water use wears seals and valves, raising leak risk. Heat and thermal expansion stress fittings and water‑heater parts. Summer storms and runoff can overwhelm outdoor drains and sump pumps. Those three factors explain why a short seasonal checklist delivers big benefits — and they point to the outdoor and indoor tasks that follow. How Does Increased Water Usage Impact Plumbing Systems in Summer? When you run more irrigation, fill pools or use more outdoor water, overall system throughput rises. That means faster wear on faucets, valves and pump seals. Higher flows can create pressure swings that loosen fittings or make water heaters and pumps cycle more often, shortening component life and raising energy use. Heavy or repeated flows also stir up settled sediment in tanks and lines, which can abrade parts and clog aerators. Watch for sudden pressure drops, noisy pipes during irrigation, or a water heater that cycles more frequently — these are signs it’s time to inspect. Fixing throughput‑related issues early prevents cascading failures like seal breaks or accelerated corrosion during the busiest months. Understanding this operational side makes it easier to spot summer‑specific problems before they turn into emergencies. What Plumbing Problems Are Common During Summer Months? Typical summer plumbing issues include dripping outdoor faucets, clogged yard drains from debris and grass clippings, sump pumps overwhelmed after storms, and water heaters suffering from sediment buildup. Tree roots can grow more aggressively and damage sewer laterals, and increased irrigation or pool fills often show up as higher water bills or unexplained wet spots around the yard. Symptoms to watch for: slow or gurgling drains after watering, sewer odors inside, wet areas near foundations, or inconsistent hot‑water temperatures. Simple DIY checks — inspecting hose bibs, running drains and testing the sump pump — catch many problems. But if issues persist or affect multiple fixtures, call a professional to diagnose and avoid larger repairs. Spotting these patterns helps you prioritize the outdoor tasks below. What Are the Key Outdoor Plumbing Maintenance Tips for Summer? Outdoor maintenance focuses on stopping leaks at hose bibs, keeping sprinkler systems aligned and clear, and making sure gutters and yard drains move stormwater away from your foundation. In practice that means visual inspections, a few mechanical checks and seasonal tune‑ups: tighten fittings, replace worn parts and clear debris so systems run at the pressures and flows they were designed for. The payoff is fewer leaks, healthier landscaping and lower repair costs if you catch issues early. Regular checks also reveal root intrusion or ground movement that can affect sewer lines. Do this short outdoor checklist at the start of summer and repeat every 4–6 weeks during peak use. Check hose bibs and hose connections for drips and damp soil around the fixture. Flush and observe each sprinkler zone for uneven spray or low pressure. Clear leaves and debris from outdoor drains, grates and gutters to keep water moving. Inspect backflow preventers and anti‑siphon devices for leaks or corrosion. Look near sewer cleanouts for root activity or unusually saturated ground. Test pool fill lines and outdoor kitchen fixtures to confirm fittings are tight and leak‑free. These steps stop most outdoor failures and get systems ready for summer storms and heavy watering. Regular attention lowers the chance of emergency digs or unexpected service interruptions. Intro to table: The table below compares common outdoor fixtures with recommended maintenance and suggested frequencies so you can prioritize inspections. Fixture Type Recommended Maintenance Action Suggested Frequency Hose bib / Outdoor faucet Look for drips, test shut‑off, replace washers or packing nuts as needed Monthly while in use Sprinkler head / System Inspect heads, flush supply lines, adjust nozzles and test zone pressure Start of season + monthly checks Outdoor drain / Gutter grate Remove debris, flush with water and verify downstream flow Every 2–4 weeks during stormy periods That simple comparison shows which outdoor fixtures need frequent attention and which are seasonal. Keeping to this schedule reduces water waste and lowers the risk of foundation or landscape damage. If you find recurring leaks, uneven pressure or signs of root intrusion, schedule a pro inspection. Frost & Kretsch Plumbing offers local outdoor fixture inspections and sprinkler tune‑ups from licensed technicians who’ll recommend repairs or estimates so a recurring worry becomes a short service visit instead of a summer escalation. How to Inspect and Maintain Outdoor Faucets and Hose Bibs? Start with a close visual and hands‑on check: look for corrosion, feel for moisture at the base and operate the valve to check for stiffness or drips when
Preventative Drain Maintenance Tips for Homeowners
Preventative Drain Maintenance for Homeowners — How to Avoid Clogs and Keep Your Plumbing Lasting Longer Clogged drains cost homeowners time, money, and a lot of stress. The simplest way to avoid slow fixtures, backups, and surprise emergency calls is regular preventative drain care. This guide walks Grosse Pointe homeowners through the common causes of clogs, practical weekly habits you can do yourself, safe cleaning options, and clear signs that it’s time to call a pro. You’ll learn how grease, hair, soap scum and roots create blockages, which DIY steps work best, and when camera inspections or hydro-jetting are the right solutions. We also cover eco-friendly choices like baking soda with vinegar and enzyme cleaners, plus an annual maintenance checklist to help reduce emergency visits. Read on for step-by-step DIY actions, simple triage tables, and local service options when professional help is needed. What Are the Common Causes of Drain Clogs in Homes? A clog happens when debris builds up inside pipes or traps and restricts water flow. Most blockages form from material sticking to pipe walls or collecting in the P-trap. Grease, hair, soap scum and mineral deposits often combine to narrow pipes over time, while roots or damaged sewer lines create more serious problems. Knowing whether a slow drain is limited to one fixture or affects several tells you whether a DIY fix is realistic or a plumber should be called. Below are the top household clog causes and a quick note on whether each is normally DIY-fixable. Common causes of household drain clogs include: Grease and food scraps — Warm oils cool and solidify, creating sticky deposits in kitchen drains. Hair and soap scum — Hair tangles with residue in bathroom drains and slows flow. Foreign objects and debris — Small items or too much paper can block traps or pipes. Mineral scale and sediment — Hard water leaves deposits that reduce pipe diameter over time. Tree roots and sewer issues — Roots enter joints or cracks in sewer lines and cause major blockages. Each cause varies in urgency and remedy. Understanding how the clog formed helps you prioritize prevention and choose the right response. How Do Grease and Food Scraps Contribute to Kitchen Drain Blockages? Grease and food waste lead to blockages because fats and oils poured down the sink cool and congeal, forming a sticky film that traps food particles. A quick rinse won’t remove this residue — it builds up and can overwhelm disposals over time. Simple kitchen precautions work well: collect grease in a container, wipe pans before washing, and use a sink strainer to catch solids. Run hot water after dishwashing and consider occasional enzyme treatments to keep organic films from forming. Avoid putting fibrous or starchy waste in the disposal to lower your risk of clogs. Why Is Hair a Major Factor in Bathroom Drain Clogs? Hair causes bathroom clogs because strands tangle and settle in the P-trap or pipe bends, then bind with soap scum and minerals into dense lumps that slow drainage. The problem often starts as a slightly slower shower and gets worse as more hair accumulates. Install hair catchers, brush or comb before showering, and remove hair from strainers regularly. If clogs keep returning despite these habits, the buildup is likely deeper in the line and may need a mechanical snake or a professional inspection to fully clear. How Can Homeowners Perform Effective DIY Drain Maintenance? DIY drain care is about steady, safe habits and the right tools so buildup never becomes a major blockage. The approach is simple: stop debris from entering the pipes, flush organic films regularly, and remove early clogs before they harden. Weekly hot-water flushes for the kitchen, frequent strainer cleaning, and periodic enzyme treatments handle most organic buildup. The table below compares common DIY tools and methods so you can pick the simplest, safest routines for your home. Tool/Method Best Use Case Frequency Drain strainer Catch food scraps and hair at sink or tub Daily / after use Plunger Dislodge localized clogs in sinks or toilets As needed Drain snake (hand auger) Remove hair and small obstructions within reach As needed (occasional) Hot water flush Soften grease films in kitchen drains Weekly after dishwashing Enzyme cleaner Break down organic residue safely Monthly or per product directions These simple tools and habits prevent most organic clogs. Using strainers and running hot water regularly keeps many problems from ever needing a tool. Below is a short, repeatable checklist to make maintenance easy. Clear strainers and screens: Empty sink and shower strainers after each use to stop buildup at the source. Run hot water: After washing dishes, run hot water for about one minute to flush grease toward the sewer before it cools in the pipe. Use enzyme cleaners: Apply enzyme-based treatments monthly to digest organic films without harming pipes. Employ a plunger or snake: Try a plunger first on slow drains; if that fails, use a hand auger to reach and remove the clog. These steps are quick to do and greatly reduce the chance of a severe clog. The next section covers cleaning details like baking soda with vinegar and safe tool use. What Are the Best Practices for Using Drain Strainers and Hair Catchers? Strainers and hair catchers stop solids before they enter your plumbing — but they only work if they fit and are cleaned regularly. Choose a strainer matched to the drain: flat screens for kitchen sinks and mesh or dome catchers for showers. Make sure it sits snugly and clean it daily or after heavy use. Rinse and sanitize to prevent odors and bacteria. Pair strainers with good habits — wipe pans, avoid pouring grease, and brush hair before showering — and you’ll cut down on mechanical clearing later. How to Use Baking Soda and Vinegar for Natural Drain Cleaning? The baking soda and vinegar method uses a mild fizzy reaction to loosen light organic residue and remove odors. It works mostly by agitation, followed by a hot-water
Why Annual Plumbing Inspections are Crucial
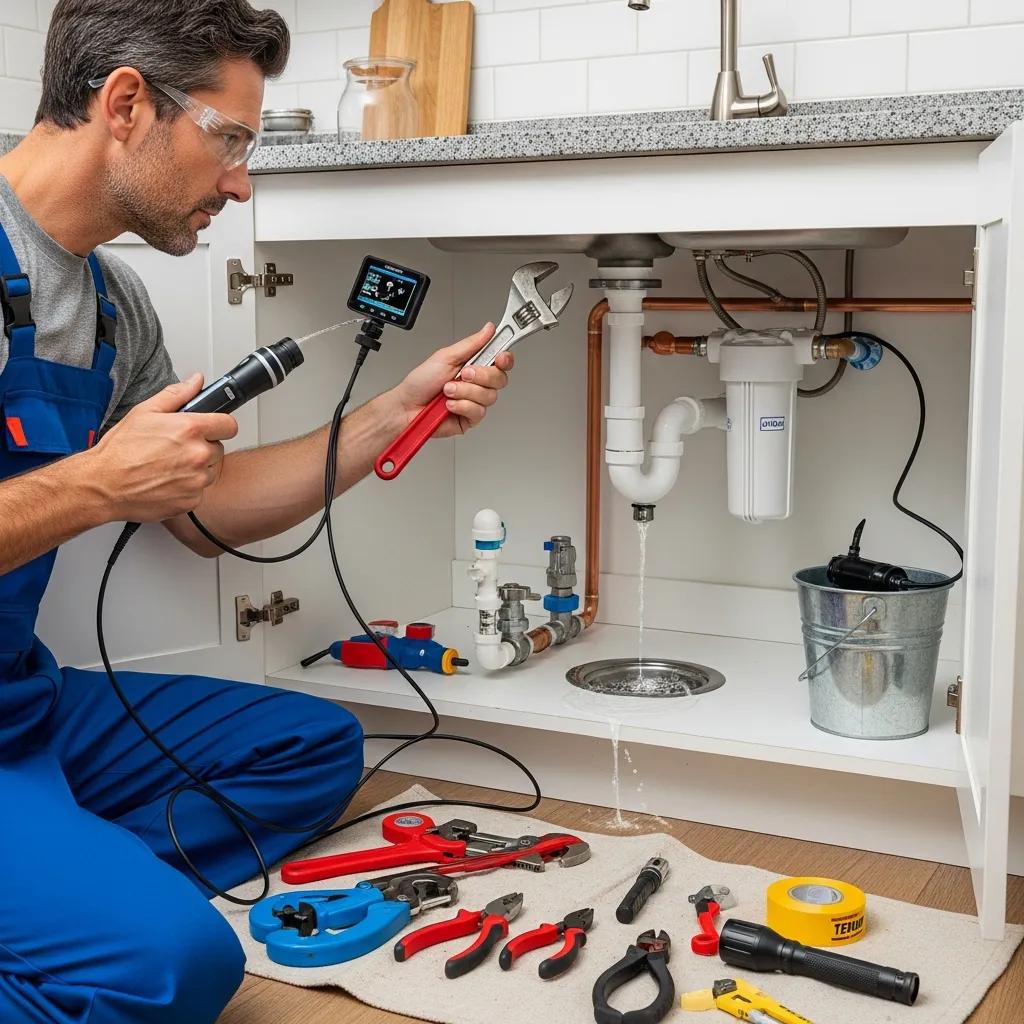
Why Annual Plumbing Inspections Matter: Benefits, Costs, and Preventative Care for Homes and Businesses An annual plumbing inspection is a thorough, professional check of a property’s water, waste, and drainage systems. The goal is to spot wear, leaks, and code issues before they turn into emergencies. Regular inspections act as planned maintenance—catching small problems early to avoid sudden pipe failures, sewer backups, and costly water damage. This guide walks through what a full inspection covers, how inspections save you money, the differences between residential and commercial checks, when to schedule one, what affects cost and ROI, and how targeted tools like sewer cameras and leak detection improve results. We also reference services a local provider offers so you can see next steps for your property. What Are Annual Plumbing Inspections and Why Are They Essential? An annual plumbing inspection is a routine assessment of a building’s plumbing using visual checks, functional testing, and focused diagnostics to confirm system health. In short: find corrosion, mineral buildup, leaks, loose fittings, and drainage problems early so fixes are planned—not emergency. The main benefits are fewer emergency calls, longer system life, and lower overall plumbing costs over time. Below are the immediate advantages that make yearly inspections a smart choice. Annual plumbing inspections provide three clear benefits: Catch small leaks and weakened pipes early to prevent expensive emergencies. Keep systems running longer through scheduled maintenance and timely part replacement. Protect health and property by stopping contamination risks and water damage before they spread. Those benefits lead naturally into what a thorough inspection looks like and which tests reveal common failure points. What Does a Comprehensive Plumbing Inspection Include? A full inspection combines visual assessment, hands-on functional tests, and targeted diagnostics to map system condition and uncover hidden issues. Technicians usually inspect fixtures, visible piping, water heaters, sump pumps, drains, and sewer lines. Common methods include pressure testing, acoustic leak detection, and sewer camera inspection to find corrosion, blockages, or concealed leaks. The table below summarizes core inspection elements, how they’re checked, and the typical problems each uncovers. Inspection Component Method / Checkpoint What It Reveals Sewer Line Camera inspection Blockages, root intrusion, cracks or bellied pipe Water Heater Pressure/TPR check, thermostat test Failing element, leaking tank, unsafe pressure relief Sump Pump & Basin Operational test, float check Stuck pump, clogged basin, failed backup systems Drains & Fixtures Flow test, visual check Slow drainage, hair/grease buildup, fixture leaks This breakdown shows which diagnostics target which failure modes and why using multiple techniques improves detection. Knowing these components helps explain how inspections stop small issues from becoming emergencies. How Do Plumbing Inspections Prevent Costly Repairs and Emergencies? Inspections turn unseen wear into planned repairs, avoiding the higher cost and disruption of emergency fixes. Early leak detection—using acoustic or infrared tools—lets technicians make small, localized repairs instead of replacing long runs of pipe. Finding a failing water heater element or a weak joint allows for scheduled part replacement before a catastrophic failure. For example, spotting a slowly corroding sewer section can lead to targeted relining or limited excavation instead of a sudden backup that closes a building. Regular inspection schedules also reduce how often emergency crews are needed, cutting both direct repair bills and indirect costs like downtime and mold remediation. Once you see prevention in action, the broader value of inspections becomes clear. What Are the Key Benefits of Annual Plumbing Inspections? At their core, annual inspections deliver financial, safety, and operational benefits that build up over time through early detection and routine upkeep. By addressing leaks, corrosion, and blockages on a schedule, inspections reduce emergency risk, extend the life of fixtures and piping, and lower health hazards from sewage or contaminated water. The table below links common inspection actions to the concrete benefits property owners see. Maintenance Activity Benefit Outcome Early Leak Detection Smaller repair scope Lower repair cost and less property damage Sewer Camera Diagnostics Precise problem location Less excavation and faster repairs Routine Component Testing Planned part replacement Longer system life and more reliable performance Drain Cleaning & Flow Tests Restored hydraulic performance Fewer backups and better water efficiency When inspection actions are combined, those outcomes add up to long-term savings and reduced risk for homeowners and businesses. How Do Inspections Save Money Through Early Leak Detection and Maintenance? Inspections save money by shifting fixes from emergency responses to scheduled maintenance, which is usually cheaper and less disruptive. Leak-detection tools—visual checks, pressure tests, infrared scans, and acoustic sensors—spot small failures before they grow. Repairing a joint or replacing a short corroded run costs far less than dealing with a burst pipe and widespread water damage. Preventing chronic leaks also cuts water waste and avoids indirect costs like mold cleanup, structural repairs, and lost business time. Routine maintenance can improve fixture efficiency too, lowering utility bills over the long run. In short, a regular inspection program is an investment that brings predictable, lower operating costs instead of surprise expenses. In What Ways Do Inspections Extend Plumbing System Longevity and Ensure Safety? Inspections address common wear factors—corrosion, mineral scaling, mechanical fatigue, and blockages—by spotting conditions that speed failure and recommending fixes. Technicians check safety-critical parts like pressure relief valves, backflow preventers, and water heater thermostats to prevent scalding, contamination, or overpressure events. Regular drain and grease-trap cleaning prevents buildup that stresses the system, and replacing worn seals or sacrificial anodes on heaters slows corrosion. These actions preserve materials, keep systems operating safely, and protect occupants from waterborne hazards and structural harm—ultimately lengthening functional service life. How Do Residential and Commercial Plumbing Inspections Differ? Residential and commercial inspections share the same aim—system health and safety—but they differ in scale, regulations, and priorities. Commercial systems often include higher-capacity fixtures, heavier usage patterns, grease traps, backflow devices, and code-driven checks you don’t see in typical homes. Residential inspections focus on household items like water heaters, sump pumps, and fixture leaks. The techniques—visual checks, pressure testing, and video diagnostics—overlap, but the checklist and recommended remedies vary based on
Seasonal Plumbing Maintenance Checklist for Homeowners
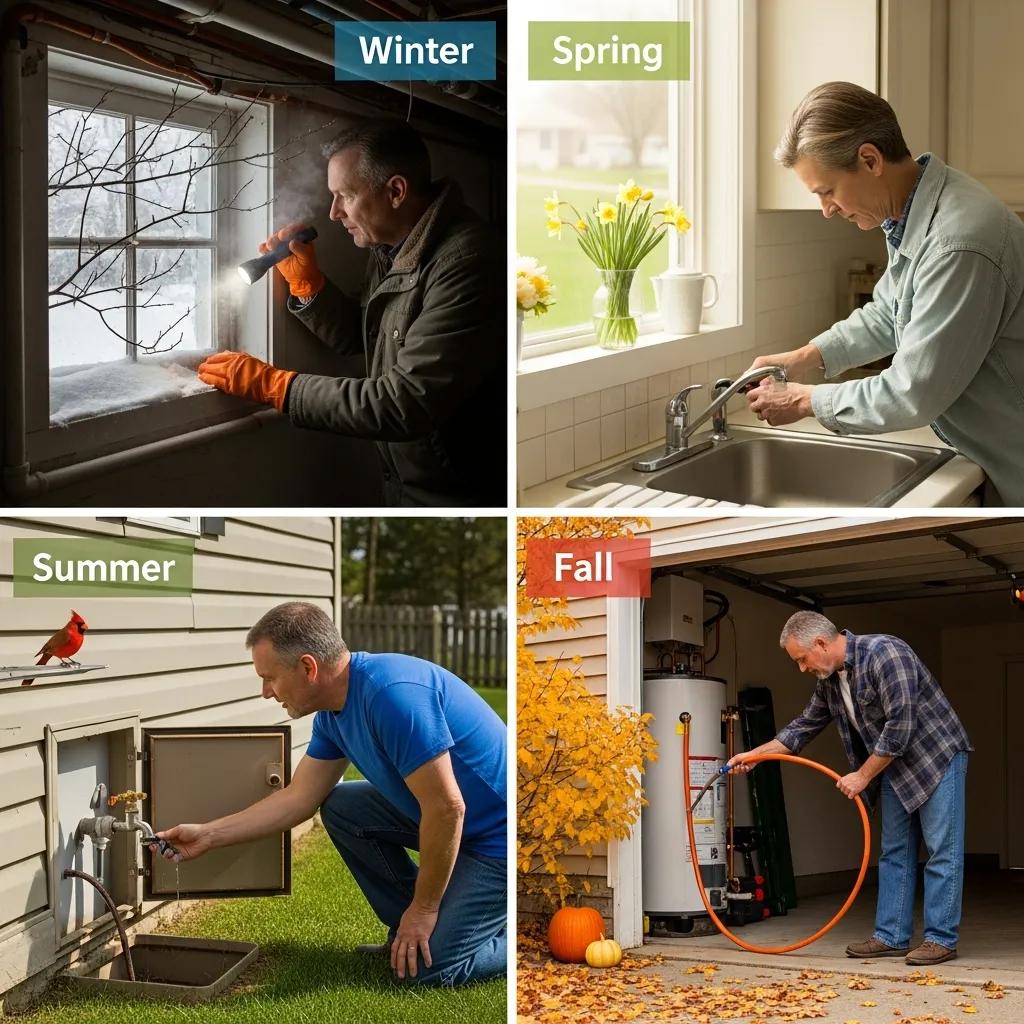
Seasonal Plumbing Maintenance Checklist for Homeowners: Essential Preventative Tips for Michigan Homes Seasonal plumbing maintenance means doing a few focused tasks each season to protect your pipes, fixtures, and drains from weather-related wear. In Michigan, harsh winters and quick spring thaws put predictable stress on home plumbing—so a simple checklist can stop small problems from becoming expensive emergencies. This guide walks you through practical, step-by-step seasonal tasks—winter prep, spring tune-ups, summer care, and fall readiness—so you can spot issues early, waste less water, and get more life from equipment. We also include a short local note about professional help: Frost and Kretsch Plumbing is a family-owned team serving Macomb, Oakland, and Wayne counties with licensed, insured technicians and 24/7 emergency response. Prefer DIY first? Keep reading for targeted checklists, basic tools, and clear signs that it’s time to call in a pro. Why Is Seasonal Plumbing Maintenance Crucial for Homeowners? Seasonal maintenance means adjusting inspections and small repairs to match the risks each season brings. Targeted steps—like adding insulation before heavy cold or flushing tanks before peak use—prevent the most common failures. That means fewer emergency calls, lower long-term repair costs, and longer life for water heaters, sump pumps, and sewer lines. Industry experience shows that homeowners who manage seasonal risks proactively see fewer peak-demand failures during Michigan winters and spring thaws, which protects both safety and resale value. Below are the top three benefits to keep front of mind. Seasonal maintenance delivers three primary homeowner benefits: Lower repair costs by avoiding major failures and emergency service fees. Fewer disruptive events like burst pipes and basement flooding. Longer, more efficient service life for key systems—water heaters, sump pumps, and sewers. These gains come from simple preventive steps; the next section explains how small actions translate to real savings and fewer emergencies. How Does Preventative Plumbing Save Costs and Prevent Emergencies? Preventative plumbing saves money by finding small issues—corrosion, slow leaks, or sediment build-up—before they turn into major repairs that need excavation or replacement. Early leak detection and routine flushing limit repair scope and keep fixtures working efficiently, which lowers monthly water and heating costs. For example, flushing sediment from a water heater improves heat transfer and can delay replacement, and insulating supply lines cuts freeze-related repairs. Homeowners who schedule seasonal checks usually call us less often and pay smaller bills. If you spot repeated clogs, visible corrosion, or suspect hidden leaks during DIY checks, reach out to a licensed plumber to avoid escalation. Those general savings lead into season-specific tasks that address Michigan’s climate challenges next. What Are the Unique Plumbing Challenges in Michigan’s Climate? Michigan brings long stretches of freezing weather, frequent freeze-thaw cycles, and heavy spring runoff—all of which strain plumbing in predictable ways. Freezing air shrinks water in pipes and increases burst risk where insulation is thin; thaws and heavy rains ramp up sump-pump use and raise the risk of sewer backups. Older homes in Macomb, Oakland, and Wayne counties often have aging lines or drain layouts that are more vulnerable. Knowing these seasonal failure patterns helps homeowners prioritize insulation, sump-pump readiness, and sewer awareness. The winter section that follows covers the most urgent steps to take before deep cold arrives. What Are the Key Tasks in the Winter Plumbing Checklist for Homes? Winter maintenance concentrates on preventing frozen pipes, protecting outdoor fixtures, checking water heaters, and making sure you’re ready to act fast in an emergency. Doing these tasks cuts the most common cold-weather failures: bursts, frozen spigots, and extra strain on heating systems. The checklist below highlights the highest-impact jobs, with short how-to notes and clear signs for when to call a professional. Knock these out before sustained cold moves in to lower your winter risk. Winter checklist — six high-impact tasks with when to call a pro: Insulate vulnerable pipes: wrap exposed supply lines with foam and use heat tape where recommended; hire a pro if pipes run inside walls or are not accessible. Shut off and drain outdoor faucets: close interior isolation valves, remove hoses, and open spigots to drain remaining water; call a plumber if isolation valves are seized or leaking. Check water heater settings and schedule a flush: set a safe temperature and plan an annual sediment flush; call a technician for heavy buildup or failing components. Keep indoor temps steady and open cabinet doors: maintain a reasonable thermostat and let warm air reach under-sink pipes; call a pro if pipes freeze inside wall cavities. Prep emergency shutoffs and a thaw kit: know your main shutoff’s location and keep safe thawing tools on hand; call immediately for visible bursts or uncontrolled leaks. Inspect sump pump backups: test battery backups and run the pump to confirm operation; call for replacement if the pump won’t run or cycles strangely. Most of these items are DIY-friendly; the table below shows common winter problems, practical DIY steps, and when to bring in a licensed technician. Winter task comparison — protection method and intervention threshold: System Recommended Prevention DIY vs Professional Exposed supply pipes Foam insulation, heat tape, seal wall penetrations DIY for visible lines; call a pro if inaccessible or freezing recurs Outdoor faucet/spigot Close interior valve, drain lines, remove hoses DIY for basic shutoff; pro for replacing stuck isolation valves Water heater Check temperature, flush sediment yearly DIY drain for light sediment; pro for heavy buildup or element work Sump pump Test, clean strainer, confirm battery backup DIY monthly checks; pro for replacement or electrical issues Main shutoff accessibility Clear access and label the valve DIY labeling; pro for stuck or corroded shutoffs This table makes it easier to see what you can handle and when a licensed technician is the safer choice. The next sections offer focused how-to tips for frozen pipes and outdoor faucet winterization. How Can Homeowners Prevent Frozen Pipes and Pipe Bursts? Pipes freeze when water inside drops below 32°F and expands, which can split the pipe. Prevent freezing by raising the surrounding temperature, insulating exposed runs, and minimizing
Submersible vs. Pedestal Sump Pumps: Choosing the Best for Your Home
Submersible vs. Pedestal Sump Pumps — Which One Is Right for Your Home? A sump pump is your last line of defense against a wet basement — it moves excess groundwater or stormwater out of the sump pit and away from your home’s foundation. This guide compares the two main pump styles—submersible and pedestal—so you can pick the one that fits your pit size, noise tolerance, and maintenance preferences. We’ll explain how each pump works, outline the design and functional differences, list pros and cons, and cover measurable factors like GPM and noise. You’ll also get a practical checklist for choosing the right pump for homes in Grosse Pointe, plus basic sizing tips (horsepower and flow), backup options, and maintenance needs. Throughout, we’ll use terms like GPM, head pressure, float switch, and battery backup so you can weigh tradeoffs with confidence. What Is a Sump Pump and Why Is It Essential for Your Home? A sump pump is a mechanical device installed in a sump pit that removes water and sends it to a safe discharge point, preventing basement flooding and moisture damage. When water fills the pit, a float switch (or pressure sensor) trips the motor and impeller, which push water through the discharge pipe and away from the foundation. The payoff is lower risk of structural damage, mold, and ruined belongings — especially during heavy rain or when your local water table is high. Knowing how the system works makes it easier to choose the right pump and installation for dependable, long-term performance. How Do Sump Pumps Prevent Basement Flooding? Sump pumps stop flooding by sensing rising water in the pit, switching on, and moving that water out of the home. Water typically reaches the pit via perimeter drains or groundwater; the float rises, the pump runs until the float drops, and a check valve prevents water from flowing back. For extra protection, homeowners add alarms and secondary power sources — battery backups or water-powered backups — so the pump keeps working when the power goes out. Understanding these steps helps you see where failures can happen and why redundancy matters. What Are the Key Components of a Sump Pump? The main parts are the motor, impeller, float switch (or sensor), check valve, discharge pipe, and the sump pit itself — each plays a role in reliable operation. The motor provides torque and horsepower (HP); paired with impeller design, that determines gallons per minute (GPM) and head pressure — the vertical lift the pump can overcome. Float switches control on/off cycles and are often the first thing to fail if debris jams them, so accessible float designs are easier to maintain. A correctly sized check valve and well-routed discharge line prevent backflow and freezing. Knowing these parts helps you troubleshoot and plan maintenance. What Are the Design and Functional Differences Between Submersible and Pedestal Sump Pumps? Submersible and pedestal pumps mainly differ in where the motor sits, how they’re enclosed, and their physical footprint — and those differences affect noise, maintenance access, and where they work best. Submersible pumps have a sealed motor assembly that sits in the pit, which makes them quieter and less visible. Pedestal pumps keep the motor above the pit on a vertical shaft, which makes service easier but adds noise and needs more vertical space. That usually means submersible models are the right choice for finished basements or higher flow needs, while pedestal units are common for shallow pits or tighter budgets. How Is a Submersible Sump Pump Constructed and Installed? Submersible pumps are built with sealed motor housings and corrosion-resistant materials so they can run underwater without overheating. Proper installation puts the pump in a correctly sized sump pit, with a secure discharge line and a check valve to stop siphoning; electrical connections should be GFCI-protected and routed to stay dry. Common installation mistakes include undersized pits, poor support that causes vibration, and bad sealing where the discharge penetrates the floor — all of which shorten the pump’s life. Seal integrity and heat dissipation are maintenance priorities because the motor runs submerged, so we recommend routine inspections. What Defines a Pedestal Sump Pump’s Structure and Setup? Pedestal pumps mount the motor above the pit on a vertical shaft while the impeller sits in the water to pump it out. Because the motor stays dry, it’s easier to access for repairs or replacement, often lowering labor costs for service. The downside is more audible noise and the need for vertical clearance, so pedestal pumps are usually better in utility spaces rather than finished living areas. They’re a solid option for shallow pits and where straightforward serviceability and lower upfront cost matter most. What Are the Advantages and Disadvantages of Submersible Sump Pumps? Submersible pumps bring quiet operation and a compact, pit-contained installation, making them popular for finished basements and homes where noise and appearance matter. But they rely on seals to keep water out of the motor; when seals fail the motor can be expensive to replace, and repairs typically mean pulling the unit from the pit. Knowing these tradeoffs helps you weigh higher upfront cost against quieter operation and potentially better flow performance over time. Below is a quick-read table summarizing typical pros and cons so you can compare at a glance before we dig into details. Pump Type Characteristic Typical Value Submersible Noise Level Lower dB range — quieter in living areas Submersible Maintenance Difficulty Moderate–higher (sealed motor access) Submersible Pit Suitability Standard/deeper pits — compact footprint Pedestal Noise Level Higher dB range — motor above the pit Pedestal Maintenance Difficulty Lower (motor is easy to access) Pedestal Pit Suitability Shallow pits — long vertical profile This comparison shows how submersible pumps favor quieter, neater installations while pedestal pumps make maintenance easier. What Benefits Do Submersible Sump Pumps Offer Homeowners? Submersible pumps are quiet, sit neatly in the pit, and generally offer strong flow for heavier inflows — a good match for finished basements and homes with higher water tables.
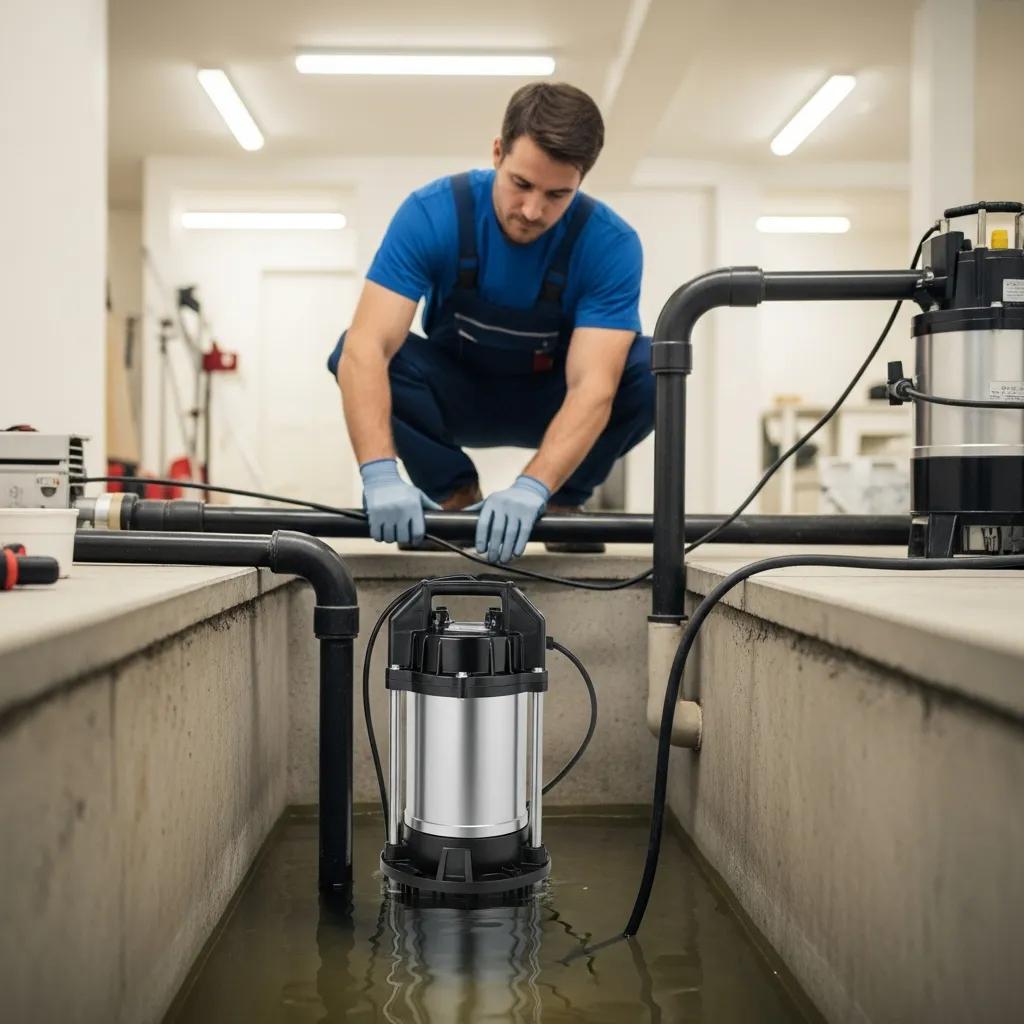
DIY Sump Pump Maintenance for Longevity
DIY Sump Pump Care That Actually Protects Your Basement: Practical Steps and Pro Tips A sump pump keeps groundwater out of your basement — but only if it’s cared for. This guide walks homeowners through straightforward DIY sump pump maintenance: what to clean, how to test, common failure modes, and when to call in help. Skipping routine checks often leads to emergency repairs, flooded basements, and spoiled belongings. Follow the cleaning, inspection, and battery-backup checks here to reduce those risks and make your pump last longer. You’ll get easy step-by-step instructions, simple troubleshooting checks, and a seasonal maintenance calendar so preventative care becomes a repeatable habit, not a scramble during a storm. Why Is Regular Sump Pump Maintenance Crucial for Longevity? Regular maintenance means inspecting, cleaning, and testing the pump and its parts so the system works when water levels rise. Small chores — clearing debris, testing the float switch, and keeping the discharge clear — prevent motor strain and premature failure. The payoff for homeowners is clear: less chance of flooding, smaller repair bills over time, and predictable planning for replacements instead of surprise emergencies. Industry guidance supports planned maintenance as the best way to avoid the most common causes of basement water damage. Those routine checks are effective because they address the mechanical and electrical problems that shorten a pump’s life. Removing grit from the basin reduces impeller wear and prevents overloads. Verifying float movement keeps the motor from running nonstop and overheating. In short, hands-on cleaning and periodic testing are simple steps that make a real difference — especially in flood-prone areas. How Does Preventative Care Extend Sump Pump Life? Preventative maintenance fights the typical reasons pumps fail early: debris, stuck floats, and blocked discharge lines. A regular sump pump check — basin cleaning, float tests, and a quick look at the impeller — reduces friction and heat that wear out motors. For example, clearing silt keeps the impeller balanced and lowers vibration that wears bearings, which can add years to the pump’s service life. These improvements mean fewer emergency calls and more predictable replacement timing. Preventative checks also catch electrical and control issues early, like loose wiring or corroded terminals, before they cause intermittent operation or total failure. Testing the pump under load and confirming the check valve and discharge path helps you spot parts that need replacing or a pro’s attention, lowering overall ownership costs across the pump’s life. What Are the Risks of Neglecting Sump Pump Maintenance? Putting off maintenance raises the chance of basement flooding, motor failure, and follow-on problems like mold and structural damage — all of which are far costlier than routine upkeep. Sediment and debris can jam the impeller or trap the float switch, causing the pump to run continuously, run dry, or fail to start. Corroded electrical connections can create unsafe, intermittent operation, increasing flood risk during storms. A simple maintenance schedule is almost always cheaper than fixing flood damage after the fact. Typical consequences of neglect include direct water damage, ruined finished basement areas, and long-term costs like mold remediation or replacing damaged possessions. Recognizing these risks makes the case for regular inspection and prepares you for the cleaning and testing steps that follow. What Are the Essential DIY Sump Pump Cleaning Steps? A safe and effective DIY cleaning routine focuses on cutting power, removing debris, checking moving parts, and running a final test. Always start by switching off the pump circuit and confirming the power is off. Only remove the pump from the basin if the unit is designed for easy removal and you’re comfortable doing so. Clean out silt and debris, inspect the impeller and inlet, check that the float moves freely, then reinstall and run a test. These steps help you clean the pump without causing damage or voiding warranties. How to Safely Clean the Sump Pump Basin and Components Safe cleaning begins with power isolation and basic protective gear. Turn off the pump’s breaker and unplug the unit when possible. Remove standing water with a shop-vac or bucket and scrape silt gently to avoid damaging the basin. Check the impeller and inlet screen for lodged debris and clear it with a soft brush — avoid harsh chemicals or wire brushes that can harm seals and plastic parts. After reassembly, run a controlled water test to watch the float and confirm the discharge flows freely. Which Tools and Materials Are Needed for Effective Cleaning? Most homeowners only need a handful of inexpensive tools to clean a sump pump safely: sturdy gloves, eye protection, a wet/dry vacuum or bucket, a soft brush, a screwdriver for clamps, and a flashlight. If you’re comfortable with electrical checks, a multimeter can help verify power. Optional items that help include replacement gaskets or pipe clamps and a small brush for the impeller. Avoid wire brushes and harsh solvents that can damage impellers, seals, and plastic parts. If you run into persistent electrical problems, signs of motor burnout, or a blockage you can’t clear safely, call Frost and Kretsch Plumbing at (586) 675-0097 for professional assessment and repair. That gives you a safe, local backup when DIY isn’t enough. How Can You Troubleshoot Common Sump Pump Problems Yourself? Troubleshooting starts with a simple, ordered check: power, float movement, physical blockage, then check valve position. Verify the breaker and outlet, watch the float move, inspect the impeller inlet for clogs, and confirm the check valve orientation. Many problems are stuck floats or clogged intakes — not burned-out motors — so a step-by-step approach can save time and money. The table below pairs common issues with likely causes and quick DIY checks to help you decide what to try first. The table below compares common failure modes with probable causes and DIY checks to run during initial troubleshooting. Use it to quickly decide whether a problem is likely fixable at home or needs a professional visit. Issue Likely Cause DIY Check Pump not running No power or tripped breaker Check the breaker,
Troubleshooting a Sump Pump That Won’t Turn On
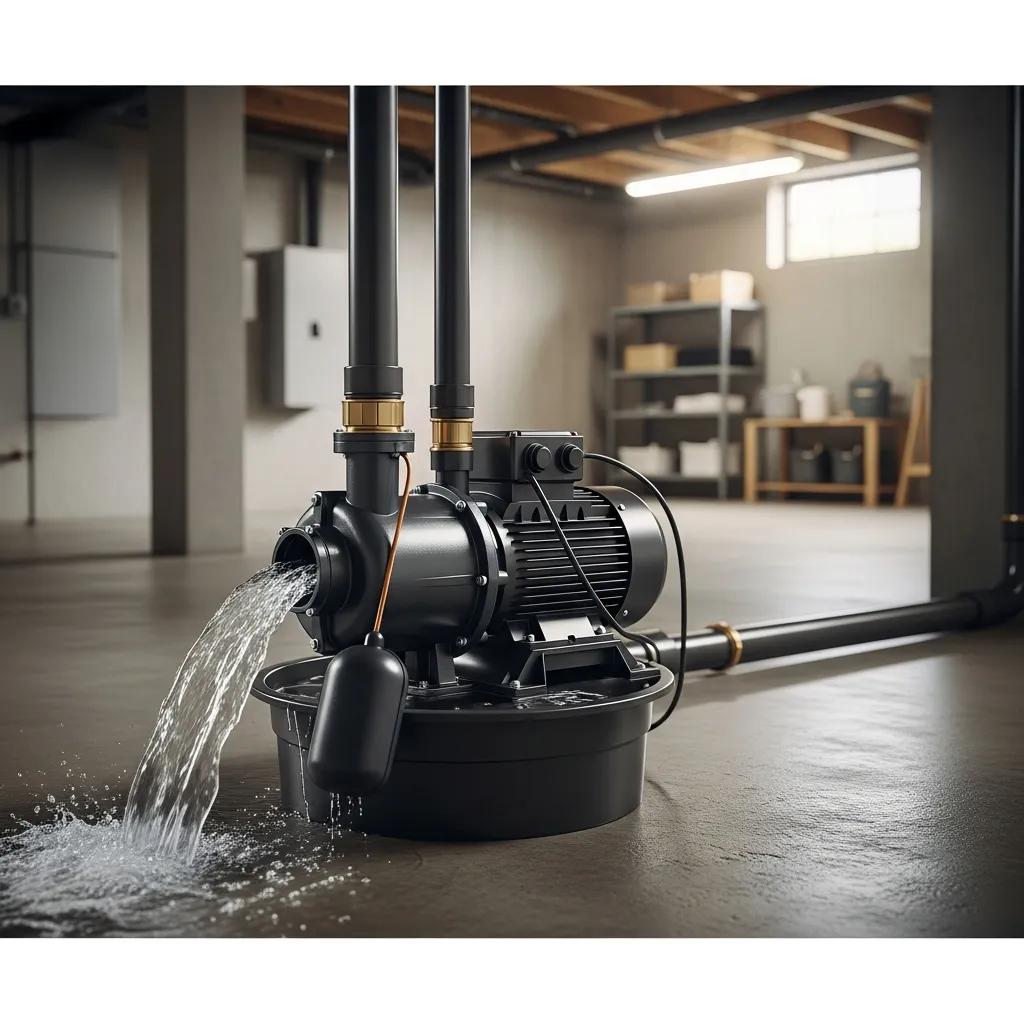
How to Troubleshoot a Sump Pump That Won’t Turn On: Practical Fixes and Local Repair Options If your sump pump doesn’t turn on, your basement is at real risk when water rises. This guide walks you through the most common causes, safe DIY checks you can do now, and when a professional should step in. You’ll get clear tests for power and float-switch problems, steps to clear clogs and inspect the impeller and check valve, and routine maintenance tips to prevent future failures. We also explain component-level clues — motor hums, stalled impellers, leaking check valves — and provide quick-reference diagnostic tables and step-by-step how-tos so you can act fast. When a job needs a pro, Frost and Kretsch Plumbing explains how we support homeowners across Macomb, Oakland, and Wayne counties with both emergency and scheduled sump pump services. What Are the Most Common Causes of a Sump Pump Not Turning On? Most sump pumps fail to start for five reasons: electrical issues, a bad float switch, motor failure, clogs or obstructions, and check valve problems. Each one interrupts either the signal to start the pump or the path for water to leave the pit, producing symptoms like silence, a humming motor that won’t spin, or frequent short cycles. Identifying the likely cause helps you run safe, focused checks and avoids wasting time on the wrong fix. Here’s a compact list for quick decisions. Common causes and quick explanations: Electrical failure: No power, a tripped breaker, or a faulty outlet keeps the pump from getting electricity. Float switch malfunction: A stuck, misaligned, or waterlogged float won’t signal the pump to run. Motor problems: Seized bearings or burned windings can make the motor hum or stay silent without spinning the impeller. Clogs and debris: Sediment, rags, or scale can jam the impeller or discharge line and stop flow. Check valve failure: A leaking or stuck check valve causes backflow or constant cycling rather than proper discharge. Knowing these failure modes helps you prioritize checks that start with power and end with component inspection and cleaning. The next sections show how to test electrical systems and float-switch behavior so you can troubleshoot with confidence. How Do Electrical Issues Prevent a Sump Pump from Operating? Electrical problems stop a sump pump by cutting power or creating unsafe conditions — common causes include tripped breakers, a tripped GFCI, damaged cords, or a bad outlet. Signs you’re facing an electrical issue include no sound or lights from the pump, a motor that hums without turning, or intermittent operation during heavy storms. Homeowners can safely check the circuit breaker and test the outlet with a lamp or multimeter, but avoid opening junction boxes or touching wet wiring. If the breaker keeps tripping, you smell burning, or wiring looks frayed, stop testing and call a licensed professional — those are electrical hazards that need an electrician or a trained plumber to fix. After checking power, your next logical step is the pump’s activation device: the float switch, which can mimic electrical faults when it sticks or becomes waterlogged. Why Does a Faulty Float Switch Stop the Sump Pump? The float switch senses the basin’s water level and completes the pump’s circuit when water rises. If the float sticks, becomes waterlogged, or is misaligned, it won’t trigger the pump. Typical symptoms are the pump not starting even when the pit is high, the pump running continuously because the float is stuck “on,” or erratic cycling if the float catches on debris. To test the float safely, first confirm the pump has power, then lift the float by hand to simulate rising water — if the pump runs, the float or its path is likely the problem. If lifting the float does nothing, the issue may be electrical or motor-related and requires further checks. Once you’ve identified float issues, you can decide whether cleaning, repositioning, or replacing the switch is the right next step — or if you need professional help. How Can You Diagnose and Fix Sump Pump Problems Yourself? Always prioritize safety — electricity and water are a dangerous mix. Then follow a short, ordered checklist: confirm power, test the outlet and breaker, simulate float activation, and inspect the discharge and impeller for clogs. This approach isolates the most common, repairable problems while keeping risk low. Below is a numbered how-to you can follow; each step lists what to look for and what outcome to expect. Turn off power at the breaker and visually inspect the pump and pit for obvious debris or damage; restoring power after that check prevents accidental shorts while you probe. Reset the circuit breaker for the pump and test the outlet with a known-good device or multimeter; if the outlet has power but the pump doesn’t respond, move on to float and motor tests. Manually lift the float to see if the pump activates; if it does, clean and reposition the float or replace the switch if it’s waterlogged or damaged. Inspect the discharge pipe and check valve for obstructions or backflow; clear debris and ensure piping is properly supported and sloped. If safe and recommended by the manufacturer, remove the pump from the basin to check the impeller for clogs or damage; clean sediment and only test the motor on a dry run if allowed. These steps let most homeowners rule out simple issues and know when to call a pro. For quick reference while you work, the table below pairs common tools with expected diagnostic results for each test. Diagnostic tool table introduction paragraph: Before you start, gather a few basic tools and safety items so you can test quickly and safely. The table below links each tool to the test you’ll run and the result you should expect. Test Focus Tool Required Diagnostic Step / Expected Result Power/outlet Multimeter or lamp Verify outlet voltage; expected: ~120V (or house standard). No voltage means a breaker/outlet issue. Breaker reset Gloves, access to panel Reset pump circuit; expected: pump runs when