How to Fix a Running Toilet: Causes, Simple DIY Fixes, and When to Call a Pro
A running toilet is one that keeps letting water flow from the tank into the bowl after a flush — either steadily or on and off. That wasted water raises your bill and creates annoying noise. This guide walks you through why toilets run, how the tank’s parts are supposed to stop the flow, and practical steps you can take: from quick DIY checks to knowing when to call a licensed plumber. You’ll get simple diagnostic methods (like the dye test), targeted fixes (flapper swaps, fill‑valve adjustments), and a ballpark idea of costs for Michigan homeowners. The focus is on safe, effective repairs and bringing in local pros when needed. For immediate service, call Frost and Kretsch Plumbing 24/7. Read on for clear steps, checklists, and quick reference tables to save water and get the job done right.
What Is a Running Toilet and Why Does It Matter?
A running toilet means water keeps moving from the tank to the bowl after the flush should be finished. That usually happens because seals, valves, or settings inside the tank aren’t doing their jobs. Even a small leak can waste a lot of water, push up your utility bills, and create noise or moisture problems in the bathroom. Fixing a running toilet quickly saves water and helps avoid long‑term damage to floors or nearby fixtures. Below we explain how the tank’s parts normally stop flow and how to weigh the environmental and cost impacts so you can prioritize the repair.
Most running toilets are caused by failures or misadjustments in a few common parts: the flapper, fill valve, float, chain, or overflow tube. In the next section we’ll describe what each part does so you can match the symptom you see to the likely problem and pick the right fix.
- A running toilet is continuous or intermittent water flow from the tank to the bowl after a flush.
- Typical causes are a worn flapper seal, a misadjusted float, a faulty fill valve, chain or handle issues, or sediment-clogged parts.
- Fixing it promptly saves water, lowers bills, and prevents moisture damage to your bathroom.
The short list above covers what you’re most likely to find. Next we’ll show how the tank’s mechanism is supposed to keep water from running so you can see why each part matters.
How Does a Toilet Mechanism Work to Prevent Running?
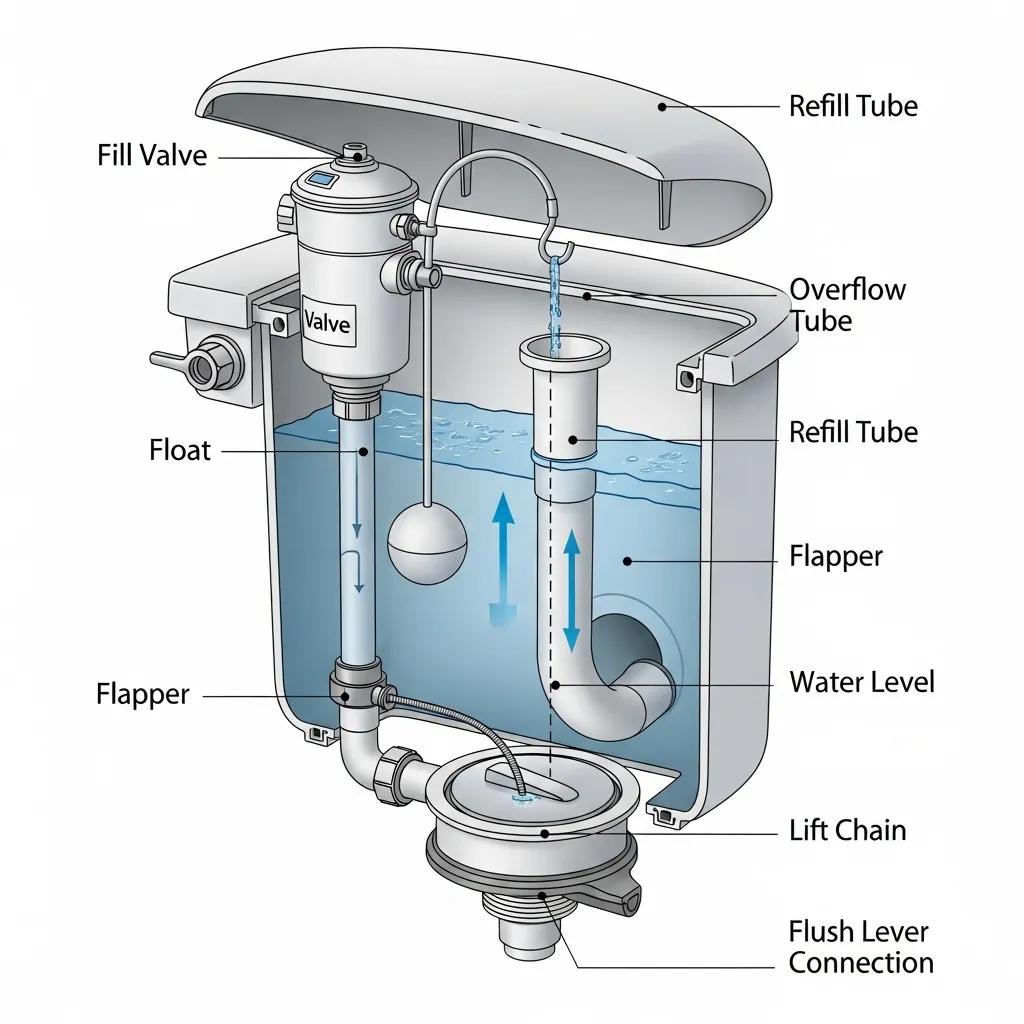
Your toilet tank stops water from running using a few parts that work together. The flapper or seal closes the flush valve after a flush so water stops entering the bowl. The fill valve and float let water back into the tank and shut it off once the right level is reached. The overflow tube prevents overfilling by sending excess water into the bowl instead of out of the tank. Knowing how these pieces interact makes it easier to trace a symptom — like a steady trickle or intermittent refills — back to the most likely faulty part.
A normal flush starts when the handle lifts the flapper and water rushes into the bowl. After the tank empties the flapper should reseal and the fill valve should refill the tank to the float’s set level. If the float is set too high, water can run into the overflow tube; if the flapper is warped, it can leak. Understanding those relationships helps you follow the inspection and diagnosis steps below.
What Are the Environmental and Cost Impacts of a Running Toilet?
One running toilet can waste hundreds of gallons a day depending on the leak. Even small leaks add up quickly and raise your water bill while putting extra strain on municipal systems or septic setups. Beyond the monthly cost, persistent leaks increase the chance of moisture damage — mold, mildew, or subfloor rot — especially in older bathrooms with poor ventilation. Because of these risks, it pays to find and fix leaks early. The next section shows quick ways to identify leaks and decide which repairs will get your toilet back to efficient operation.
Early detection reduces wasted water and the likelihood of secondary damage. The diagnostic steps ahead will help you judge leak severity and decide whether a simple parts swap or a professional visit is the best next move. You’ll use the dye test, listening checks, and water‑level inspections to map symptoms to causes.
What Are the Most Common Causes of a Running Toilet?
Most running toilets trace back to a handful of parts that either wear out or get out of adjustment. The usual suspects are the flapper, fill valve, float assembly, chain or handle linkage, and the overflow tube. Sediment inside the valve body can also keep parts from sealing. The table below is a quick reference to help you scan each component, see how it fails, and recognize the likely symptom.
Intro: This table lists the main tank components that cause running toilets, how they typically fail, and the symptoms that point to each part. Use it while you inspect the tank.
| Component | Typical Failure Mode | Likely Symptom |
|---|---|---|
| Toilet Flapper | Wears out, warps, or won’t seal | Slow, continuous leak into the bowl after a flush |
| Fill Valve | Clogs, wears internally, or sticks | Constant trickle or occasional short refills |
| Float (cup/ball) | Set too high, binds, or misadjusted | Tank water rises to overflow or won’t shut off correctly |
| Chain / Handle Linkage | Chain too long/short or caught on parts | Flapper won’t seat or doesn’t lift fully |
| Overflow Tube | Cracked, damaged, or set too low | Water flows into bowl while tank is refilling |
This quick table helps you focus your inspection. Next we’ll dig into the flapper — the part most often at fault — and what to look for when you open the tank.
How Does a Faulty Toilet Flapper Cause Running?
The flapper is the main seal between the tank and the flush valve. When it gets brittle, warped, or coated in mineral deposits it can’t seat properly and allows water to leak into the bowl. Open the tank and look for uneven edges, soft spots, or buildup, and watch whether the flapper sits flat after a flush. If it’s older than a few years or shows clear wear, replacing it is usually the easiest and most reliable fix. A new flapper restores the seal and often stops running quickly and cheaply.
If the flapper looks good but the chain is too short or long it may stop the flapper from sealing, so check chain length and that the handle returns fully before replacing parts. After swapping or testing the flapper, verify the fill valve and float behavior described in the next section.
What Role Does the Fill Valve Play in Toilet Running Issues?
The fill valve lets water into the tank and relies on a float to know when to stop. Fill valves can stick, get clogged with minerals, or wear out internally. There are float‑arm (ball) systems and newer float‑cup designs — each adjusts differently. Signs of a failing fill valve include a steady trickle, frequent short refills, or water rising to the overflow tube before shutting off. Often a good cleaning or a replacement valve assembly fixes the issue when float adjustments don’t.
To clean the valve, briefly shut off the supply, inspect for grit or mineral rings, and clear any debris. If cleaning doesn’t restore a reliable shutoff, replacing the fill valve is usually the next step. The diagnostics section below explains safe ways to confirm which component is at fault.
How Can You Diagnose a Running Toilet Problem?
Diagnosing a running toilet is a short sequence of safe observations and simple tests that point to the faulty part. Start with a visual check inside the tank, listen for continuous or intermittent flow, do a dye test to catch invisible leaks, and check the water level against the overflow tube. The steps below are an easy workflow anyone comfortable opening the tank can follow with household items.
- Visual Inspection: Lift the tank lid and check for visible damage, mineral buildup, a tangled chain, or a warped flapper.
- Listen and Observe: With the lid off, listen for trickles or hissing and watch whether the tank refills on and off or continuously.
- Dye Test: Put a few drops of food coloring in the tank, wait 10–15 minutes without flushing, then check the bowl for colored water to find a seal leak.
- Water‑Level Check: See where the water sits relative to the overflow tube — water above the tube usually means the float or valve needs adjustment.
Follow these steps to narrow the likely culprit and avoid replacing parts unnecessarily. After diagnosis, move on to the targeted DIY fixes below that match the most common outcomes.
What Is the Dye Test and How Does It Detect Leaks?
The dye test is a simple way to spot tank‑to‑bowl leaks without disassembly. Put a few drops of food coloring or a dye tablet into the tank, wait 10–20 minutes without flushing, then look in the bowl — any color means water is passing the flapper or seal. It’s inexpensive, safe, and catches slow leaks that are hard to hear. If the dye shows up in the bowl, start with a flapper inspection or replacement; if it doesn’t, focus on the fill valve or chain.
A positive dye test usually points to the flapper or seat; a negative result suggests intermittent fill‑valve cycling or linkage problems may be to blame.
How to Listen and Observe for Running Toilet Symptoms?
Listening and watching are fast, effective checks: a steady trickle or hiss usually means water is leaking past the flapper. Short, periodic clicks or small refills indicate the fill valve is cycling. Put your ear near the tank (without touching internal parts) to tell steady flow from intermittent refills, and watch the float during a refill to see whether it rises and shuts off cleanly. Also check if the water level rests about an inch below the overflow tube — that’s a common correct setting. These checks help you pick the right DIY fix or decide if you need professional help.
If the water level keeps fluctuating despite part changes, or if symptoms are unclear, that’s a sign to get a professional diagnosis — we cover when to call a plumber later.
What DIY Fixes Can Stop a Running Toilet?
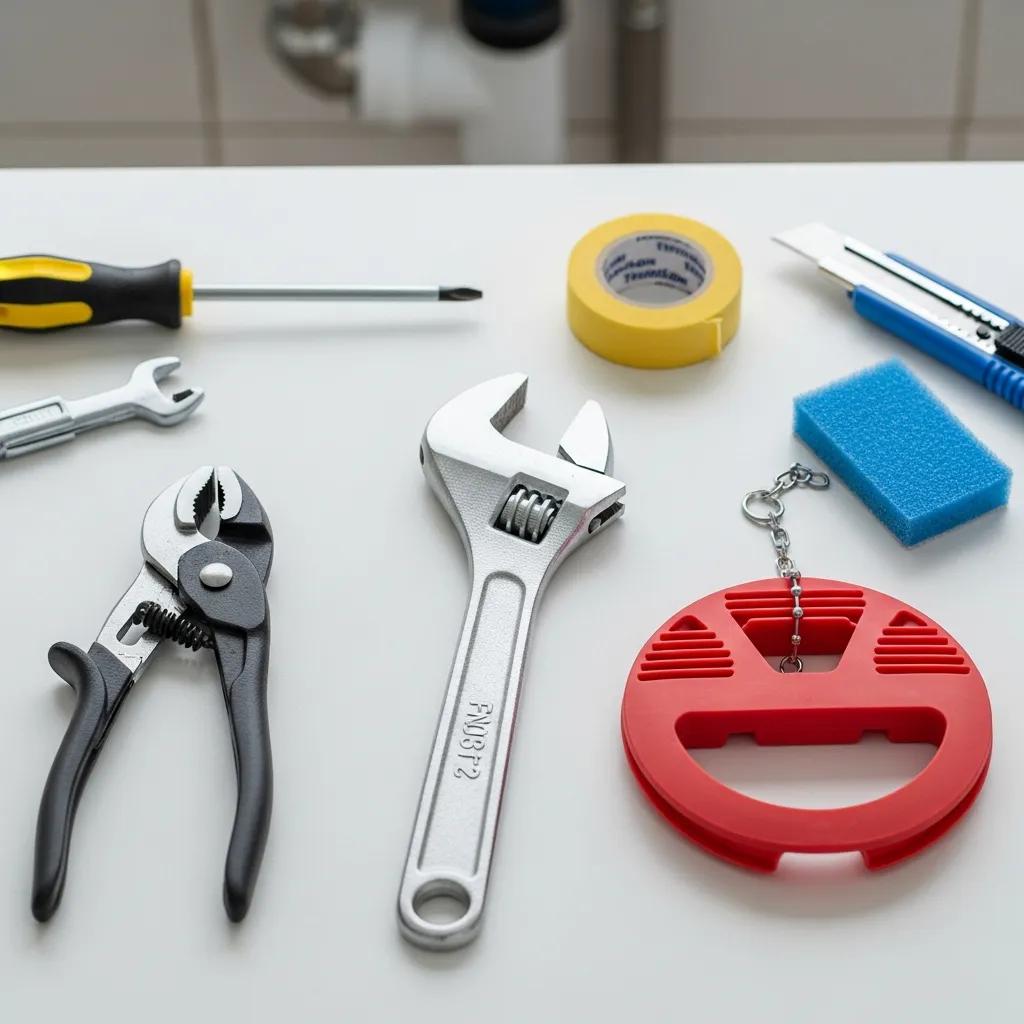
Many running‑toilet problems are simple to fix with basic tools and inexpensive parts: swap the flapper, adjust the float or fill valve, change chain length, or clear sediment from the valve. Start with the easiest checks — flapper and chain — then move to float or fill‑valve adjustments if needed. The table below links common failing parts to the best DIY action and the tools you’ll likely need so you can plan the repair and time required.
Intro: This table helps homeowners match a failing component to a straightforward DIY fix and lists the simple tools you’ll need. Use it to decide which parts to buy before you begin.
| Component | Best DIY Fix | Tools Required |
|---|---|---|
| Toilet Flapper | Install a compatible replacement flapper | Adjustable pliers, rag, new flapper |
| Fill Valve | Clean or replace the valve and adjust the float | Bucket, screwdriver, replacement valve kit |
| Float (cup/ball) | Adjust or swap the float assembly | Pliers, screwdriver |
| Chain / Handle | Adjust chain length or replace the linkage | Needle‑nose pliers, replacement chain/clip |
- Replace the flapper: Remove the old flapper, clean the seat, install the new one, and test — typical result: stops leaks in 10–20 minutes.
- Adjust the float: Bend the arm slightly or move the float cup lower so the valve shuts off sooner — typical result: prevents overfilling in 5–10 minutes.
- Clean or replace the fill valve: Flush debris out and test; if cleaning doesn’t help, replace the valve — typical result: restores reliable shutoff in 15–30 minutes.
- Adjust the chain: Give the chain a little slack so the flapper seats fully but still lifts during a flush — typical result: fixes handle-related leaks in 2–5 minutes.
After any fix, run the dye test and listen for remaining flow. If the toilet still runs, consider a professional diagnosis to avoid buying unnecessary parts and repeating work.
How to Replace a Toilet Flapper for Running Toilet Repair?
Replacing a flapper is usually the fastest DIY fix. Turn off the water supply, flush to empty most of the tank, and lift the tank lid carefully. Remove the old flapper from the pegs and disconnect the chain from the handle. Fit a new compatible flapper so it sits flat on the seat, reconnect the chain with a small amount of slack, turn the water back on, let the tank refill, then check the seal with a dye test or visual inspection.
If the new flapper doesn’t stop the leak, check the valve seat for mineral deposits or damage. If the seat is corroded, you may need to replace the flush‑valve assembly or call a professional. Often correct seating and proper chain length finish the repair.
How to Adjust the Fill Valve and Float to Stop Running?
Find out whether you have a float‑arm (ball) or float‑cup system, then adjust per the manufacturer’s method to set the shutoff point. For float‑arm setups, gently bend the arm down to lower the water level. For float‑cup valves, use the adjustment clip or screw to move the cup down the stem until the water stops about an inch below the overflow tube. If you suspect debris, shut off the supply, remove the valve cap, and flush out grit before reassembling. Watch one or two refill cycles to make sure the valve stops reliably without returning to the overflow.
If adjustments and cleaning don’t fix it, the fill valve’s internal parts may be worn — replacing the valve assembly is usually a straightforward and effective next step. The following section explains when it’s time to call a professional.
When Should You Call a Professional Plumber for Running Toilet Repair?
Call a professional when the toilet keeps running after reasonable DIY attempts, when several components fail at once, when you see signs of moisture damage, or when the toilet uses nonstandard parts or complex valve assemblies. A licensed plumber will run a full diagnosis, source the right replacement parts, and do any tank or valve assembly swaps to code. They can also spot related issues like high incoming water pressure or hidden leaks homeowners might miss. If flapper swaps and valve adjustments don’t stop the problem, a pro will prevent further water waste and damage.
A technician will typically inspect the tank and supply line, test water pressure, replace worn parts or assemblies, and verify proper sealing and float settings before leaving. For homes in Macomb, Oakland, and Wayne counties, using a local licensed service ensures parts fit and the job gets done quickly. Call Frost and Kretsch Plumbing 24/7 for professional repairs if your symptoms match the escalation criteria — their team will explain the recommended steps on site.
What Are Signs That DIY Fixes Aren't Enough?
Warning signs that DIY work isn’t enough include repeated running after replacing parts, visible water damage or mold around the toilet, ongoing phantom refills, or strange noises from the supply line or tank that point to deeper issues. If multiple parts are failing at once — for example a bad flapper and a corroded fill valve — or if the flush‑valve seat looks damaged, get a professional diagnosis to avoid wasting time and parts. Structural problems like soft subflooring or stains on ceilings below the bathroom also need immediate professional attention to prevent higher repair costs. Recognizing these red flags switches the priority from quick fixes to trained intervention.
When a pro is needed, they’ll document the issue, recommend targeted repairs, and often provide a warranty or satisfaction guarantee. The section below explains why a local licensed provider makes the repair process smoother.
Why Choose Frost and Kretsch Plumbing for Expert Toilet Repair?
Frost and Kretsch Plumbing serves Macomb, Oakland, and Wayne counties and offers practical benefits when DIY efforts aren’t enough. Their licensed and insured technicians handle full diagnostics and repairs, they provide upfront, transparent pricing so you know the expected cost, and they offer 24/7 emergency service backed by a 100 percent satisfaction guarantee. That combination gives homeowners confidence when scheduling repairs — day or night.
- Licensed, insured technicians experienced with tank and valve repairs.
- 24/7 emergency availability for urgent running‑toilet situations.
- 100 percent satisfaction guarantee on completed work.
- Transparent pricing with clear explanations of project costs.
- Local service across Macomb, Oakland, and Wayne counties.
These features help homeowners move from a DIY attempt to a professional repair with fewer surprises. Check the company’s local profile or contact options to schedule service and review the symptoms with a technician.
What Are the Typical Costs of Running Toilet Repair in Michigan?
Costs depend on which part failed, the quality of the replacement parts, labor time, and whether the call is scheduled or urgent. Main cost drivers are the parts (flapper, fill valve, or full flush‑valve assembly), diagnostic time, and any travel or emergency fees. Because prices vary by part brand and toilet model, call for a specific estimate based on your setup. The table below gives rough parts cost ranges and typical labor/time to help you plan before you contact a technician.
Intro: Use this table as a guideline for common repair parts and approximate labor time; actual prices depend on brand, model, and service timing.
| Repair Item | Typical Parts Cost (range) | Typical Labor/Time (range) |
|---|---|---|
| Flapper Replacement | $5–$20 | 10–30 minutes |
| Fill Valve Replacement | $15–$50 | 20–60 minutes |
| Flush Valve / Full Assembly | $50–$150 | 45–90 minutes |
How Do Parts and Labor Affect Running Toilet Repair Costs?
Parts choice — generic vs. premium or OEM — affects the parts cost. Labor time varies with how accessible the toilet is, the toilet model, and whether additional repairs (seat replacement, corroded hardware) are needed. Simple jobs like flapper swaps are quick and inexpensive. Full valve‑assembly replacements or work on older, nonstandard toilets take longer and may require extra parts. A professional diagnosis helps avoid buying unnecessary parts and repeat visits that add to labor time. Call a licensed technician for an itemized, transparent estimate explaining part options and labor.
After‑hours or emergency calls can cost more because they require rapid dispatch and resources outside regular hours. The next subsection covers emergency service considerations and local provider availability.
Are Emergency Plumbing Services More Expensive?
Yes, emergency or after‑hours plumbing often costs more because it requires immediate response and staffing outside normal business hours. If a running toilet threatens water damage, call a provider that offers 24/7 emergency service, but ask for clear pricing and estimated charges when you call. Frost and Kretsch Plumbing advertises 24/7 emergency response and emphasizes upfront cost explanations so homeowners understand options before work begins. If you need an emergency visit, request a clear estimate before authorizing repairs.
An emergency call is appropriate when ongoing leakage risks nearby structures or mold. Discuss parts and labor estimates openly with the provider to avoid surprises while restoring reliable operation.
Frequently Asked Questions
What are the signs that indicate a running toilet needs professional help?
Call a pro if the toilet keeps running after DIY repairs, if there’s visible water damage or mold near the fixture, or if you hear unusual noises from the tank or supply line. If several parts fail at once or you notice structural issues like soft flooring, a licensed plumber can diagnose deeper problems and recommend the right repairs.
How can I prevent a running toilet from occurring in the future?
Regular maintenance helps prevent running toilets. Inspect the flapper, fill valve, and float periodically and replace worn parts. Keep the water level about an inch below the overflow tube, and clean mineral buildup to protect seals. Consider a water‑efficient toilet to reduce the chance of leaks and lower water use.
What tools do I need for DIY toilet repairs?
Most DIY toilet fixes require a few basic tools: an adjustable wrench for nuts, pliers for gripping small parts, and a flathead and Phillips screwdriver. Keep a bucket nearby to catch water. For specific jobs you’ll also need replacement parts like a flapper or fill valve kit, which are available at hardware stores.
Can a running toilet affect my home's plumbing system?
Yes. A running toilet raises your water bill and can stress your water supply or septic system. Over time, persistent leaks can cause moisture damage to surrounding structures, encouraging mold growth and weakening flooring or walls. Fixing leaks quickly helps protect your plumbing system and home.
What should I do if my toilet keeps running after replacing parts?
First, double‑check that new parts are installed correctly and are compatible with your toilet model. Inspect the flush‑valve seat for damage or mineral buildup that prevents a seal. If the problem continues, contact a professional plumber who can diagnose less obvious issues or plumbing connections that may need repair.
How often should I perform maintenance on my toilet?
Do a basic check at least once a year: inspect the flapper, fill valve, and float, and confirm the water level is set correctly. Look for leaks or water damage around the base and tank. Older homes or fixtures with recurring issues may need more frequent checks.
Conclusion
Fixing a running toilet saves water, reduces bills, and prevents costly damage. Most causes are simple to diagnose and repair with basic tools — especially flapper or fill‑valve issues — but know when to call a pro. If DIY attempts don’t stop the running, a licensed plumber can diagnose, replace parts, and make sure everything is sealed and working correctly. Contact Frost and Kretsch Plumbing for local, reliable service to keep your plumbing efficient and worry‑free.