
DIY Sump Pump Maintenance for Longevity
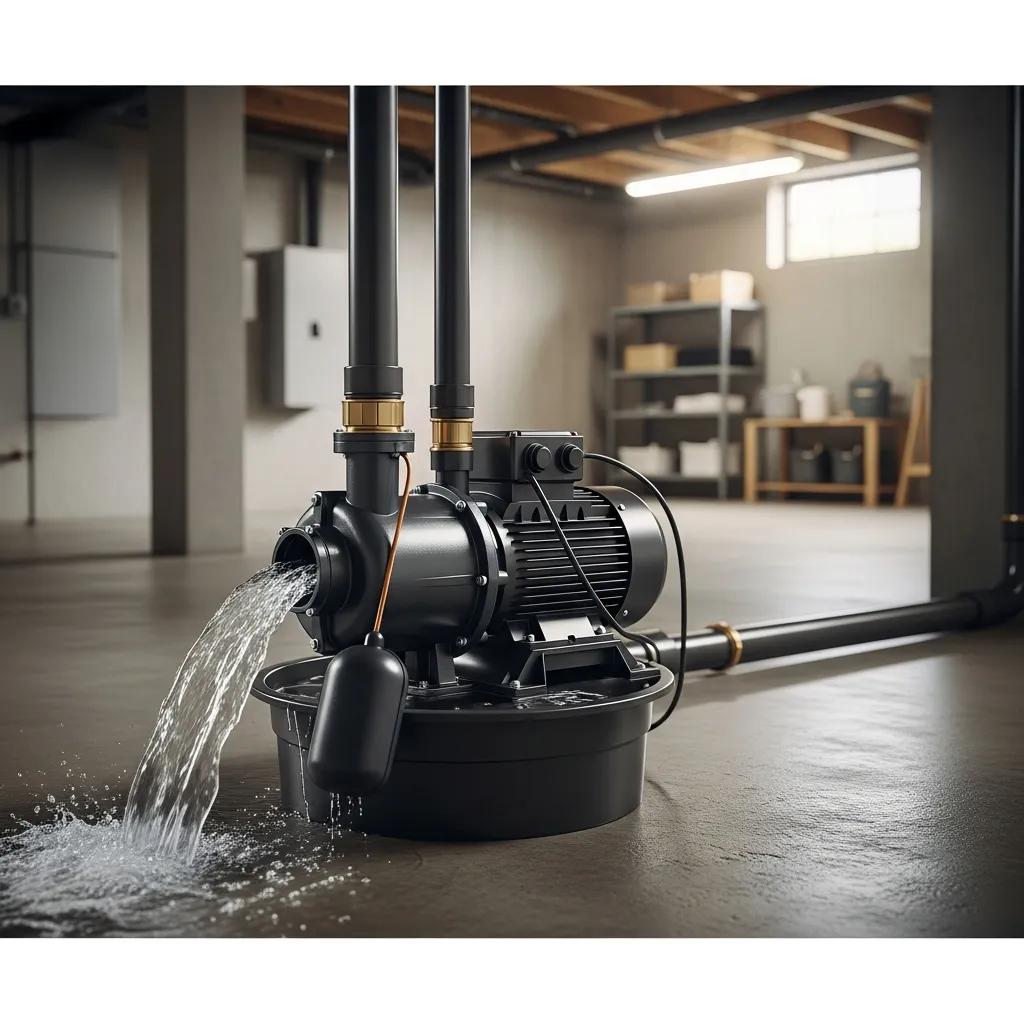
DIY Sump Pump Care That Actually Protects Your Basement: Practical Steps and Pro Tips A sump pump keeps groundwater out of your basement — but only if it’s cared for. This guide walks homeowners through straightforward DIY sump pump maintenance: what to clean, how to test, common failure modes, and when to call in help. Skipping routine checks often leads to emergency repairs, flooded basements, and spoiled belongings. Follow the cleaning, inspection, and battery-backup checks here to reduce those risks and make your pump last longer. You’ll get easy step-by-step instructions, simple troubleshooting checks, and a seasonal maintenance calendar so preventative care becomes a repeatable habit, not a scramble during a storm. Why Is Regular Sump Pump Maintenance Crucial for Longevity? Regular maintenance means inspecting, cleaning, and testing the pump and its parts so the system works when water levels rise. Small chores — clearing debris, testing the float switch, and keeping the discharge clear — prevent motor strain and premature failure. The payoff for homeowners is clear: less chance of flooding, smaller repair bills over time, and predictable planning for replacements instead of surprise emergencies. Industry guidance supports planned maintenance as the best way to avoid the most common causes of basement water damage. Those routine checks are effective because they address the mechanical and electrical problems that shorten a pump’s life. Removing grit from the basin reduces impeller wear and prevents overloads. Verifying float movement keeps the motor from running nonstop and overheating. In short, hands-on cleaning and periodic testing are simple steps that make a real difference — especially in flood-prone areas. How Does Preventative Care Extend Sump Pump Life? Preventative maintenance fights the typical reasons pumps fail early: debris, stuck floats, and blocked discharge lines. A regular sump pump check — basin cleaning, float tests, and a quick look at the impeller — reduces friction and heat that wear out motors. For example, clearing silt keeps the impeller balanced and lowers vibration that wears bearings, which can add years to the pump’s service life. These improvements mean fewer emergency calls and more predictable replacement timing. Preventative checks also catch electrical and control issues early, like loose wiring or corroded terminals, before they cause intermittent operation or total failure. Testing the pump under load and confirming the check valve and discharge path helps you spot parts that need replacing or a pro’s attention, lowering overall ownership costs across the pump’s life. What Are the Risks of Neglecting Sump Pump Maintenance? Putting off maintenance raises the chance of basement flooding, motor failure, and follow-on problems like mold and structural damage — all of which are far costlier than routine upkeep. Sediment and debris can jam the impeller or trap the float switch, causing the pump to run continuously, run dry, or fail to start. Corroded electrical connections can create unsafe, intermittent operation, increasing flood risk during storms. A simple maintenance schedule is almost always cheaper than fixing flood damage after the fact. Typical consequences of neglect include direct water damage, ruined finished basement areas, and long-term costs like mold remediation or replacing damaged possessions. Recognizing these risks makes the case for regular inspection and prepares you for the cleaning and testing steps that follow. What Are the Essential DIY Sump Pump Cleaning Steps? A safe and effective DIY cleaning routine focuses on cutting power, removing debris, checking moving parts, and running a final test. Always start by switching off the pump circuit and confirming the power is off. Only remove the pump from the basin if the unit is designed for easy removal and you’re comfortable doing so. Clean out silt and debris, inspect the impeller and inlet, check that the float moves freely, then reinstall and run a test. These steps help you clean the pump without causing damage or voiding warranties. How to Safely Clean the Sump Pump Basin and Components Safe cleaning begins with power isolation and basic protective gear. Turn off the pump’s breaker and unplug the unit when possible. Remove standing water with a shop-vac or bucket and scrape silt gently to avoid damaging the basin. Check the impeller and inlet screen for lodged debris and clear it with a soft brush — avoid harsh chemicals or wire brushes that can harm seals and plastic parts. After reassembly, run a controlled water test to watch the float and confirm the discharge flows freely. Which Tools and Materials Are Needed for Effective Cleaning? Most homeowners only need a handful of inexpensive tools to clean a sump pump safely: sturdy gloves, eye protection, a wet/dry vacuum or bucket, a soft brush, a screwdriver for clamps, and a flashlight. If you’re comfortable with electrical checks, a multimeter can help verify power. Optional items that help include replacement gaskets or pipe clamps and a small brush for the impeller. Avoid wire brushes and harsh solvents that can damage impellers, seals, and plastic parts. If you run into persistent electrical problems, signs of motor burnout, or a blockage you can’t clear safely, call Frost and Kretsch Plumbing at (586) 675-0097 for professional assessment and repair. That gives you a safe, local backup when DIY isn’t enough. How Can You Troubleshoot Common Sump Pump Problems Yourself? Troubleshooting starts with a simple, ordered check: power, float movement, physical blockage, then check valve position. Verify the breaker and outlet, watch the float move, inspect the impeller inlet for clogs, and confirm the check valve orientation. Many problems are stuck floats or clogged intakes — not burned-out motors — so a step-by-step approach can save time and money. The table below pairs common issues with likely causes and quick DIY checks to help you decide what to try first. The table below compares common failure modes with probable causes and DIY checks to run during initial troubleshooting. Use it to quickly decide whether a problem is likely fixable at home or needs a professional visit. Issue Likely Cause DIY Check Pump not running No power or tripped breaker Check the breaker,
Troubleshooting a Sump Pump That Won’t Turn On
How to Troubleshoot a Sump Pump That Won’t Turn On: Practical Fixes and Local Repair Options If your sump pump doesn’t turn on, your basement is at real risk when water rises. This guide walks you through the most common causes, safe DIY checks you can do now, and when a professional should step in. You’ll get clear tests for power and float-switch problems, steps to clear clogs and inspect the impeller and check valve, and routine maintenance tips to prevent future failures. We also explain component-level clues — motor hums, stalled impellers, leaking check valves — and provide quick-reference diagnostic tables and step-by-step how-tos so you can act fast. When a job needs a pro, Frost and Kretsch Plumbing explains how we support homeowners across Macomb, Oakland, and Wayne counties with both emergency and scheduled sump pump services. What Are the Most Common Causes of a Sump Pump Not Turning On? Most sump pumps fail to start for five reasons: electrical issues, a bad float switch, motor failure, clogs or obstructions, and check valve problems. Each one interrupts either the signal to start the pump or the path for water to leave the pit, producing symptoms like silence, a humming motor that won’t spin, or frequent short cycles. Identifying the likely cause helps you run safe, focused checks and avoids wasting time on the wrong fix. Here’s a compact list for quick decisions. Common causes and quick explanations: Electrical failure: No power, a tripped breaker, or a faulty outlet keeps the pump from getting electricity. Float switch malfunction: A stuck, misaligned, or waterlogged float won’t signal the pump to run. Motor problems: Seized bearings or burned windings can make the motor hum or stay silent without spinning the impeller. Clogs and debris: Sediment, rags, or scale can jam the impeller or discharge line and stop flow. Check valve failure: A leaking or stuck check valve causes backflow or constant cycling rather than proper discharge. Knowing these failure modes helps you prioritize checks that start with power and end with component inspection and cleaning. The next sections show how to test electrical systems and float-switch behavior so you can troubleshoot with confidence. How Do Electrical Issues Prevent a Sump Pump from Operating? Electrical problems stop a sump pump by cutting power or creating unsafe conditions — common causes include tripped breakers, a tripped GFCI, damaged cords, or a bad outlet. Signs you’re facing an electrical issue include no sound or lights from the pump, a motor that hums without turning, or intermittent operation during heavy storms. Homeowners can safely check the circuit breaker and test the outlet with a lamp or multimeter, but avoid opening junction boxes or touching wet wiring. If the breaker keeps tripping, you smell burning, or wiring looks frayed, stop testing and call a licensed professional — those are electrical hazards that need an electrician or a trained plumber to fix. After checking power, your next logical step is the pump’s activation device: the float switch, which can mimic electrical faults when it sticks or becomes waterlogged. Why Does a Faulty Float Switch Stop the Sump Pump? The float switch senses the basin’s water level and completes the pump’s circuit when water rises. If the float sticks, becomes waterlogged, or is misaligned, it won’t trigger the pump. Typical symptoms are the pump not starting even when the pit is high, the pump running continuously because the float is stuck “on,” or erratic cycling if the float catches on debris. To test the float safely, first confirm the pump has power, then lift the float by hand to simulate rising water — if the pump runs, the float or its path is likely the problem. If lifting the float does nothing, the issue may be electrical or motor-related and requires further checks. Once you’ve identified float issues, you can decide whether cleaning, repositioning, or replacing the switch is the right next step — or if you need professional help. How Can You Diagnose and Fix Sump Pump Problems Yourself? Always prioritize safety — electricity and water are a dangerous mix. Then follow a short, ordered checklist: confirm power, test the outlet and breaker, simulate float activation, and inspect the discharge and impeller for clogs. This approach isolates the most common, repairable problems while keeping risk low. Below is a numbered how-to you can follow; each step lists what to look for and what outcome to expect. Turn off power at the breaker and visually inspect the pump and pit for obvious debris or damage; restoring power after that check prevents accidental shorts while you probe. Reset the circuit breaker for the pump and test the outlet with a known-good device or multimeter; if the outlet has power but the pump doesn’t respond, move on to float and motor tests. Manually lift the float to see if the pump activates; if it does, clean and reposition the float or replace the switch if it’s waterlogged or damaged. Inspect the discharge pipe and check valve for obstructions or backflow; clear debris and ensure piping is properly supported and sloped. If safe and recommended by the manufacturer, remove the pump from the basin to check the impeller for clogs or damage; clean sediment and only test the motor on a dry run if allowed. These steps let most homeowners rule out simple issues and know when to call a pro. For quick reference while you work, the table below pairs common tools with expected diagnostic results for each test. Diagnostic tool table introduction paragraph: Before you start, gather a few basic tools and safety items so you can test quickly and safely. The table below links each tool to the test you’ll run and the result you should expect. Test Focus Tool Required Diagnostic Step / Expected Result Power/outlet Multimeter or lamp Verify outlet voltage; expected: ~120V (or house standard). No voltage means a breaker/outlet issue. Breaker reset Gloves, access to panel Reset pump circuit; expected: pump runs when
Benefits of Sump Pump Alarms for Flood Prevention
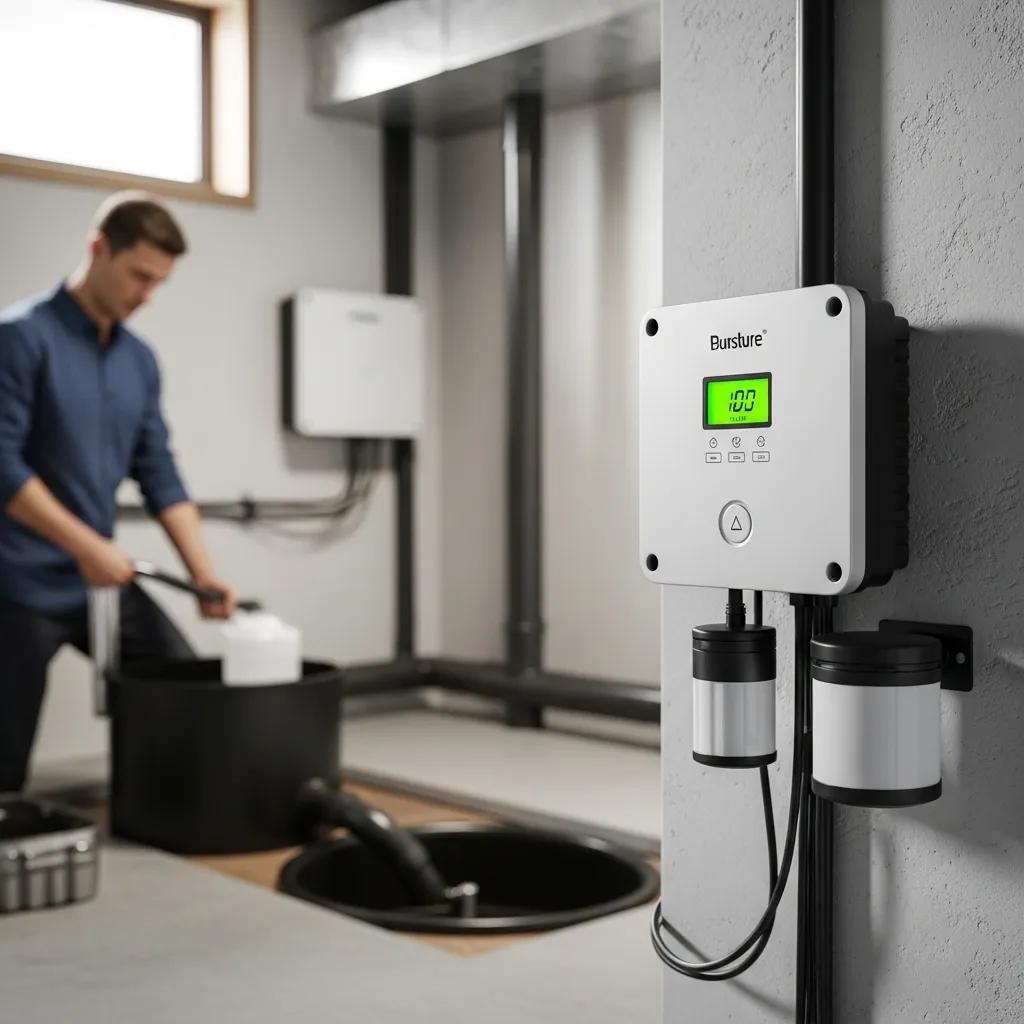
Why Sump Pump Alarms Matter in Michigan: Protect Your Home or Business from Basement Flooding Sump pump alarms watch for rising water or pump failures and alert you the moment something goes wrong—giving you time to act before a small leak becomes a major basement flood. Using float switches, probes, or electronic sensors, these alarms send audible, visual, or remote notifications that cut down on structural damage and protect items stored below grade. With Michigan’s heavy spring rains, snowmelt and seasonal seepage, a dependable sump pump alarm is a smart, practical safeguard for homes and small businesses. Below we explain why alarms matter, compare common alarm types and how they work, outline professional installation and maintenance best practices, and answer cost and insurance questions for property owners in Macomb, Oakland, and Wayne Counties. You’ll also get clear guidance on detection methods—flood sensors and high-water alarms—recommendations for wireless and smart options, and guidance on when to call a pro. By the end, you’ll know how to choose, install, and maintain the right basement flood alarm for your risk and budget. Why Sump Pump Alarms Are a Key Part of Basement Flood Prevention A sump pump alarm matters because it catches problems early—before a little water turns into a costly flood. Sensors monitor water level or float position and trigger an alert when levels pass a safe threshold. That early warning gives you, a neighbor, or a monitoring service time to respond. The result: less standing water, lower mold risk, and smaller repair bills. Knowing these core benefits makes it easier to plan a layered approach—pairing a working pump with dependable alarm monitoring. Sump pump alarms offer clear, practical benefits: Early detection: Alerts you at the first sign of high water or pump trouble so you can act quickly. Less damage: Faster response limits structural, electrical, and content losses. More confidence: Audible alerts and remote notifications ease the stress of storms or travel. Insurance documentation: Proof of mitigation and monitoring can help when filing claims or talking with your insurer. These advantages explain why a basement flood sensor or high-water alarm is a worthwhile part of a practical flood-control plan. What Early Warnings Do Sump Pump Alarms Give? Sump pump alarms spot rising water using float switches, electronic probes, or pressure sensors and then trigger audible alerts or remote messages so you can respond before finished areas are affected. Alerts can come as a built-in siren, control-panel lights, or push notifications and texts from a wireless or smart module. Because many basement floods happen during storms or power interruptions, the best setups combine battery backup with remote alerts to increase the chance of timely intervention—whether that means starting a backup pump, calling a service, or arranging emergency pumping. When an alarm goes off it sets a chain in motion: you get notified, assess the situation, and take action. That notification→assessment→response flow is what saves time and money in severe weather. Later we’ll show how those early warnings translate to real savings on repairs and restoration. How Sump Pump Alarms Reduce Water Damage and Repair Costs Alarms cut damage by prompting action before water reaches drywall, insulation, and flooring—materials that drive up restoration costs when soaked. Fixing a small sump-pit overflow within hours often avoids expensive structural drying, mold remediation, and content replacement. The logic is straightforward: alarm → action → less exposure → simpler repairs and lower chance of hidden mold. Industry data and field experience both show that quick mitigation after early detection reduces repair costs and the risk of secondary damage. Shortening the time between failure and response also helps with insurance claims—documented alarms and maintenance make the situation clearer for adjusters. Knowing how alarms affect the cost picture helps you decide which features—remote monitoring, battery backup, or redundant sensors—are worth adding. Next we compare alarm types and how each one works so you can match features to needs. What Types of Sump Pump Alarms Are Available and How They Work Alarms range from simple mechanical float switches to electronic probes, wireless modules, and fully integrated smart monitors. Float alarms trip when water lifts a float; probe systems sense conductivity or pressure; wireless and smart units add remote alerts via RF or Wi‑Fi and can feed data to apps. The right choice depends on priorities like backup power, remote notifications, and ease of installation. Understanding how each type senses water and notifies you helps pick the best fit for your property. Below is a compact comparison of common alarm styles, their power needs, and how they typically alert you. Different alarm types suit different needs depending on power source and notification reach. Alarm Type Power Source Typical Alerts High Water Float Alarm Wired to home power (often with battery backup) Loud siren and local panel light Wireless/Wi-Fi Alarm Battery or wired; connects wirelessly App push, SMS/email, plus audible alarm Battery Backup Alarm Battery-only or hybrid Audible alarm during outages; LED status indicator This quick comparison shows how float, wireless, and battery-backed designs trade off reliability, reach, and convenience. Next we’ll dig into how sensors detect high water and where to place them for reliable alerts. How High Water Level Alarms Detect Flood Risk High-water alarms use float switches, vertical probes, or conductive/contact sensors set at key heights in the sump pit. When water reaches the sensor, the alarm trips. Float switches give reliable single-point detection; probe sensors can monitor multiple levels or give continuous readings for finer control. Correct placement—away from pump turbulence, above normal water levels but below overflow—cuts false alarms and gives early notice. For complicated pits or systems with multiple pumps, a professional check is often worth it to ensure sensors are positioned for consistent performance. Good sensor placement balances early sensitivity with resistance to nuisance trips. That balance is one reason many people opt for wireless or smart alarms for extra alert flexibility. Why Choose Wireless and Smart Sump Pump Alarms? Wireless and smart alarms push alerts to your phone and can tie into home