
Important Questions to Ask Before Hiring a Plumber

Questions to Ask Before You Hire a Plumber: A Practical Guide to Choosing a Reliable Pro Hiring the right plumber starts with the right questions. This guide helps homeowners and small business owners quickly check credentials, read estimates, judge specialized skills, and confirm warranties and emergency support so you avoid surprise bills and unsafe work. We’ll walk you through simple verification steps, show how estimate line items should look, give an interview checklist for vetting experience, explain warranty and satisfaction policies, and flag common red flags to avoid scams. You’ll see concrete examples — like how a license number ties to state oversight and what labor, parts, and permit entries should look like on a quote — so you can compare bids, verify credentials with Michigan regulators, and know exactly what to get in writing before any work begins. How do you verify a plumber’s credentials and licensing in Michigan? Start by asking what license or registration the plumber holds, then confirm that number with Michigan’s regulatory database to make sure it’s current and in good standing. That quick check protects you from unlicensed contractors and gives you the documentation you need to ask for insurance and bonding proof. Below are clear steps and resources to help you verify credentials and a short list of questions to ask before scheduling any work. When you call a prospective plumber, ask for the license number and the business or registrant name, then request a certificate of insurance that names the contractor or company. Use the table below to match each credential to where you can verify it and what details to look for. If a contractor won’t provide license or insurance documents, treat that as a red flag and get a second estimate before moving forward. Different jobs require different credentials, so confirm the credential fits the scope of work. If you want help checking license data or reviewing documents, contact Frost and Kretsch Plumbing — they can share license numbers and proof of insurance on request and explain what those records mean for your project. Which licenses and certifications should a qualified plumber hold? In Michigan you’ll commonly see a master plumber license, journeyman plumber license, or contractor registration — each shows different training and permitted responsibilities. Master plumbers typically plan and supervise complex installs, journeymen perform skilled work under supervision, and contractor registration is required to operate a business and pull permits. Those distinctions matter: a simple faucet job doesn’t need the same credentials as a commercial install or permit-required sewer work. Also ask about trade certificates or continuing education for things like water heaters, backflow prevention, or sewer repairs. Those specialized credentials show extra training beyond baseline licensing and help you match the right professional to the job. Verifying the proper credential up front lowers permit and code risk and helps ensure the work is done correctly. How can you confirm a plumber’s insurance and bonding? Insurance and bonds protect you if something goes wrong on the job. Ask for a Certificate of Insurance (COI) showing liability limits and effective dates, and confirm whether workers’ compensation covers on-site employees. A valid COI should list the insured name, policy numbers, coverage types, and carrier — details you can verify with the insurer if needed. If a plumber won’t provide a COI or gives vague answers about coverage, ask for written proof or consider another provider — evasive responses are a common warning sign. Know the difference between general liability (covers property damage) and workers’ comp (covers employee injuries), and make sure insurance confirmation is documented in your written estimate or contract. Credential Type Where to Verify What to Check Master/Journeyman License Michigan Department of Licensing and Regulatory Affairs (LARA) online database License number matches name, status is active, expiration date, disciplinary history Contractor Registration Local permitting office / Michigan LARA Authority to pull permits, business name matches registration, registration status Insurance (Liability / Workers’ Comp) Certificate of Insurance from carrier Policy number, coverage limits, effective/expiration dates, named insured Bonding Issuing surety company Bond amount, bond period, scope of covered claims Use this table as a checklist — each item is a practical verification step before you award a job. What should you expect in a detailed plumbing estimate and pricing? A clear estimate separates labor, parts, permit fees, disposal, taxes, and any surcharges so you can compare bids fairly and avoid unexpected costs. Ask for an itemized, written estimate that notes whether charges are hourly or flat, lists parts by name or specification when relevant, and states if permits or disposal are included. When quotes differ widely, the variance is usually in scope, warranty coverage, or hidden fees — itemization forces clarity and makes comparison easy. Below are common estimate line items to expect and a table that shows how each should appear in a transparent quote. Always ask for a written scope and timeline, and if anything is unclear, have the contractor revise the estimate with explicit inclusions and exclusions. After comparing bids, reach out to Frost and Kretsch Plumbing for an itemized quote — they emphasize no hidden fees and clear, written estimates. Typical components on a good plumbing estimate: Labor: Technician time — hourly rate or flat labor charge. Parts: Replacement components listed with part names or specs. Permits: Local permit fees needed for code compliance. Disposal: Removal and disposal of old fixtures or materials. Taxes and administrative fees: Local taxes and any handling fees. Those items make apples-to-apples comparisons possible and help you spot omissions or bundled charges that inflate cost. Estimate Component Typical Presentation Included or Itemized? Labor Hourly rate and estimated hours or flat labor fee Should be itemized with hours or flat fee explained Parts Part names, brands, or specifications with unit cost Itemized by part, including markups if any Permits Permit type and cost Listed separately or noted as responsibility of contractor Disposal Description of removed items and disposal fee Itemized to avoid surprise charges Taxes & Fees Local tax percentage
Choosing Water-Efficient Appliances for Your Home
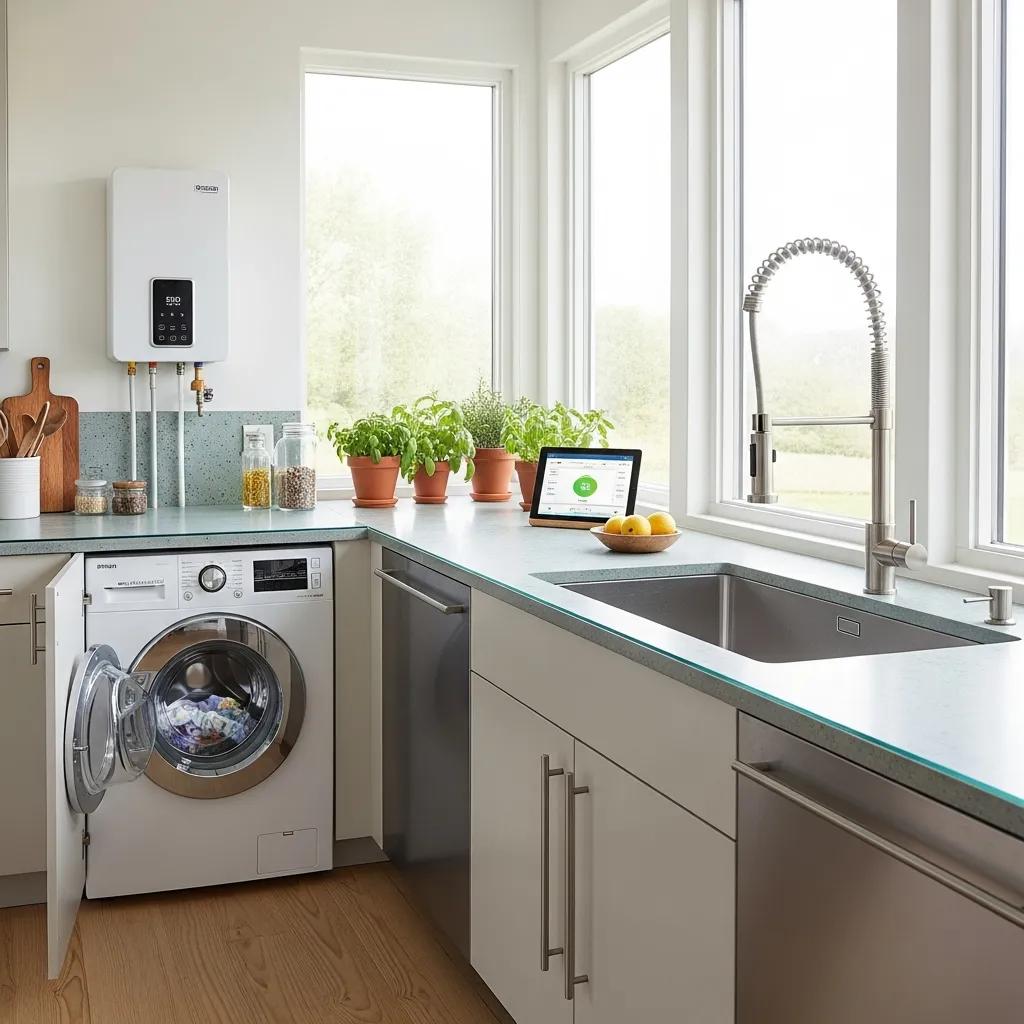
Choosing Water‑Efficient Appliances for Your Home: Expert Installation and Eco‑Friendly Upgrades Water‑efficient appliances lower household water use by doing more with less—using less water per use while still getting the job done. In this guide we walk through common water‑saving upgrades—low‑flow toilets, aerated faucets, ENERGY STAR dishwashers, high‑efficiency washers, and tankless water heaters—how they save money and reduce environmental impact, and why professional installation matters. You’ll get clear, actionable steps for choosing certified products, the plumbing services needed to make them perform as promised, how smart water technology supports efficiency, and routine maintenance to protect long‑term savings. We include checklists, installation steps, rebate and incentive notes for homeowners in Macomb, Oakland, and Wayne counties, and guidance on where local plumbing expertise fits in. Terms like ENERGY STAR, WaterSense, tankless water heaters, low‑flow toilets, and smart leak detectors are used throughout so you can make decisions that capture utility rebates and reliable savings. What Are the Benefits of Installing Water‑Efficient Appliances? Water‑efficient appliances lower the amount of water you use, reduce the energy needed to heat that water, and frequently cut monthly utility bills. They also ease demand on local water supplies and sewage systems. How they do it varies—some limit flow, others optimize cycles to use less water per load, and tankless heaters avoid the standby heat loss of storage tanks. The result for homeowners is lower water and water‑heating costs, smoother home performance, and a smaller household carbon footprint. Knowing these benefits helps you choose upgrades that deliver the quickest payback and biggest environmental impact. Water‑efficient upgrades give homeowners three clear advantages: Lower utility bills: Using fewer gallons per use and more efficient water heating cuts monthly costs. Greater resource resilience: Lower household demand eases pressure on local supply and treatment systems. Rebate eligibility: Certified products often qualify for manufacturer, utility, or municipal incentives that reduce upfront costs. The table below compares common appliance categories by their main efficiency trait and typical benefit, so you can weigh options before scheduling an install. Appliance Category Primary Efficiency Attribute Typical Outcome Tankless Water Heater On‑demand heating; no standby loss Lower energy use for water heating; smaller footprint Low‑Flow Toilet Reduced gallons per flush (GPF) Noticeable reduction in indoor water use ENERGY STAR Dishwasher Optimized cycles; lower water per cycle Less hot water use and shorter cycles—saves energy and water High‑Efficiency Washing Machine Lower water per load; higher spin extraction Fewer gallons per load and reduced dryer energy use Use this comparison to focus retrofit choices on devices that fit your household’s routine and budget. Many local homeowners choose a nearby installer to make sure efficiency gains are real and rebates get captured. Frost and Kretsch Plumbing is family‑owned and operated, serving Macomb, Oakland, and Wayne counties with 24/7 emergency service and hands‑on installation support to keep projects code‑compliant and stress‑free. How Do Water‑Efficient Appliances Reduce Utility Bills and Environmental Impact? They save money by cutting the gallons you use and the energy to heat or move that water. They lower environmental impact by reducing demand on treatment plants and shrinking greenhouse gas emissions from water heating. Replacing older fixtures, dishwashers, and washers with ENERGY STAR or WaterSense‑rated models reduces repeat water use and optimizes hot‑water cycles—both of which show up as lower meter readings and smaller seasonal energy bills. Tankless, on‑demand heaters remove standby losses found in tanks, improving efficiency for homes with intermittent hot‑water needs. That’s why picking the right product and getting it installed correctly are essential to achieve the savings you expect. Which Local Rebates and Incentives Support Water‑Efficient Upgrades in Michigan? Federal, state, and utility programs often offer rebates for water‑efficient fixtures and high‑efficiency water heaters—especially when you buy certified models like ENERGY STAR or WaterSense. Qualifying usually requires proof of purchase and installation, and programs may name specific certifications or installer credentials. Check with your utility and local government to find rebates for toilets, dishwashers, washers, and tankless water heaters and to confirm document requirements. Many homeowners find it helpful to work with an installer who already knows the paperwork and product criteria. Frost and Kretsch Plumbing can help identify eligible programs and perform installations that meet rebate documentation standards, assisting homeowners across Macomb, Oakland, and Wayne counties to claim local incentives while ensuring code‑compliant installation and testing. How to Choose the Right Water‑Efficient Appliances for Your Home Start by checking certification labels and understanding key water‑use metrics (gallons per flush, liters or gallons per cycle). Match product features to how your household uses water and to any retrofit limits. Look at energy and water ratings, compare total cost of ownership (not just the sticker price), and confirm plumbing, venting (for heaters), and electrical or gas compatibility. Decide whether smart‑enabled models or built‑in leak detection fit your monitoring goals. And remember: some upgrades are simple retrofits while others—like tankless heaters or irrigation integrations—need more site prep. Checklist for selecting water‑efficient appliances: Confirm certification: Look for ENERGY STAR or WaterSense labels and review the spec sheet for water use per cycle or per flush. Assess compatibility: Verify supply lines, venting, and pressure work with your existing plumbing. Calculate total cost: Compare lifetime energy and water savings against upfront cost and available rebates. Plan installation: Determine if additional plumbing, electrical, or permit work is required. Appliance Attribute to Check What to Check Dishwasher Water/energy rating ENERGY STAR label; gallons per cycle Washing Machine Water factor/efficiency High‑spin extraction; water per load Toilet Gallons per flush WaterSense certification; single or dual‑flush options Water Heater Delivery method Tank vs. tankless; venting and fuel compatibility Following this decision flow helps you narrow choices to models that balance certified efficiency, plumbing compatibility, and rebate potential. If you’d like an on‑site assessment before buying, Frost and Kretsch Plumbing offers local evaluations and installation throughout Macomb, Oakland, and Wayne counties to confirm compatibility and scope. What Features Define ENERGY STAR and WaterSense Certified Appliances? ENERGY STAR and WaterSense certify products that meet strict energy or water‑efficiency standards. ENERGY STAR focuses on energy performance across
Designing Your Kitchen Sink Plumbing Layout
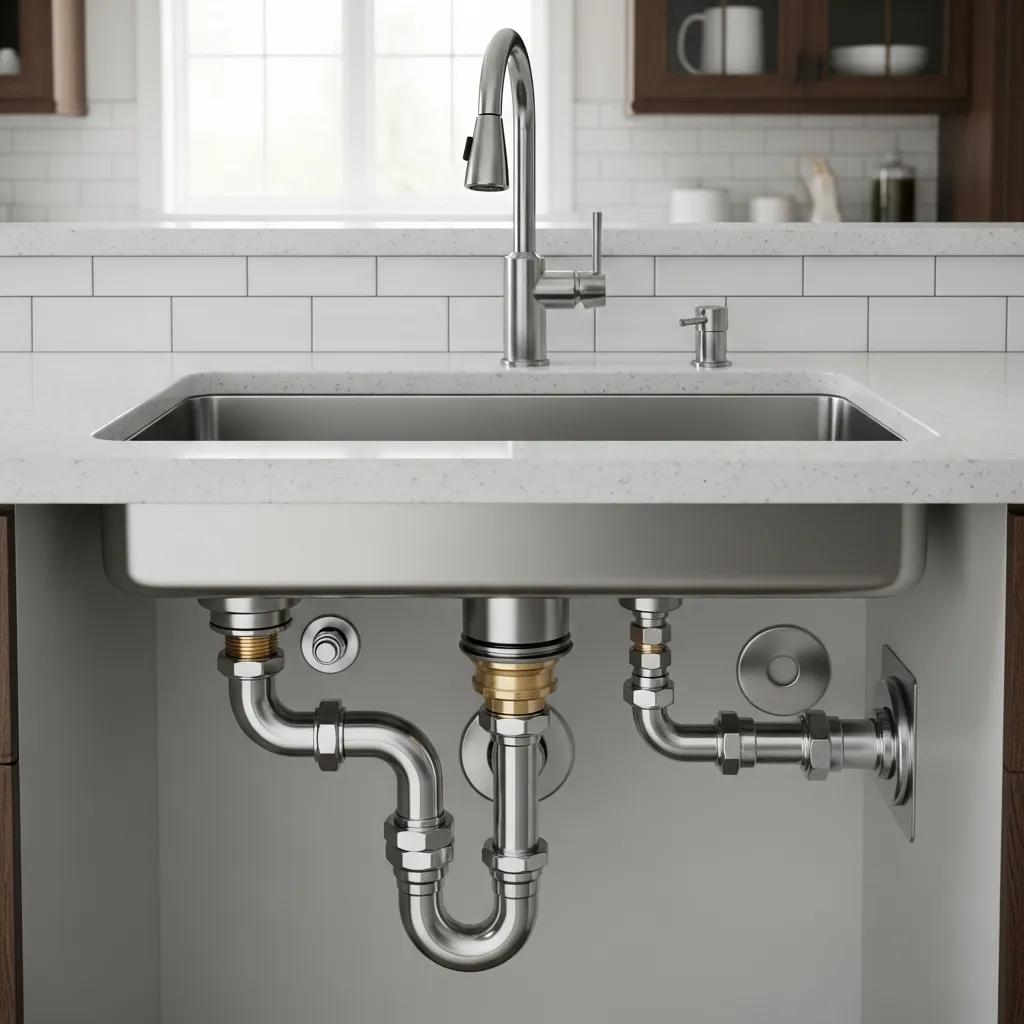
Designing Your Kitchen Sink Plumbing Layout: A Practical Guide to Installation, Diagrams & Costs A kitchen sink plumbing layout is the blueprint for how clean water arrives and wastewater leaves your sink — through the drain, trap, vent, and supply lines. A well-planned layout keeps water flowing, prevents sewer gas from entering your home, avoids stubborn clogs, and makes routine maintenance straightforward. This guide covers the fundamentals: how different sink styles change plumbing needs, a step-by-step installation overview, how to read plumbing diagrams, the main cost drivers, and design choices that lower long‑term maintenance. You’ll get practical dimensions and placement tips for rough‑ins, learn where P‑traps and trap arms sit in relation to vents, and see how adding a garbage disposal or dishwasher affects routing and electrical planning. Clear instructions and diagram notes make this useful for remodels or new builds, and we include local service options if you want a pro to handle the work. What Are the Different Kitchen Sink Types and Their Plumbing Requirements? The sink style you pick controls drain layout, cabinet changes, and venting needs. A single‑basin sink usually needs a straight tailpiece, one P‑trap, and a standard trap arm to a vented drain. Double basins can use a continuous‑waste kit or separate disposals and often need careful trap arm alignment to avoid siphoning. Farmhouse (apron‑front) sinks frequently have offset drains, which can mean longer trap arms and cabinet modifications. Island sinks create venting challenges and commonly rely on either an air admittance valve (AAV) or a remote vent run up through a chase — both affect routing and complexity. The table below summarizes common sink types and typical plumbing implications. Sink Type Typical Drain Configuration Plumbing Considerations Single Basin Sink Single tailpiece to P‑trap Simple layout, easy service access, standard venting Double Basin Sink Continuous‑waste or two disposals May need continuous‑waste kit or dual‑disposal wiring; careful trap arm alignment Farmhouse Sink Offset drain with longer trap arm Often requires cabinet changes and custom tailpiece or adapter Island Sink Remote venting or air admittance valve Needs vertical chase or AAV; plan for electrical and access Knowing these trade‑offs helps decide whether you can reuse existing rough‑ins or must reroute drains and change cabinets. The next section walks through the practical installation steps: measuring rough‑ins, assembling drains, and testing slope and seals. How Does Single Basin Sink Plumbing Differ from Other Types? Single‑basin plumbing is centered on one drain assembly and one P‑trap, which keeps the drain path short and reduces potential trouble spots. The strainer attaches to a tailpiece that drops to the P‑trap; the trap arm then slopes to the branch drain. Single basins pair easily with disposals or open tailpieces and usually avoid offset fittings. They’re a good choice when you want a big, uninterrupted bowl and easier maintenance, though they’re less convenient for multitasking than a double basin. Because the layout is simpler, installations are often quicker and cheaper. Adding a disposal or using a dishwasher knockout still requires electrical planning and proper knockouts, but for many retrofit projects a single basin is the most straightforward option when cabinet and rough‑in locations are fixed. What Are the Plumbing Considerations for Double Basin and Farmhouse Sinks? Double basins require a method to combine both drains: a continuous‑waste fitting ties the two bowls to one trap, while dual‑disposal setups mean extra wiring and possibly a larger drain path. Farmhouse sinks complicate matters because the drain can be offset from the cabinet center, so you may need longer trap arms, custom tailpieces, and cabinet reinforcement. In both cases it’s essential to keep proper slope and trap arm length to the vent to preserve the trap seal and prevent siphoning. Continuous‑waste connections simplify venting and reduce odor risk, while dual disposals offer processing at each bowl at the cost of added electrical work. Plan for cabinet access and future serviceability when choosing assemblies and offset solutions. How To Plumb a Kitchen Sink: Step-by-Step Installation Process Installing a kitchen sink includes confirming the rough‑in, fitting the drain and P‑trap, routing vents, connecting supply lines, and testing for leaks and proper flow. Start by checking rough‑in locations, mark the drain centerline, and place shut‑off valves so faucet hoses reach without strain. Install the strainer and tailpiece, assemble the P‑trap ensuring the trap arm slopes correctly, and tie into the vented branch. Finish by connecting hot and cold supplies to shut‑offs, secure flexible connectors, then run water and inspect all joints and the trap seal. Use this checklist to keep the work in order: Verify rough‑in and fixture alignment: Confirm sink centerline, cabinet framing, and room for the trap and disposal. Install sink strainer and tailpiece: Use plumber’s putty or the supplied gaskets per manufacturer directions for a watertight seal. Assemble drain and P‑trap: Maintain trap arm slope (1/4″ per foot) toward the drain and orient the trap to the vent. Connect supply lines and shut‑offs: Attach flexible hoses to shut‑offs and faucet inlets, and check for kinks or tension. Test system: Run water, operate the disposal if present, and inspect all joints for leaks and proper venting. In short: accurate rough‑in layout and correct trap and vent placement determine long‑term performance. If you prefer a licensed pro, Frost and Kretsch Plumbing handles sink and faucet installs, emergency repairs, and more complex venting or electrical work. Call (586) 675-0097, (248) 600-0426, or (313) 881-2818 to schedule service or get an estimate. Knowing when to hire a pro reduces code risks and preserves warranties. What Are the Essential Plumbing Components for Kitchen Sink Installation? Key components include the sink strainer, tailpiece, P‑trap, trap arm, branch drain, vent, supply lines, shut‑off valves, and the disposal flange if you’re installing a garbage disposal. The strainer keeps debris out and provides the threaded connection for the tailpiece; the tailpiece feeds the P‑trap, which holds a water seal to block sewer gas. Trap arms must slope correctly and tie into a vented branch to prevent siphoning. Supply lines and shut‑offs deliver hot and
Challenges of Plumbing for an Island Sink
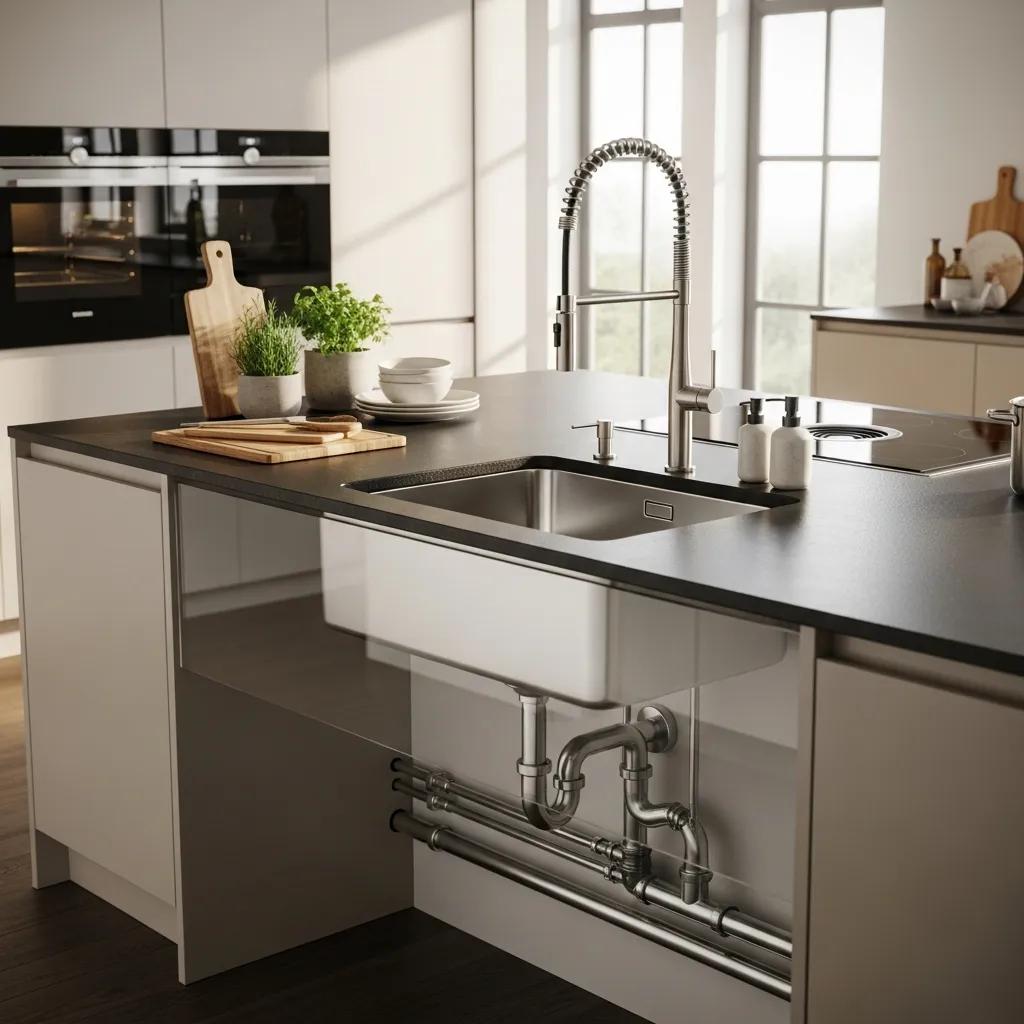
Island Sink Plumbing: Common Challenges and Practical Venting Solutions Island sinks—those placed on a freestanding kitchen island with no nearby exterior or interior wall—bring plumbing challenges that differ from standard wall-mounted sinks. Without an adjacent wall to carry a vent stack and with longer, often hidden drain runs, island sinks are more likely to suffer trap siphonage, slow drains, and tricky routing through floors and cabinets. This guide explains why venting and drainage are harder for island sinks, lays out practical venting options like loop vents and air admittance valves (AAVs), and links common problems to clear professional fixes. You’ll also get a concise overview of relevant Michigan code considerations and the cost factors to expect when planning an installation or repair. If you live in Macomb, Oakland, or Wayne counties, we include local guidance and advise when it’s time to call a licensed plumber for an on-site evaluation. What Are the Unique Plumbing Challenges of an Island Sink? Because an island sink can’t tie into a nearby wall vent, it often needs longer trap arms and concealed routing through the floor or island cabinet. Those constraints raise the risk of trap siphonage—which causes gurgling, sewer odors, and a lost trap seal—and make it harder to meet vent height and slope rules during installation. What may seem like a simple sink swap can turn into a multi-trade job requiring carpentry, subfloor access, or creative venting. Planning routing and venting early in the project saves time and money and ensures disposals, P-traps, and trap arms are installed correctly. With those challenges understood, you can evaluate the venting options that follow. Island sink plumbing differs from wall-mounted sinks in both physical layout and inspection requirements; the next section compares those differences to set up venting choices. How Does Island Sink Plumbing Differ from Traditional Sink Installations? The key differences are routing, vent access, and trap-arm length—all of which affect how complicated and reliable the installation will be. A wall sink usually ties into a nearby vertical vent with minimal piping, while an island sink may require a long horizontal trap arm that must keep the correct pitch and avoid creating an illegal S-trap. Longer trap arms increase the chance of slow drainage and need careful slope (commonly 1/4 inch per foot) to prevent standing water and buildup. These layout issues also change inspection points and can create the need for access panels or floor openings, which adds labor and coordination with other trades. Knowing these contrasts helps homeowners weigh less invasive options like AAVs against more robust solutions such as loop vents. Those physical differences explain why venting matters; the next section covers the mechanics of venting and how it stops common symptoms. Why Is Proper Venting Critical for Island Sink Functionality? Venting keeps the trap full of water, balances pressure in the drain-waste-vent (DWV) system, and stops siphonage that can pull water out of a P-trap and let sewer gas into the home. Vents admit air to equalize pressure when water flows—think of how a straw lets air into a bottle so the liquid can pour smoothly. Without a vent, negative pressure can pull the trap dry and cause gurgling or odors. Choosing a vent approach—loop vent, wet vent, or an air admittance device—helps protect the trap seal under real-world conditions like garbage-disposal use or heavy flows. With vent mechanics understood, you can evaluate the specific venting methods suitable for island sinks. How Do You Effectively Vent an Island Sink? Effective venting depends on available space, local code acceptance, and whether you can reach existing vents without creating prohibited trap configurations. Common approaches are a loop vent (Chicago loop), an air admittance valve (AAV), tying into a legal wet vent, or extending a vent stack through the floor and up to the roof. Each option has trade-offs: loop vents avoid mechanical parts but can be invasive to install; AAVs are easier to fit under a cabinet but may be restricted by local code and need future access. Key considerations include whether the island can accommodate a vertical rise above the sink flood rim for a loop, whether an AAV location will stay accessible and dry, and how local inspectors interpret Michigan code or municipal amendments. For complex venting that requires routing through floors or ceilings, we recommend a professional evaluation—licensed contractors can verify compliance and install loop vents or AAVs where allowed. Contact Frost and Kretsch Plumbing for an on-site assessment and a clear plan. Before comparing vent types, the next section explains what a loop vent is and how it works on an island. What Is a Loop Vent and How Does It Work for Island Sinks? A loop vent—often called a Chicago loop—runs the drain horizontally from the island, rises above the sink’s flood rim inside the island or cabinet, then returns to tie into a main vent or stack. By rising above the flood level and then dropping back, the loop lets the trap arm see atmospheric pressure and prevents siphonage without a direct vertical vent through the island’s face. Installing a loop vent requires space inside the island or chase and may mean cutting access panels or routing through joists to reach the vent stack. Loop vents are passive and require little maintenance once done, but they demand precise layout and skilled installation to meet slope and clearance rules. Knowing how loop vents function helps you decide if they’re preferable to mechanical AAVs in your layout. Next we’ll look at AAVs as an alternative venting option. Can Air Admittance Valves Solve Island Sink Venting Issues? Air admittance valves (AAVs) are one-way mechanical vents that admit air into the DWV system when negative pressure occurs, preventing trap siphonage while sealing against sewer gas under normal or positive pressure. AAVs work well for islands because they can sit under the sink and avoid running a vent through the island structure, which reduces invasive routing and cost. Limitations: some local codes restrict AAV use, they’re mechanical with a finite
Guide to Shower Pan Installation & Waterproofing
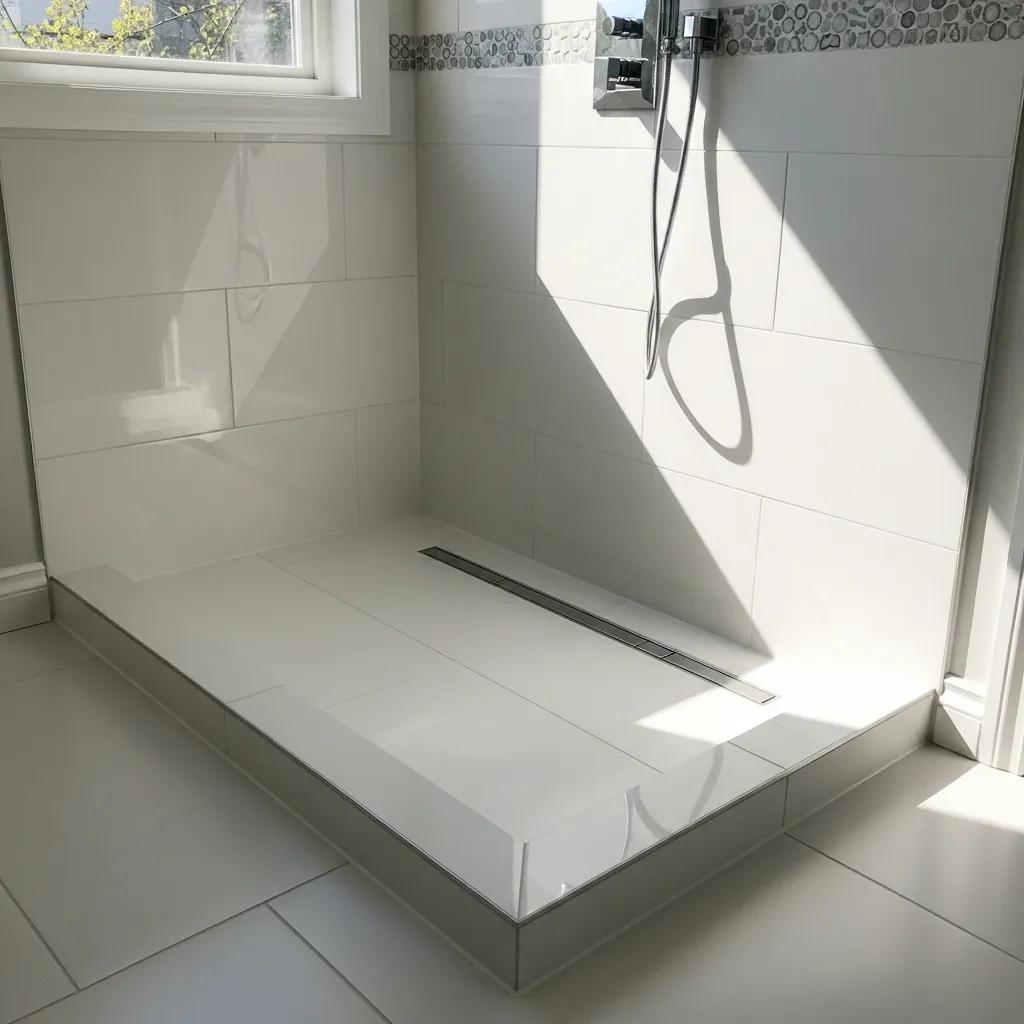
Shower Pan Installation & Waterproofing: A Michigan Homeowner’s Guide to Costs, Methods, and Local Services The shower pan is the waterproof base under your shower that channels water to the drain. Waterproofing is the set of layers and details that keep moisture away from framing and subfloors. Done right, a proper pan and a solid waterproofing system stop leaks, reduce mold risk, and prevent expensive structural damage. Before you remodel, it helps to understand pan types, membrane choices, and the trade-offs installers face. This guide walks through common shower pan options, waterproofing methods, realistic cost drivers in Michigan, typical failure modes and repairs, and when you should call in a pro. You’ll learn how prefab pans stack up against mortar-bed tile bases, which membranes work best for different substrates, a pre-tile waterproofing checklist, and how features like curbless or linear drains affect complexity and price. Practical inspection steps and repair paths are included so you can spot slow drainage or leak signs and decide between a spot fix or a full replacement. Finally, we explain how a local plumbing company can simplify permits, testing, and long-term protection for projects across Macomb, Oakland, and Wayne counties. What Are the Different Types of Shower Pans and Their Benefits? A shower pan is the finished drainage surface designed to send water to the drain. Common types include prefabricated acrylic or fiberglass pans, mortar-bed (pre-sloped) tile bases, and curbless systems that combine slope and threshold for easier access. Each option balances install ease, design flexibility, durability, and waterproofing approach differently, so your choice depends on budget, tile style, and accessibility needs. Knowing how each pan is built also clarifies the waterproofing required — for example, prefab pans give a finished surface but need careful drain flange sealing, while mortar beds typically use liners or bonded membranes and demand precise slope control. The table below summarizes common pan types and where they work best to help you compare quickly. Pan Type Material / Ease of Install Durability / Maintenance Best Use Prefabricated shower pan Acrylic or fiberglass / Quick install Moderate; surface repairs possible Smaller remodels or fast updates Mortar-bed (custom tile base) Pre-sloped mortar / Labor-heavy High; requires tile upkeep Full remodels and custom tile work Shower pan liner system PVC/CPE liner under mortar / Moderate Very durable if installed correctly Traditional builds where redundancy is wanted Curbless (zero-threshold) pan Mortar + linear drain / Complex High when slope and drain are correct Accessible bathrooms and modern designs Pre-sloped manufactured pans Factory-sloped panels / Moderate Reliable slope, less onsite labor Mid-range remodels, tile-ready bases This side-by-side helps you see how material choices affect install workflow and long-term upkeep, and it leads into a closer look at prefabricated pans versus custom tile bases to help you pick the right path for your project. How Do Prefabricated Shower Pans Compare to Custom Tile Bases? Prefabricated pans arrive as a single-piece or modular unit in acrylic or fiberglass and give you a finished, water-shedding surface with little onsite shaping. They’re attached to the subfloor and rely on a properly sealed drain flange, which speeds installation and cuts labor. A mortar-bed tile base is built on site: installers form a pre-slope, set a liner or bonded membrane, then place the mortar bed and tile. That method gives complete design freedom but needs more skill to ensure slope and watertight connections. Prefab pans offer faster turnaround and consistent factory quality; custom tile bases deliver design flexibility and, when waterproofed correctly, long-term durability. When choosing, weigh tile preference, maintenance expectations, and accessibility — curbless tile floors often need custom mortar work to get slope and drainage right. What Are the Features of Curbless Shower Pans for Modern Bathrooms? Curbless shower pans remove the raised curb for a seamless floor transition, using a carefully sloped substrate and a well-placed linear or point drain to keep water moving. This approach improves accessibility and gives a clean, modern look. It depends on tight slope tolerances — commonly 1/4 inch per foot or a manufacturer’s spec — and on waterproofing that extends beyond the pan to protect nearby floors and framing. Drain choice matters: linear drains allow one-directional slope and work well with long-format tile, while point drains need a radial or multi-plane slope toward the center. Because curbless installs require advanced detailing at thresholds and wall junctions to prevent lateral water migration, experienced planning and installers are strongly recommended for reliable long-term performance. How Do You Properly Waterproof a Shower Pan Before Tiling? Effective shower pan waterproofing starts with a clean, stable substrate, the right membrane, correct drain flashing, and testing before tile goes down — that combination keeps moisture out of structural elements and prevents leaks and mold. Waterproofing creates a continuous barrier: sheet membranes, liquid-applied membranes, or liners under a mortar bed that tie into a properly flashed drain flange and extend up the walls. Trade-offs include ease of detailing (liquid membranes conform to odd shapes) versus seam reliability (sheet membranes have uniform thickness), plus cure or dry times that affect scheduling. The table below outlines common methods, their pros and cons, typical uses, and realistic cure times so you can pick the system that fits your substrate and tile choice. Waterproofing Method Pros / Cons Typical Use Typical Cure Time Liquid-applied membrane Pros: seamless, great for corners. Cons: needs correct thickness Tile over cement board or mortar beds 24–48 hours depending on product Sheet membrane (bonded) Pros: consistent thickness, faster install. Cons: seams need careful work Direct tile over membrane or mortar beds Some bonded systems allow immediate tile — confirm product specs Shower pan liner (PVC/CPE) Pros: reliable backup under mortar. Cons: sits hidden unless tested Traditional mortar-bed setups Not a tile-bonding surface; follow mortar cure times above These comparisons make it easier to choose the right system for new construction, full remodels, or quick retrofits. Below is a practical, pre-tile waterproofing checklist you can use on-site. Inspect and prepare the substrate — the subfloor must be rigid
Key Considerations for Bathroom Plumbing Layout
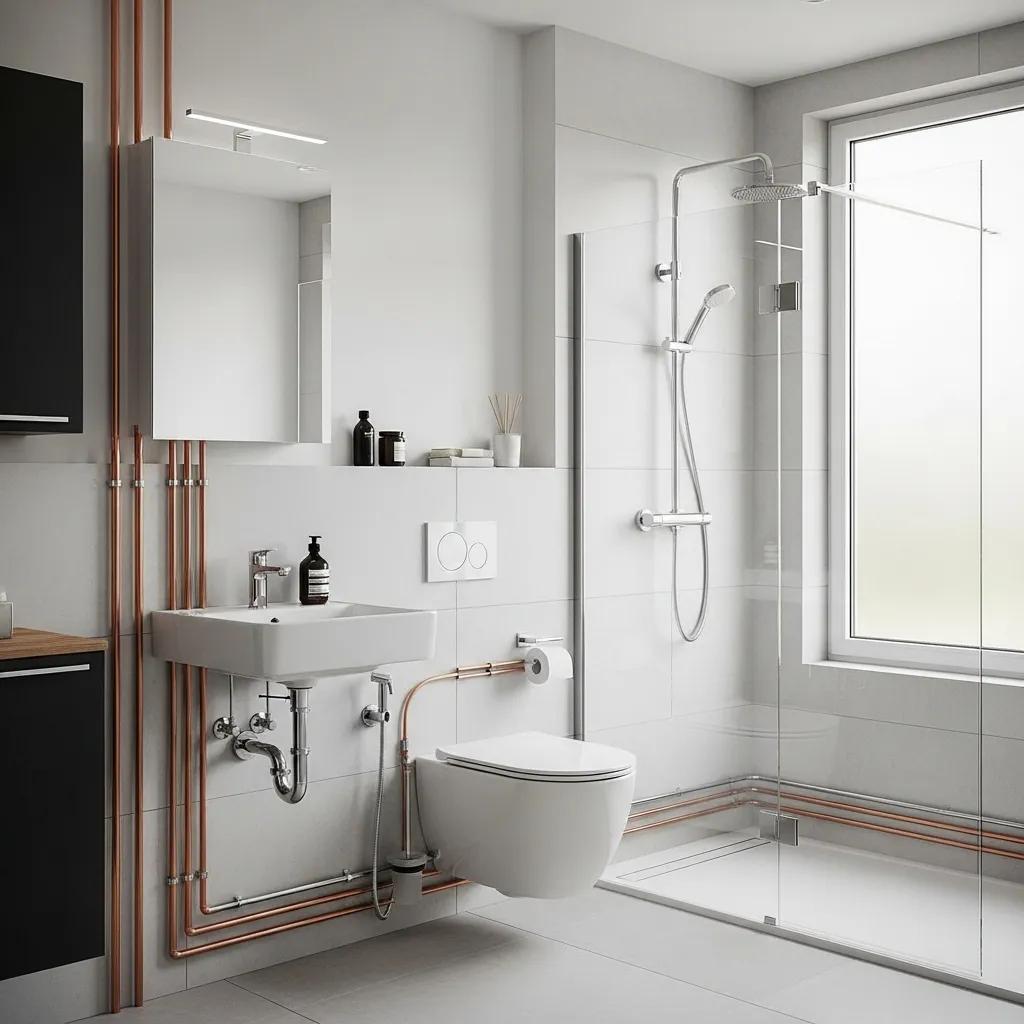
Bathroom Plumbing Layout: Essential Design and Installation Considerations A bathroom plumbing layout determines how water supply, waste lines, and vents are routed to serve toilets, sinks, showers and tubs. Getting the layout right up front prevents leaks, keeps drains reliable, meets code, and avoids pricey rework once finishes go in. This guide breaks down the core layout elements, typical rough‑in measurements, venting and drainage basics, material choices, cost drivers, and practical tips for small bathrooms — with local permitting notes for Macomb, Oakland and Wayne counties. You’ll find standard rough‑in dimensions, a plain explanation of how vents and P‑traps protect the system, guidance on common piping options for remodels, and what to expect when moving fixtures so you can budget and schedule accordingly. Each section includes concise checklists and clear steps to verify measurements before finishing. Planning a remodel or new build? Use this resource to coordinate trades, avoid common mistakes, and know when to call a licensed residential plumber. What Are the Fundamental Elements of an Optimal Bathroom Plumbing Layout? An effective plumbing layout balances fixture placement, water supply and waste routing, venting, maintenance access, and shutoff locations so the system works reliably and is easy to service. These parts work together: supply piping delivers water, drain piping removes waste, vents protect trap seals, and access panels or cleanouts let technicians clear problems without demolition. Prioritizing fixture clearances and correct center‑to‑center dimensions prevents interference, preserves ergonomics, and keeps the installation compliant. Early rough‑in planning sets the centerlines and heights that determine cabinet fit, tile patterns and final fixture positioning. Fixture locations with centerline measurements and minimum clearances to walls and nearby fixtures. Water supply routing with shutoff valves positioned for easy service at each fixture. Drain and vent routing sized and sloped to code to promote self‑clearing flow. Accessible cleanouts and access panels on main lines and branch drains to simplify maintenance. These basics form the foundation for the fixture rough‑ins and venting rules that follow. Accurate early layouts minimize surprises during finish work and make coordination with carpenters and tile contractors much smoother. Which Plumbing Fixtures Require Special Placement and Rough-In Dimensions? Fixture placement follows standard rough‑in measurements so plumbing lines line up with cabinets and fixtures. Toilets use a center‑to‑wall rough‑in, vanities need drain centerline height and supply spacing that clear the cabinet interior and allow a P‑trap, and showers and tubs require specific drain locations and valve heights plus proper pan slope. Keeping standard tolerances in mind prevents mid‑project changes that can lead to demolition or compromised fixture choices. Common rough‑in reference points (planning examples): Toilet: centerline to finished wall commonly 12 inches; verify per fixture spec. Sink/Vanity: drain centerline typically 18–20 inches from finished wall and 16–20 inches above finished floor to fit cabinet traps. Shower: drain centered in stall or offset per pan design; valve commonly 36–48 inches above floor depending on trim and accessibility. Bathtub: drain and overflow positions follow the tub manufacturer’s specifications; ensure routing for waste and supply is clear. These manufacturer standards are starting points — always confirm with your chosen fixtures and a licensed plumber before installing drywall, backer board or tile to avoid mismatches and stay code‑compliant. How Does Proper Fixture Placement Enhance Bathroom Functionality and Compliance? Thoughtful fixture placement optimizes circulation, safety and access for maintenance while ensuring the layout meets local clearance and accessibility rules. Placing fixtures with recommended clearances preserves comfort and keeps control valves and shutoffs reachable for routine service. Correct placement reduces trap seal problems, improves drainage performance, and makes future fixture swaps possible without invasive work. In remodels, keeping existing rough‑ins where practical saves cost and time; when relocation delivers a better layout, do it with coordinated planning. Poor placement often leads to cramped clearances, blocked access panels and noncompliant layouts that trigger permit corrections. Good placement anticipates maintenance tasks and aligns plumbing with cabinetry and electrical work. That forward planning lowers long‑term ownership costs and makes future upgrades — for example changing from a single vanity to a double — far simpler. Fixture Required Rough-In Notes Toilet Centerline to finished wall (common: 12 in) Verify fixture spec; ADA and comfort‑height models can alter requirements Sink/Vanity Drain centerline height and horizontal offset for cabinet depth Allow space for P‑trap and shutoffs inside the cabinet Shower Drain center position and valve height relative to curb or curbless entry Slope to drain minimum 1/4″ per foot; allow valve access for servicing Bathtub Drain and overflow aligned to tub manufacturer dimensions Check floor framing and chase access when relocating drains This comparison clarifies each fixture’s basic needs so you can match chosen products to the rough‑in plan before finishes go in and avoid costly corrections when fixtures arrive on site. How Do Plumbing Rough-In Dimensions Impact Bathroom Design and Installation? “Rough‑in” refers to the initial placement of supply and waste connections that determine where fixtures will sit and how finishes are installed. Rough‑ins set horizontal centerlines and vertical heights for drains and supplies; they affect cabinet layout, tile runs and whether standard fixtures fit without modification. Accurate rough‑ins let finish trades proceed confidently and prevent late‑stage moves like relocating a toilet flange or shower drain after tile is laid. Standard rough‑in examples help crews coordinate on site: Toilet: Standard center‑to‑wall rough‑in is commonly 12 inches; 10 or 14 inches are used for some models. Sink/Vanity: Drain and supply centered to fit the vanity cabinet and allow trap clearance. Shower/Tub: Drain location and valve set to accommodate pan slope and trim placement. Verifying rough‑ins before finishing saves time and money and keeps designers and installers aligned. Licensed plumbers use layout diagrams and measurement checkpoints; schedule a professional check before drywall, backer board or tile to reduce the risk of rework and to meet local permitting expectations. What Are Standard Rough-In Measurements for Common Bathroom Fixtures? Standard rough‑ins are industry norms most manufacturers design around, but always double‑check each fixture’s technical specs. Toilets commonly use a 12‑inch centerline from the finished wall, though 10‑ or 14‑inch
Key Factors Affecting Plumbing Repair Prices
Understanding What Drives Plumbing Repair Prices: Clear, Local Cost Guidance for Michigan Homeowners and Businesses Plumbing repair bills are built from several moving parts. Knowing what those parts are helps homeowners and businesses avoid surprises and plan a realistic budget. This guide breaks down the core pieces that make up plumbing costs—labor, parts and materials, job complexity, emergency response, permits, and local logistics—with a focus on Macomb, Oakland, and Wayne counties in Michigan. You’ll learn how technician experience and specialty equipment affect price, why access or excavation increases cost, and when emergency work comes with a premium. We’ll compare minor and major repairs, show typical parts price ranges, explain permit considerations, and describe how project-based pricing reduces uncertainty. Finally, we’ll explain how Frost and Kretsch Plumbing brings value with upfront estimates, a 100 percent satisfaction guarantee, licensed and insured technicians, and 24/7 emergency service. First we define the pricing components, then we walk through complexity, emergency impacts, location effects, company pricing practices, and common customer questions to help you plan your next repair. What Are the Core Components of Plumbing Repair Pricing? Plumbing repair pricing adds together several clear components. Choices in one area—like upgrading parts—can change labor needs and timing. In practical terms, price reflects technician time and skill, parts and material costs and availability, the job’s technical complexity and scope, any after‑hours or emergency premium, permit and inspection needs, and specialized equipment or restoration after access. Knowing these elements makes it easier to compare estimates and decide between project-based and hourly bids. Below is a quick list of the main pricing drivers for easy reference. Labor and expertise: technician skill, diagnostic time, and on-site hours make up a large share of the bill. Parts and materials: brand, warranty, and availability affect cost and long-term reliability. Complexity and scope: a single fixture fix costs far less than a system replacement or repipe. Emergency and urgency: after-hours calls, travel, and expedited parts can add surcharges. Permits and local regulations: inspections and paperwork add time and line items. Equipment and access: camera inspections, hydro-jetting, and excavation carry specialized charges. Below is a quick-reference parts cost table to show how prices vary by part and quality. These plumbing parts price ranges are intended as quick references; brand choice and local supply affect actual costs. Part / Component Typical price range Notes on quality/impact Faucet cartridge / valve $75–$250 OEM versus aftermarket affects lifespan and warranty Toilet fill/flush assembly $50–$220 Water-saving and dual-flush models typically cost more Section of copper / PEX pipe (fitting included) $30–$150 Material and pipe diameter change the price Water heater dip tube / element $90–$350 Brand and tank capacity are major cost factors Sump pump (basic) $150–$600 Submersible vs. pedestal and pump capacity affect price That table shows how parts affect the total price and why selecting certain brands or materials often changes the work and time required. Next, let’s look at how labor and expertise shape overall cost estimates. How Does Labor and Expertise Influence Plumbing Repair Costs? Labor and expertise set the baseline for price and also affect repair speed and quality. Licensed, insured technicians bring training, diagnostic methods, and the authority to perform code-related work. Senior techs and master plumbers can pinpoint root causes faster and often prevent repeat visits, but their time comes at a higher rate—usually a better investment over the long run. Diagnostic tasks—camera inspections, pressure testing, tracing—add billable hours, and jobs that require coordination with other trades extend labor costs. Project-based pricing often bundles expected labor into a clear estimate, which helps avoid surprises compared with open-ended hourly billing. That leads into parts and materials, where the choices you make affect both upfront cost and future maintenance. What Role Do Parts and Materials Play in Pricing? Parts and materials affect the immediate line-item cost and the repair’s long-term durability. Higher-grade components usually last longer and come with stronger warranties, but they raise the upfront price. Availability matters too: common parts stocked on-service trucks are cheaper to replace immediately, while specialty valves or branded elements may need to be ordered, adding lead time and procurement fees. Choosing better parts often reduces repeat service calls and shifts the conversation from short-term cost to life-cycle value. The parts table above shows typical ranges and how choices create variability. When parts are special-order or supply-limited, projects can expand in scope and scheduling, which leads into how job complexity drives cost. How Does the Complexity and Scope of Repairs Affect Plumbing Costs? Complexity and scope increase costs because larger or more technical jobs need more labor, special equipment, and often permit coordination. A small fixture repair focuses on a single access point, but whole-house repiping or sewer replacement involves material staging, excavation, and multi‑day crews—everything that raises both direct and indirect costs. Tools like camera inspection systems, hydro-jetters, and excavation equipment are capital investments that get passed to the project when required. Early diagnostic work and clear scope mapping help homeowners choose between temporary fixes and long-term repairs that lower lifecycle costs. Below is a comparison table outlining how minor and major repairs differ in labor time and typical complexity indicators. Use this table to compare repair types and set expectations for labor and complexity. Repair Type Typical labor time Typical complexity indicators Minor fixture repair 1–3 hours Single-access point, few parts, no excavation Medium repair (valve or localized pipe section) Half day–1 day May require cutting, small section replacement, limited access work Major repair (repiping or sewer line) Multiple days–week Excavation, multi-trade coordination, permit/inspection required This comparison explains why a small faucet fix is relatively affordable while major system work scales quickly. Next we’ll cover the practical differences between minor and major repairs. What Are the Differences Between Minor and Major Plumbing Repairs? Minor repairs usually involve one fixture or a short pipe segment. They require limited diagnostics, common parts, and often finish the same day—keeping labor and parts costs low. Major repairs—like sewer line replacement or whole-house repiping—need longer labor, heavier equipment, excavation,
What to Expect for Emergency Plumbing Costs
What to Expect for Emergency Plumbing Costs: Your Practical Guide to 24/7 Urgent-Repair Pricing Emergency plumbing covers sudden, dangerous failures — burst pipes, major leaks, sewer backups, and failing water heaters — that need immediate attention to prevent property damage and health risks. Knowing likely costs ahead of time matters: the right information helps you act fast without facing surprise fees. This guide explains how emergency plumber cost and after hours plumbing price are usually built, so you can call with confidence. You’ll learn the main cost drivers, how time of day and location change urgent repair cost, typical price ranges for common emergencies, and simple steps homeowners can take to reduce the chance of a costly call-out. The article walks through core cost factors with a quick reference table, how after-hours/weekend/holiday fees affect pricing, service-specific ranges, regional notes for Macomb, Oakland, and Wayne Counties (Michigan), transparent company practices, and prevention tips to lower long-term expenses. Keywords like emergency plumbing cost, emergency call out fee, and after hours plumbing price appear naturally to help you find the right answers fast during an urgent repair. What Are the Key Factors Influencing Emergency Plumbing Costs? Emergency plumbing prices come down to a few core elements: the call-out or diagnostic fee, whether labor is billed hourly or at a flat rate, parts and materials, how hard the repair is to access, and time-of-day or travel surcharges. These pieces interact — a hard-to-reach pipe adds labor hours and often extra parts, which raises the urgent repair cost. Knowing each factor helps you ask the right questions when you call an emergency plumber and avoids surprises on the final invoice. The table below sums up how each factor typically affects price so you can scan impact and practical tips at a glance. Cost Factor Typical Impact on Price Practical Note Call-out / Diagnostic Fee $50–$150 applied to initial visit Often credited to the final bill if repairs are done the same visit Labor (hourly vs flat) Hourly rates increase total with time; flat rates cap some jobs Confirm billing model before work begins Parts & Materials Variable — minor fittings to full pipe replacement Ask for parts pricing and options Time-of-day (after-hours) 20–100% surcharge common during nights/holidays Request the surcharge percentage up front Travel / Location Adds to cost with long dispatch distances Confirm the service area and any travel fees This quick-reference table makes it easy to see which items move emergency costs most and gives actionable tips — like asking for parts estimates and checking whether the diagnostic fee applies to the job total. Use this short checklist to prioritize questions when you call: Is there a diagnostic or call-out fee, and will it be applied to the final bill? Are you billing hourly or at a flat rate, and what’s a realistic time estimate? What do parts cost and is there any warranty or guarantee on the work? These three questions cut uncertainty, set expectations before the tech arrives, and reduce the chance of billing disputes. How Do Call-Out Fees and Diagnostic Charges Affect Pricing? Call-out and diagnostic charges cover travel time and the technician’s initial assessment. They’re usually lower during business hours and higher for after-hours or emergency dispatch. The diagnostic helps pinpoint whether the issue is a simple fixture clog or a larger sewer problem — which then determines whether you get a flat repair quote or an hourly estimate. Many companies credit the diagnostic fee toward the final invoice if the repair is completed on the same visit; other times it remains separate, especially if triage requires a return visit. Be sure to ask whether the diagnostic fee will be deducted from the repair cost and request a brief written estimate so you know how that call-out charge will be handled before any work starts. Also note that a full camera inspection or excavation raises costs considerably compared with a visual check. Knowing the diagnostic scope helps you decide between an immediate repair and staged fixes to control upfront spending. What Is the Difference Between Hourly Rates and Flat Rates? Hourly billing charges for each hour the technician works plus parts. Flat rates give a single price for a defined repair. Each has pros and cons. Hourly is transparent when scope is unknown or secondary issues may appear, but it can be unpredictable if work runs long. Flat rates offer cost certainty for common, well-understood jobs but may exclude unforeseen complications. When you call, confirm whether the advertised emergency plumber cost is hourly or flat and ask for an estimated time or capped price to reduce the risk of a large final bill. Ask for examples of typical durations and what counts as an extra line item so you can decide whether to authorize immediate repairs or schedule follow-up work during regular hours. Which model you’re offered can change by time of day — so check billing rules along with arrival time and surcharges. How Do After-Hours, Weekend, and Holiday Fees Impact Emergency Plumbing Prices? Timing often raises emergency plumbing prices. After-hours, weekend, and holiday calls usually incur a surcharge to reflect technician availability and urgency; the amount varies by provider and region. Surcharges may be a percentage (e.g., 25–100% of base labor) or a higher flat call-out fee for nights and holidays. Some companies add modest surcharges, while others keep the call-out fee steady but increase hourly labor rates. Before you authorize work, ask whether the after hours plumbing price is a fixed surcharge or a higher hourly rate, and whether parts or other service items carry extra premiums during off-hours. To confirm costs quickly with an on-call dispatcher, ask: Is there an after-hours surcharge and what amount or percentage will I be charged? Does the diagnostic/call-out fee change for nights, weekends, or holidays? Is the quoted price hourly or a flat emergency rate, and can I get a written estimate? Those three questions give immediate clarity and make it easier to compare providers; they also prevent
Benefits of Smart Leak Detectors for Your Home
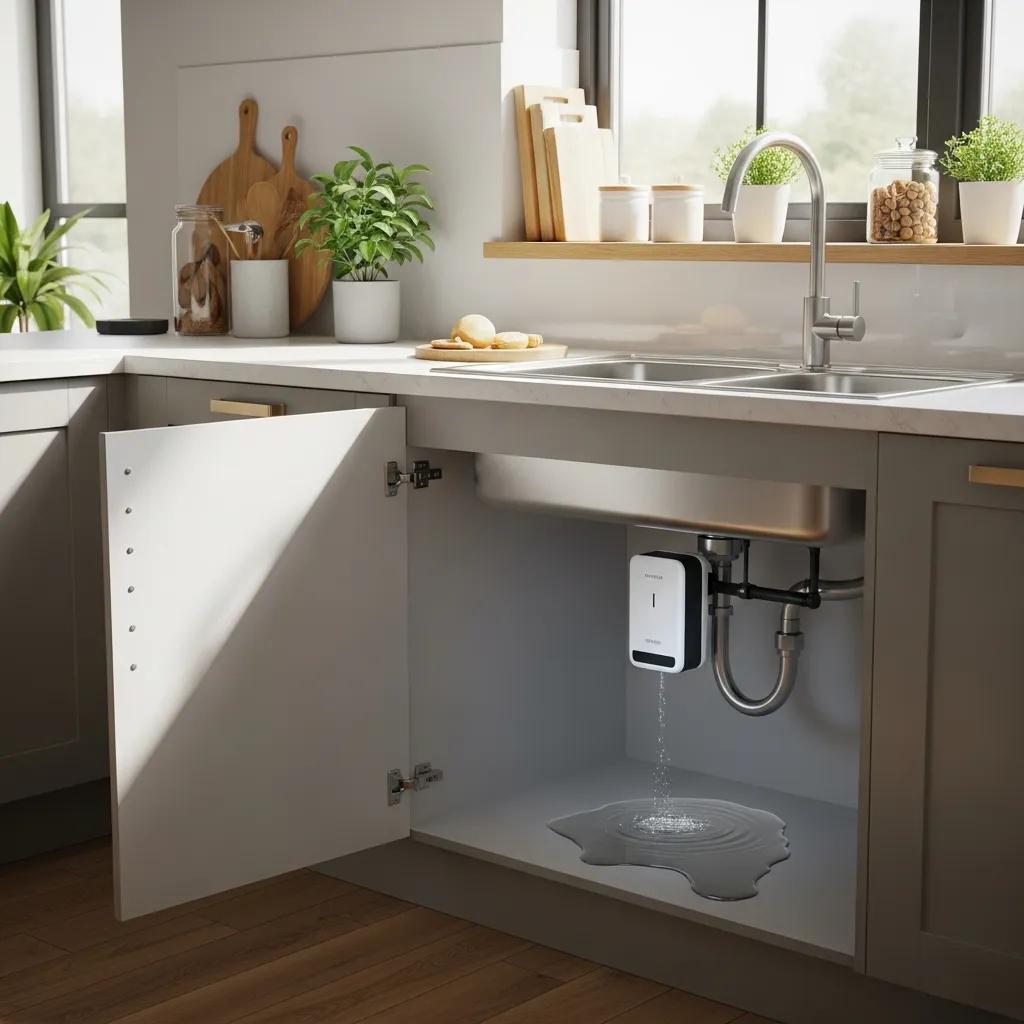
Benefits of Smart Leak Detectors for Your Home: Protect, Save, and Monitor with Confidence Smart leak detectors are compact sensors and monitoring systems that notice water where it shouldn’t be, send instant alerts, and can even trigger automatic actions to stop leaks before they cause big damage. These systems pair sensors with a gateway or hub and a smartphone app so you get early warnings, lower repair costs, and the ability to check your plumbing from anywhere. This guide walks through how leak detectors work, the main device types (point-of-use sensors, whole-home monitoring, and automatic shut-off valves), and practical tips for installation and smart-home integration. You’ll learn how these devices prevent expensive water damage, which solutions suit different homes, when a pro improves results, and where to place and maintain devices for the best protection. We also include comparison tables, clear checklists, and real-world scenarios to help you decide whether a Wi‑Fi leak detector, smart water sensor, or full shut-off system is right for your house — and when to call a licensed plumber. Why Are Smart Leak Detectors Essential for Homeowners? Smart leak detectors give continuous, automated monitoring that spots problems early, notifies you right away, and can trigger steps to limit damage. A leak sensor senses moisture or unusual flow and communicates over Wi‑Fi or a hub to push alerts to your phone — cutting the time between a leak starting and someone responding. That early warning means less structural harm, lower repair bills, and less wasted water. Remote monitoring is especially valuable for people who travel, own rentals, or manage multiple properties. Knowing these benefits helps you decide where to put sensors and whether to choose localized devices or whole‑home monitoring. The next section explains how detection and alert workflows turn a potential disaster into a manageable event. How Do Smart Leak Detectors Prevent Costly Water Damage? Smart leak detectors stop big repairs by sensing moisture, pooled water, or abnormal flow and then alerting you or closing an automatic shut‑off valve. Sensors placed under sinks, near water heaters, and by washing machines pick up early signs of failure and report to a gateway or app so you — or an automated system — can act fast. Stopping a leak within minutes often prevents materials from saturating, reduces mold risk, and saves finishes and framing. Typical response flows move from detection to notification to remediation, which cuts cleanup time and repair scope compared with finding a leak days or weeks later. Clear placement and a simple response plan make these systems much more effective. Can Smart Leak Detectors Help Reduce Water Bills and Insurance Premiums? Yes. Smart leak detectors help lower water bills by identifying slow leaks and continuous flows that quietly waste water for weeks or months. Flow‑based systems and point sensors both flag unusual use so you can fix problems quickly. Some insurers offer discounts or incentives when homeowners install whole‑home monitoring or automatic shut‑offs and can provide documentation. Tracking normal usage patterns in an app also highlights inefficiencies so you can change habits and save over time. Keeping clear records of installations and alerts strengthens your case when talking to an insurance company about discounts or claims. Benefit How it Works Real-world Impact Early damage detection Sensors spot moisture or abnormal flow and send alerts Smaller repairs; mold prevention Water waste reduction Flow monitoring and point sensors reveal slow leaks Lower monthly water bills from timely fixes Remote monitoring Smartphone apps and cloud alerts let you check from anywhere Faster response while traveling or when the home is vacant What Types of Smart Leak Detectors Are Available for Homes? Smart leak detectors fall into three main groups: point‑of‑use sensors for specific trouble spots, whole‑home monitoring that analyzes flow patterns, and automatic shut‑off valves that stop the main water feed during major events. Point sensors protect localized areas, whole‑home systems watch overall usage, and shut‑off valves act as the final line of defense. Each option differs in installation complexity, cost, and upkeep, so match the solution to your home’s layout, risk level, and whether you want a DIY install or prefer a professional. Below we break down the options to help you choose and place devices correctly. Detector Type Coverage / Best for Benefits / Cost / Installation Point-of-use sensors Under sinks, water heaters, washing machines Low cost, DIY install, battery‑powered; limited coverage Whole-home monitoring Main line flow meters plus sensor network Detects hidden leaks and abnormal usage; moderate to higher cost; professional install recommended for some setups Automatic shut-off valve Installed at main water line Stops major leaks automatically; higher cost and complexity; professional installation advised What Are Point-of-Use Sensors and Their Advantages? Point‑of‑use sensors are compact devices you place where leaks usually start — under sinks, beside water heaters, behind washing machines, and near sump pumps — to detect pooled water or moisture and send alerts. They’re usually battery‑powered, affordable, and easy to install without changing plumbing, making them a great first step for renters or homeowners who want targeted protection. The trade‑off is coverage: each sensor protects only its immediate area, so whole‑house protection requires multiple units. Point sensors work well with regular checks and are a practical, low‑risk way to reduce local damage before committing to a whole‑home system. How Do Whole-Home Water Monitoring Systems and Shut-Off Valves Work? Whole‑home systems use a flow meter on the main supply line and a network of sensors to learn normal usage patterns and spot anomalies that suggest leaks, bursts, or appliance failures. When the system sees an unusual flow signature it can alert you and — if wired to a motorized shut‑off valve — close the valve to stop the water supply. Typical hardware includes a flow meter, a gateway or hub, optional distributed sensors, and a motorized shut‑off valve; the software applies thresholds and pattern recognition to limit false alarms. Because these systems touch the main plumbing, professional installation is recommended to ensure correct placement, code compliance, and reliable fail‑safes that prevent
Automated Protection with Smart Water Shut-Off Valves
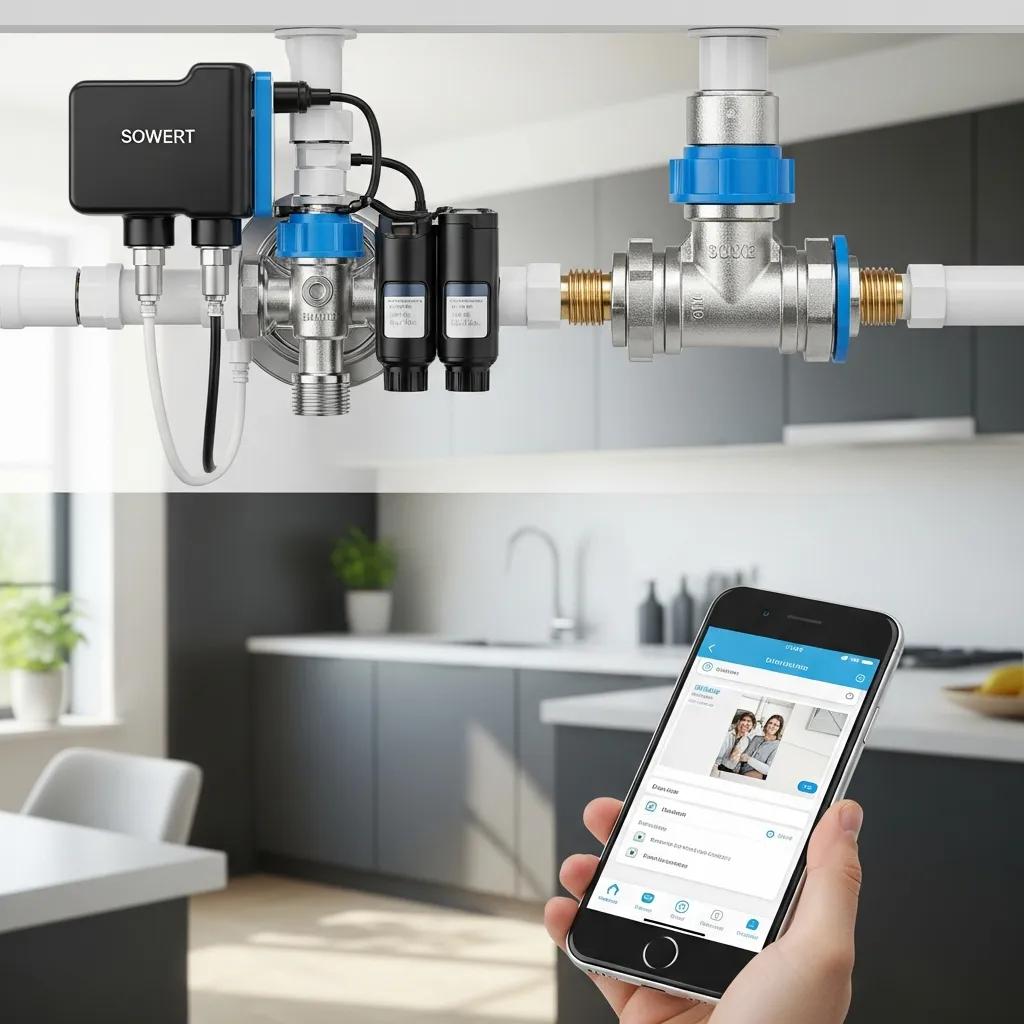
Smart Water Shut-Off Valve Installation — Automated Protection for Homes and Businesses Smart water shut-off valves are automated plumbing devices that spot abnormal flow or leaks and close a main or branch supply to prevent major water damage. They pair flow meters, wireless leak sensors, an actuator on the valve, and a control hub or mobile app so the system can detect issues, send alerts, and act within seconds to minutes. A whole-home or targeted shutoff installation lowers repair costs, reduces insurance claims, and gives property owners remote control and real-time visibility. This guide walks through how smart shutoff valves work, the parts of a whole-home system, measurable benefits (including possible insurance incentives), professional installation steps, recommended products, and maintenance tips. You’ll also find clear answers to common questions about cost, DIY feasibility, and optimal valve placement, plus when to call a local pro for a site-specific assessment. What Are Smart Water Shut-Off Valves and How Do They Work? A smart water shut-off valve is a safety device that automatically stops water flow when sensors detect leaks, unusual flow rates, or system faults, and it reports status to a user interface for alerts and control. The system pairs a valve body or actuator on the main or branch line with flow sensors that track baseline and surge behavior, and a control hub or app that runs the logic to decide when to close the valve. The result: far less water released during a failure, which means less structural damage and lower repair bills. Next we’ll look at the detection methods these systems use and how sensors work together to trigger a shutoff. Reliable systems use multiple sensor types to confirm an event before they shut off water—this reduces false alarms and keeps normal use uninterrupted. How Do Smart Water Shut-Off Valves Provide Automated Leak Detection? Smart shutoff systems combine flow, acoustic, and moisture sensors to find leaks quickly and accurately. Flow sensors learn a property’s normal usage and flag sustained abnormal patterns—think continuous flow overnight—acoustic sensors pick up sounds from a ruptured pipe, and moisture sensors detect water where it shouldn’t be, like under a water heater. When configured thresholds are met, the control hub sends an alert and, depending on settings and fail-safes, tells the actuator to close the valve. Most systems include manual overrides and scheduled tests so you can verify the automated sequence is working. That multi-sensor validation is why professionals prefer layered detection for dependable leak protection. What Components Make Up a Whole Home Water Shut Off System? A whole-home shutoff system is built from parts that handle detection, decision-making, and action: the valve body and actuator, flow and leak sensors, a control hub or bridge, and a user interface such as a mobile app. Typical components include: Valve body and shutoff actuator: the mechanical assembly that stops water flow. Flow sensor: measures volume and rate on the main or branch line. Wireless leak/moisture sensors: placed near appliances and low points to confirm actual water presence. Control hub/app: runs the logic, sends alerts, and allows remote operation. Power and backup: mains power with battery backup or local fail-safe to keep the actuator functional. Each part must be sized and located for your plumbing layout—those choices lead directly into the professional installation steps used to place valves and sensors for the best protection. What Are the Benefits of Installing Smart Water Shut-Off Valves? Smart shut-off valves limit how much water enters a building after a failure, so you get fewer and less costly repairs and less business disruption. They also offer practical advantages like remote shutoff, automatic self-tests, diagnostics, and flow history that help spot chronic issues early. For many owners, these systems deliver peace of mind and better resilience against common failures—burst pipes, water heater leaks, and unattended appliance breaks. The next section maps benefits to measurable outcomes so you can better judge return on investment. Below is a simple mapping of benefits to likely outcomes and insurance or peace-of-mind value. Benefit Outcome Value Water Damage Prevention Shortens leak-to-shutoff time, limiting water volume Reduces repair size and remediation cost Remote Control & Alerts Immediate notification and remote intervention Faster response; less downtime for businesses Diagnostics & Logs Early detection of abnormal patterns Prevents future failures; helps plan maintenance Insurance & Risk Reduction Potential for fewer claims Possible premium discounts and reduced surcharges This benefit-to-outcome view helps you see why smart water protection is often a sensible investment and how local pros make deployment straightforward. Frost and Kretsch Plumbing serves Macomb, Oakland, and Wayne counties in Michigan with 24/7 emergency response, licensed and insured technicians, clear pricing with no hidden fees, and a 100% satisfaction guarantee—services that pair well with smart shutoff systems. If you’re in our service area, request an on-site assessment so we can match system design to your plumbing layout and insurance requirements. Using a licensed local provider ensures correct sizing, code compliance, and a transparent written estimate. How Do Smart Valves Prevent Costly Water Damage? Smart valves cut water damage mainly by reducing the time between a leak starting and the water being shut off, which limits the total water that reaches finishes and framing. In many cases, shutting off water within minutes after a pipe failure greatly reduces repair scope compared with leaks that go hours undetected. Adding wireless detectors near high-risk appliances speeds detection, and flow-based logic catches slow, continuous losses that could otherwise be missed. The outcome: fewer big remediation jobs, lower mold risk, and better asset protection. Those prevention mechanics also explain why insurers ask for specific documentation when offering incentives. What Insurance Discounts Are Available for Smart Water Protection? Insurers are increasingly willing to reward active leak protection with premium reductions or mitigation credits when a documented smart shutoff system is in place. Common insurer requests include proof of professional installation, equipment make and serial numbers, and a maintenance plan showing ongoing readiness. Because discounts vary by carrier and region, check with your insurer before purchase to