
First Steps for Water Damage Cleanup: Immediate Actions and Expert Guidance
Unwanted water in a home or business can damage structures, create electrical hazards, and let mold take hold within 24–48 hours. This practical guide walks you through what to do first: how to stay safe, stop the leak if you can, remove standing water, and begin drying to limit further damage. You’ll get straightforward steps for shutting off utilities, choosing and using personal protective equipment, deciding when to keep working and when to call a pro, plus checklists and equipment comparisons to document your actions for insurance or restoration teams. Read on for clear, actionable steps you can take now to reduce loss before help arrives.
What Safety Precautions Should You Take Immediately After Water Damage?
Safety comes first. Water can interact with electricity, sewage, and building materials to create hidden dangers. From a safe spot, scan for risks like exposed outlets, sagging ceilings, or dark—potentially contaminated—water. These observations tell you whether it’s safe to do initial mitigation. Keep people and pets out of affected areas until hazards are removed or a professional says it’s safe. Take photos and notes from a safe distance—those records help insurers and restoration teams later.
If you smell gas, see damaged electrical panels, or notice structural collapse, don’t go back inside. Contact emergency services or a licensed technician and wait for help. The next section explains how to shut off utilities safely and what to avoid when water and electricity are both involved.
How Do You Turn Off Utilities to Prevent Electrical Hazards?
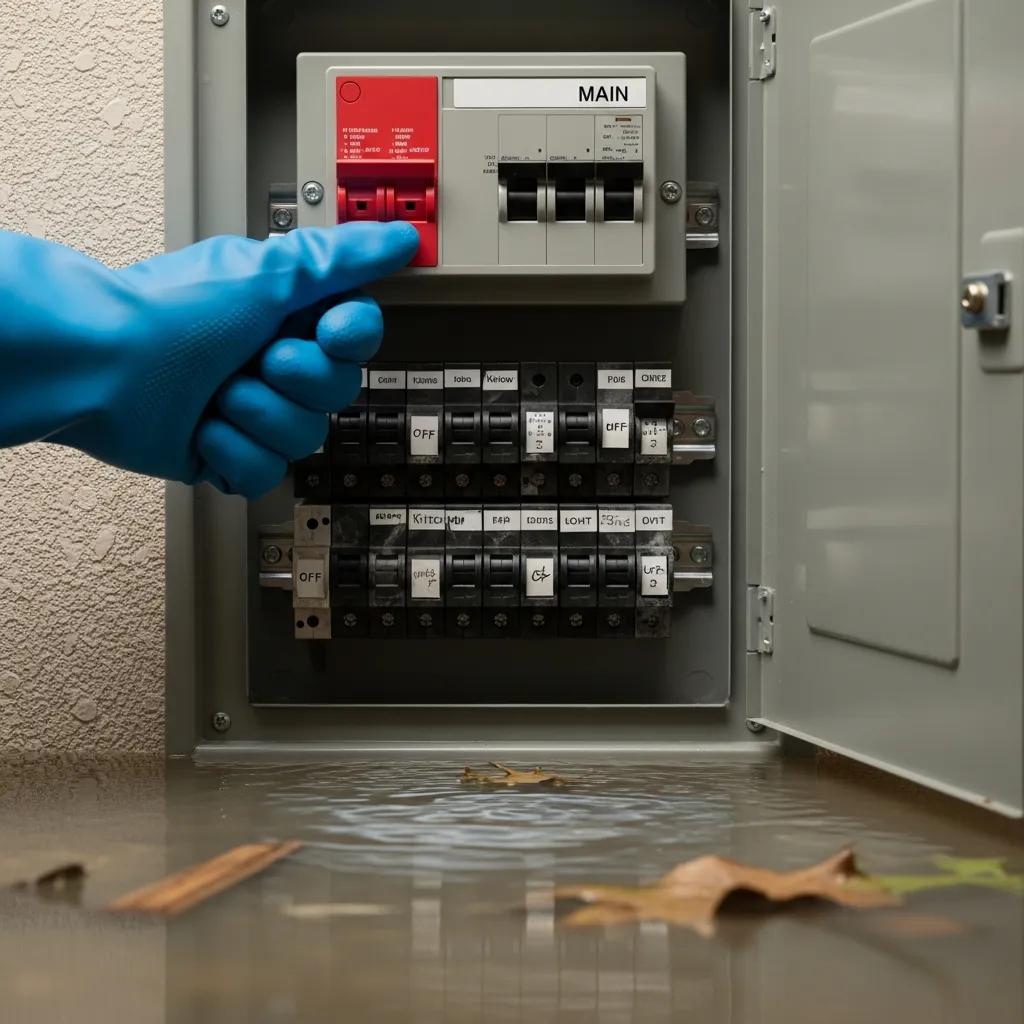
Shutting off power and gas can stop further damage, but never at the cost of your safety. If water is within a few feet of electrical panels, outlets, or appliances, do not touch breakers—call a pro. If the breaker panel is dry and reachable, turn off the main breaker to cut power to the property. Only shut off the gas at the meter if you know how and can do so safely. Use insulated tools and rubber-soled shoes when working near utilities, and if you have any doubt, wait for licensed technicians.
If you can’t access shut-offs safely, document their location and condition and evacuate until help arrives. Once utilities are controlled, you can plan PPE and cleanup steps.
What Personal Protective Equipment Is Essential During Cleanup?
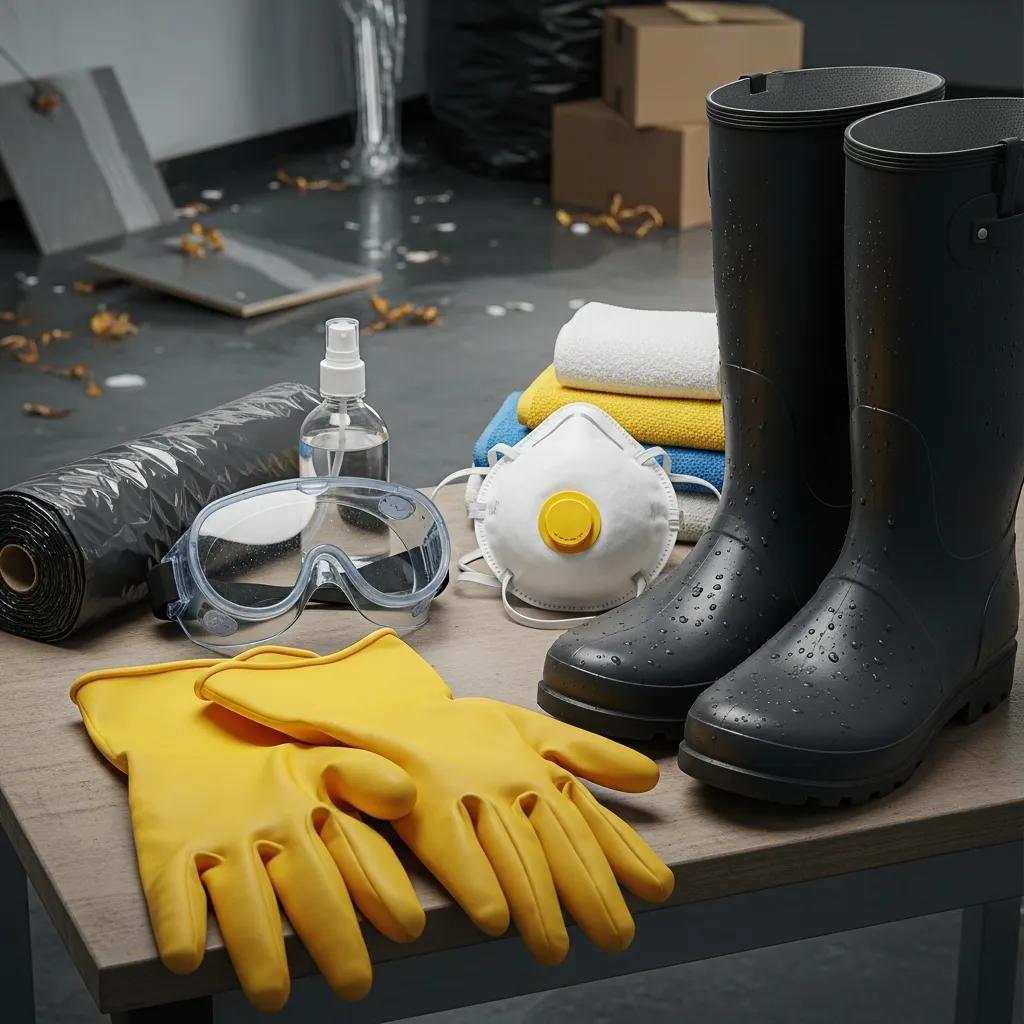
PPE limits exposure to contaminants, sharp objects, and chemical cleaners during mitigation. At minimum, wear chemical-resistant gloves, sturdy rubber boots, eye protection, and an N95 respirator when mold or dust may be present. For sewage or black-water incidents, upgrade to full-face protection and disposable coveralls. Remove and bag disposable gear carefully, and wash reusable items separately in hot water to avoid spreading contamination.
Pick PPE based on the contamination level and task. Inspect gear before use and replace anything damaged. With PPE on, you can safely move to finding and stopping the water source.
- Common PPE to have on hand: Chemical- and puncture-resistant gloves.Slip-resistant rubber boots.Respirators (N95 or better) for airborne spores and dust.
How Can You Locate and Stop the Water Source Quickly?
Stopping the flow limits damage and makes mitigation easier. Do a quick perimeter check: look at plumbing fixtures, appliance lines, water heater connections, and under sinks. At the same time, inspect the roof, exterior walls, and foundation for signs of outside intrusion. When possible, shut a valve, clamp a leaking pipe, or isolate the appliance to halt incoming water. Identifying and stopping the source also speeds the restoration assessment once pros arrive.
If the leak is plumbing-related, use the main shut-off as described below. If the problem is from the roof or foundation, apply temporary patches and divert water away until repairs can be made by a professional.
Where Is the Main Water Shut-Off Valve and How Do You Use It?
The main shut-off is usually where the water line enters the building—basement, crawlspace, utility room, or an exterior wall near the foundation. Know your valve type: a round gate valve needs several turns to close; a ball valve has a lever that turns 90 degrees. Turn a gate valve clockwise to close it, or move a ball valve lever perpendicular to the pipe. If the valve is stuck, corroded, or unreachable, don’t force it—document the condition and call a plumber.
After shutting off the main, open faucets at the highest and lowest points to drain water and relieve pressure. Mark shut-off locations ahead of time for quicker access in an emergency.
What Are Common Leak Points to Identify in Your Home or Business?
Check the most likely spots first to narrow your response: appliance supply lines (dishwashers, washing machines), refrigerator water lines, toilet and sink connections, water heater fittings, visible pipe joints, and irrigation lines. Outside, inspect roof flashings, window seals, and foundation cracks. Hidden leaks often show up as soft drywall, discolored paint, bulging baseboards, or an unexplained jump in your water bill—use those clues to prioritize inspections.
Photograph and note every suspected leak for insurance and restoration teams. With the source contained, you can move on to removing standing water and limiting saturation.
What Are the Best Methods for Immediate Water Removal and Extraction?
Removing standing water quickly lowers saturation and the chance mold will grow. The method depends on depth and contamination. Small spills are manageable with mops, towels, and buckets; larger or deeper floods need powered gear like wet/dry vacuums, submersible pumps, or truck-mounted extractors. Equipment choice matters—pumps move big volumes fast, while air movers and dehumidifiers tackle moisture left inside materials. Match the tool to the job to speed drying and reduce secondary damage.
Use DIY extraction only for clean-water incidents and small areas. Gray- and black-water situations (sewage) require trained crews and containment. The next section covers safe manual removal you can do right away.
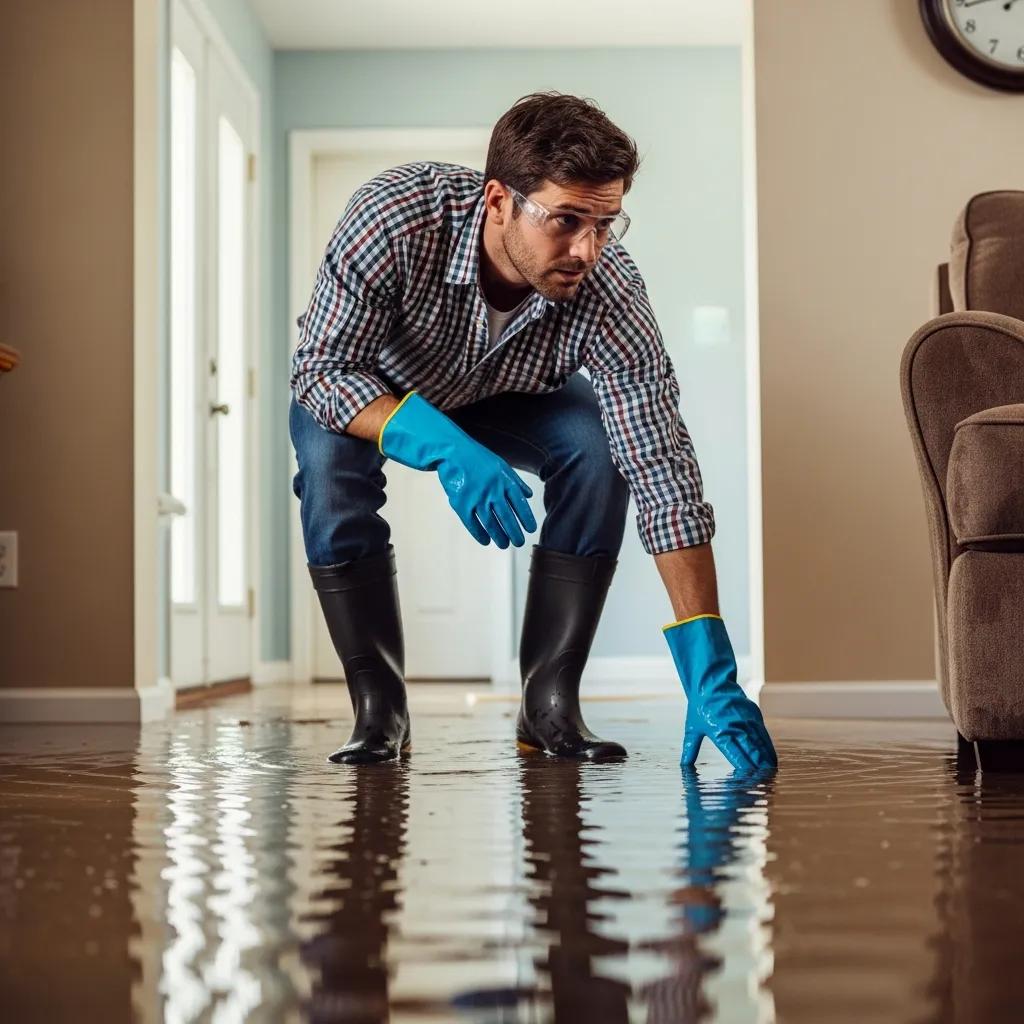
How Do You Manually Remove Standing Water Safely?
For small incidents, manual removal helps stabilize the situation but do it carefully to avoid injury or contamination spread. Put on PPE, bail water with buckets, and use squeegees to push water toward safe drains or outside—avoid directing water toward electrical panels or HVAC. Mops and absorbent towels work on thin layers; change or wring them frequently to avoid recontaminating cleared areas.
Note water depth and removal times with photos so responders and insurers see what you did. Manual methods buy time until larger extraction equipment arrives.
What Equipment Is Effective for Water Extraction?
Rental and professional extraction gear vary in capacity and purpose. A wet/dry vacuum is handy for small areas and carpet extraction; submersible pumps move deep water quickly (good for basements); truck-mounted extractors and high-capacity portable units are best for severe saturation of carpets and structural materials. Each option balances portability, flow rate, and required skill—choose based on the size and contamination of the loss.
Introductory note: This table compares common extraction equipment by application and performance to help you decide whether to rent or call a pro.
| Equipment | Typical Capacity/Feature | Best Use Case |
|---|---|---|
| Wet/dry vacuum | Portable, moderate suction | Small spills, carpet extraction in contained areas |
| Submersible pump | High flow rate for deep water | Basements or areas with >2 inches standing water |
| Truck-mounted extractor | Powerful suction and heat | Severe saturation of carpets, pads, and structural materials |
How Do You Dry and Dehumidify Affected Areas to Prevent Mold?
Drying materials and reducing humidity stops mold before it starts—especially within that critical 24–48 hour window. Air movers speed evaporation from wet surfaces; dehumidifiers pull moisture from the air so it doesn’t re-enter materials. Use moisture meters to track progress and decide whether to continue drying or remove materials. Together, focused airflow and humidity control lower material moisture and reduce mold risk.
Do things in order: extract standing water first, then run air movers toward wet spots, and place dehumidifiers centrally to capture the moisture. The next section covers airflow techniques to speed drying safely.
What Techniques Maximize Air Circulation for Faster Drying?
Good airflow speeds evaporation but should be used carefully to avoid spreading contaminants or drawing in humid outdoor air. Use axial or directed air movers to push moisture-laden air toward exits or dehumidifiers, and create cross-ventilation when weather allows. In cold or humid conditions, keep the space sealed and rely on air movers and dehumidifiers. Don’t run your HVAC to circulate contaminated air unless a professional confirms it’s safe and the system is protected.
Target saturated cavities first and use dehumidifiers to capture the evaporated moisture—this coordination prevents re-wetting and prepares materials for inspection or removal.
How Do Dehumidifiers Help Control Moisture and Humidity?
Dehumidifiers remove water vapor from the air so moisture can migrate out of building materials and be carried away. Portable residential units (rated in pints per day) work well in single rooms; commercial-grade units handle large basements and whole-house jobs. Place units where airflow is unrestricted and pair them with air movers. Use hygrometers and moisture meters to monitor progress—aim to keep relative humidity below about 60% during drying.
Choosing the right capacity avoids prolonged drying times. If materials remain damp after 24–48 hours, bring in professional-grade equipment or an expert assessment to prevent mold. The table below summarizes common dehumidifier types and typical use cases.
| Dehumidifier Type | Capacity (pints/day) | Ideal Use Case |
|---|---|---|
| Portable residential | 20–50 pints/day | Single rooms, small basements |
| Commercial dehumidifier | 70–120+ pints/day | Large basements, whole-house drying |
| Desiccant dehumidifier | N/A (humidity removal via desiccant) | Low-temperature drying in cold basements |
What Steps Should You Take to Prevent Mold and Secondary Damage?
Preventing mold means prompt cleaning, removing unsalvageable porous materials, and keeping humidity low. Clean and disinfect non-porous surfaces, remove wet debris, and isolate items you can salvage for drying. Porous items soaked longer than 24–48 hours usually need removal because they trap moisture and spores. Acting fast prevents a small problem from becoming a bigger contamination issue.
Keep records of cleaning steps and receipts for any disposal or contractor work, and continue monitoring moisture until everything stabilizes. The next section explains cleaning and disinfection protocols by surface type.
How Do You Clean and Disinfect After Water Damage?
Cleaning reduces microbial load but the method depends on contamination. For clean-water events, soap, water, and fast drying often suffice on non-porous surfaces. For gray- or black-water exposure, use EPA-registered disinfectants and follow label directions for dilution and contact time. Scrub with appropriate brushes, rinse if required, and dry quickly with air movers and dehumidifiers. Always wear PPE and dispose of contaminated cleaning materials safely.
Document each cleaning step and keep product labels and receipts for insurance. Proper disinfection helps you decide which porous materials must be removed.
When and How Should You Remove Damaged Porous Materials?
Porous materials that stay wet or can’t be reliably cleaned should be removed to stop mold and hidden decay. Examples include soaked insulation, carpet padding, upholstered furniture, and drywall saturated beyond 24–48 hours. When removing drywall, cut at least 12 inches above the visible water line to ensure the cavity can dry. Bag and contain contaminated materials, and work with remediation pros if sewage or mold is present.
Timing and containment limit spore spread and make restoration safer and less costly. If you’re unsure about contamination level or structural issues, get a professional assessment.
Quick decision guide for porous materials:
- Saturated >48 hours: Plan to remove.
- Visible mold growth: Remove and have professionals remediate.
- Sewage exposure: Immediate removal and professional handling.
When Is It Necessary to Call Frost and Kretsch Plumbing for Professional Help?
Call the pros when contamination, volume, or safety risks exceed DIY limits. Contact Frost and Kretsch Plumbing for black water or sewage, large amounts of standing water, visible structural damage (sagging ceilings, bowed beams), or electrical hazards that prevent safe access. Professional crews provide rapid emergency response, proper extraction, and coordination with remediation specialists when mold or structural repair is needed.
Frost and Kretsch Plumbing offers 24/7 emergency response with licensed, insured technicians and the right equipment to control contamination, extract water, and begin drying. If you can’t stop the source safely, reach a shut-off, or dry the area within the critical 24–48 hour window, call for emergency plumbing and extraction—doing so can reduce long-term costs and health risks. The next section lists clear red flags that require immediate professional attention.
What Signs Indicate You Need Emergency Plumbing or Restoration Services?
Seek professional help right away for these red flags: sewage or black water present, rapidly spreading water deeper than a few inches, visible structural sagging or collapse, electrical arcing or sparking, or mold appearing despite initial mitigation. If anyone has respiratory symptoms or there’s a strong sewage smell, evacuate and arrange for a professional assessment.
Safe immediate actions include shutting off water and power only if you can do so without risk, documenting the scene, and blocking off dangerous areas while you wait for responders. The next section outlines Frost and Kretsch Plumbing’s emergency response approach.
Introductory triage table: This table helps match common scenarios to the recommended response and whether professional restoration is needed.
| Scenario | Primary Risk | Recommended Response |
|---|---|---|
| Clean-water leak, small area | Minimal contamination | DIY extraction and drying; monitor moisture |
| Gray water (appliance overflow) | Moderate contamination | Professional extraction recommended if >24 hours or large area |
| Black water (sewage/flooding) | Health contamination | Immediate professional restoration and remediation |
How Does Frost and Kretsch Plumbing Provide 24/7 Emergency Water Damage Services?
Frost and Kretsch Plumbing runs a 24/7 emergency dispatch with licensed, insured technicians ready to respond to water damage. On arrival, the team evaluates contamination and structural risks, performs controlled extraction with the right equipment, and sets up drying and dehumidification while documenting everything for insurance. We prioritize clear pricing, a satisfaction-focused approach, and coordination with remediation and repair partners when mold or structural work is needed.
If you need emergency help, call the dispatch number for immediate response and coordinated restoration planning. Our goal is to stabilize your property quickly and limit long-term repair costs. End of article.
Frequently Asked Questions
What should I do if I suspect hidden water damage in my home?
Look for soft or discolored drywall, bulging baseboards, musty smells, or an unexplained rise in your water bill. Photograph and note what you find. If you see signs of hidden damage, consider a professional inspection to locate the source and prevent mold or structural issues.
How can I prevent mold growth after water damage?
Act quickly: dry affected areas within 24–48 hours, remove items that can’t be dried, and use air movers and dehumidifiers to speed drying. Clean and disinfect surfaces and keep monitoring moisture. If mold appears, call a remediation professional right away.
What are the risks of ignoring water damage?
Ignoring water damage can lead to structural decay, electrical risks, and mold-related health problems. Over time, repairs become more extensive and costly, and insurance claims may be affected if damage isn’t reported or mitigated promptly. Address water issues as soon as possible to protect people and property.
How do I document water damage for insurance claims?
Take clear photos of affected areas and standing water, note the date and time, and record what you did (shut off utilities, removed items, etc.). Keep receipts for mitigation or repair work and save product labels for disinfectants used. Detailed documentation supports your claim and helps restoration teams.
When is it safe to return to a water-damaged area?
Return only after electrical hazards are resolved and the area is properly dried and ventilated. If there’s structural damage or contamination (like sewage), wait for professionals to clear the site. Always prioritize safety and follow the guidance of responders.
What types of insurance cover water damage?
Homeowners or renters insurance often covers sudden, accidental water damage such as burst pipes or appliance failures. Flooding from external sources usually requires separate flood insurance. Review your policy and talk to your agent to understand coverage and exclusions.
How can I choose the right professional for water damage restoration?
Look for licensed, insured companies with strong local reviews and experience with similar jobs. Ask about their equipment, drying protocols, and documentation practices for insurance. Get multiple estimates if possible and confirm warranties or guarantees on their work.
Conclusion
Quick, safe action after water damage makes a big difference. Follow the steps above for safety, source control, and drying—then call Frost and Kretsch Plumbing if the situation exceeds what you can handle safely. Prompt mitigation reduces health risks and long-term repair costs. If you need emergency help, contact us now so we can get your property stabilized.