
DIY Sump Pump Care That Actually Protects Your Basement: Practical Steps and Pro Tips
A sump pump keeps groundwater out of your basement — but only if it’s cared for. This guide walks homeowners through straightforward DIY sump pump maintenance: what to clean, how to test, common failure modes, and when to call in help. Skipping routine checks often leads to emergency repairs, flooded basements, and spoiled belongings. Follow the cleaning, inspection, and battery-backup checks here to reduce those risks and make your pump last longer. You’ll get easy step-by-step instructions, simple troubleshooting checks, and a seasonal maintenance calendar so preventative care becomes a repeatable habit, not a scramble during a storm.
Why Is Regular Sump Pump Maintenance Crucial for Longevity?
Regular maintenance means inspecting, cleaning, and testing the pump and its parts so the system works when water levels rise. Small chores — clearing debris, testing the float switch, and keeping the discharge clear — prevent motor strain and premature failure. The payoff for homeowners is clear: less chance of flooding, smaller repair bills over time, and predictable planning for replacements instead of surprise emergencies. Industry guidance supports planned maintenance as the best way to avoid the most common causes of basement water damage.
Those routine checks are effective because they address the mechanical and electrical problems that shorten a pump’s life. Removing grit from the basin reduces impeller wear and prevents overloads. Verifying float movement keeps the motor from running nonstop and overheating. In short, hands-on cleaning and periodic testing are simple steps that make a real difference — especially in flood-prone areas.
How Does Preventative Care Extend Sump Pump Life?
Preventative maintenance fights the typical reasons pumps fail early: debris, stuck floats, and blocked discharge lines. A regular sump pump check — basin cleaning, float tests, and a quick look at the impeller — reduces friction and heat that wear out motors. For example, clearing silt keeps the impeller balanced and lowers vibration that wears bearings, which can add years to the pump’s service life. These improvements mean fewer emergency calls and more predictable replacement timing.
Preventative checks also catch electrical and control issues early, like loose wiring or corroded terminals, before they cause intermittent operation or total failure. Testing the pump under load and confirming the check valve and discharge path helps you spot parts that need replacing or a pro’s attention, lowering overall ownership costs across the pump’s life.
What Are the Risks of Neglecting Sump Pump Maintenance?
Putting off maintenance raises the chance of basement flooding, motor failure, and follow-on problems like mold and structural damage — all of which are far costlier than routine upkeep. Sediment and debris can jam the impeller or trap the float switch, causing the pump to run continuously, run dry, or fail to start. Corroded electrical connections can create unsafe, intermittent operation, increasing flood risk during storms. A simple maintenance schedule is almost always cheaper than fixing flood damage after the fact.
Typical consequences of neglect include direct water damage, ruined finished basement areas, and long-term costs like mold remediation or replacing damaged possessions. Recognizing these risks makes the case for regular inspection and prepares you for the cleaning and testing steps that follow.
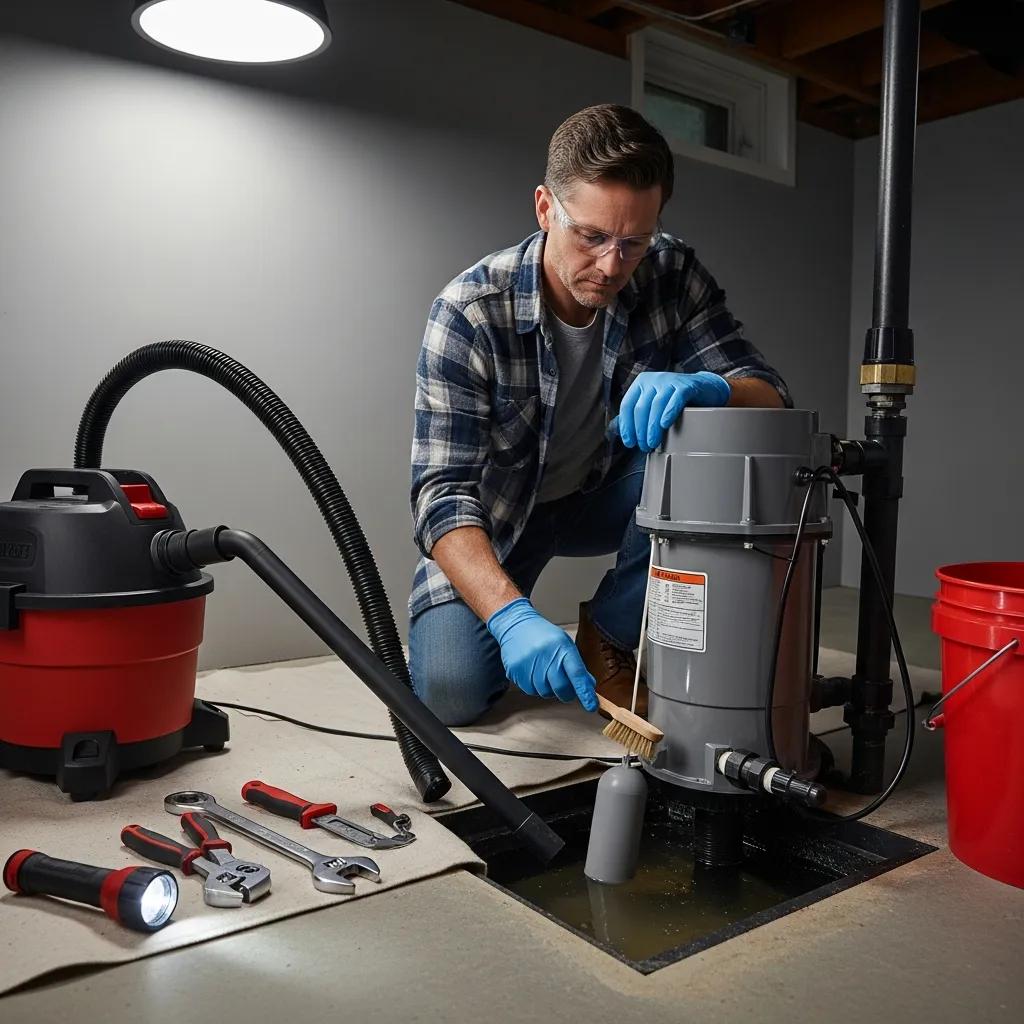
What Are the Essential DIY Sump Pump Cleaning Steps?
A safe and effective DIY cleaning routine focuses on cutting power, removing debris, checking moving parts, and running a final test. Always start by switching off the pump circuit and confirming the power is off. Only remove the pump from the basin if the unit is designed for easy removal and you’re comfortable doing so. Clean out silt and debris, inspect the impeller and inlet, check that the float moves freely, then reinstall and run a test. These steps help you clean the pump without causing damage or voiding warranties.
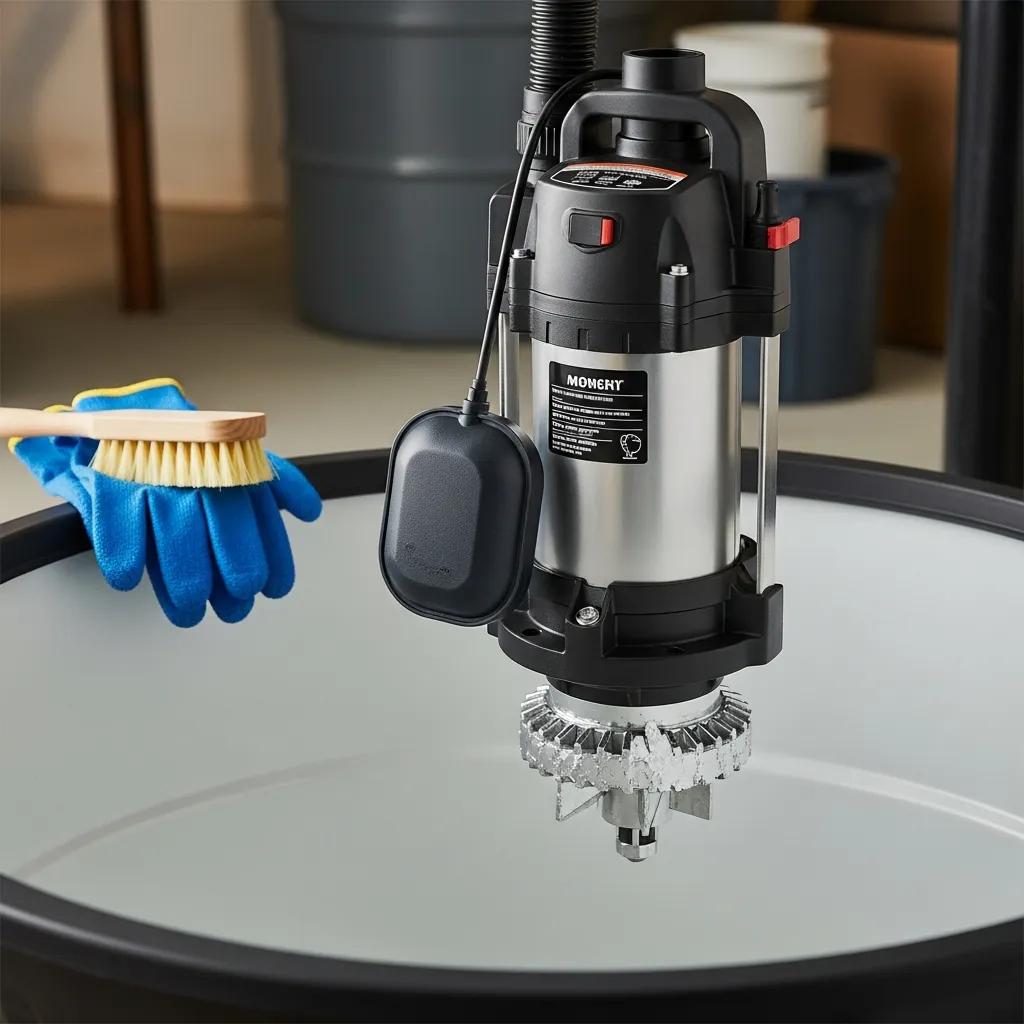
How to Safely Clean the Sump Pump Basin and Components
Safe cleaning begins with power isolation and basic protective gear. Turn off the pump’s breaker and unplug the unit when possible. Remove standing water with a shop-vac or bucket and scrape silt gently to avoid damaging the basin. Check the impeller and inlet screen for lodged debris and clear it with a soft brush — avoid harsh chemicals or wire brushes that can harm seals and plastic parts. After reassembly, run a controlled water test to watch the float and confirm the discharge flows freely.
Which Tools and Materials Are Needed for Effective Cleaning?
Most homeowners only need a handful of inexpensive tools to clean a sump pump safely: sturdy gloves, eye protection, a wet/dry vacuum or bucket, a soft brush, a screwdriver for clamps, and a flashlight. If you’re comfortable with electrical checks, a multimeter can help verify power. Optional items that help include replacement gaskets or pipe clamps and a small brush for the impeller. Avoid wire brushes and harsh solvents that can damage impellers, seals, and plastic parts.
If you run into persistent electrical problems, signs of motor burnout, or a blockage you can’t clear safely, call Frost and Kretsch Plumbing at (586) 675-0097 for professional assessment and repair. That gives you a safe, local backup when DIY isn’t enough.
How Can You Troubleshoot Common Sump Pump Problems Yourself?
Troubleshooting starts with a simple, ordered check: power, float movement, physical blockage, then check valve position. Verify the breaker and outlet, watch the float move, inspect the impeller inlet for clogs, and confirm the check valve orientation. Many problems are stuck floats or clogged intakes — not burned-out motors — so a step-by-step approach can save time and money. The table below pairs common issues with likely causes and quick DIY checks to help you decide what to try first.
The table below compares common failure modes with probable causes and DIY checks to run during initial troubleshooting. Use it to quickly decide whether a problem is likely fixable at home or needs a professional visit.
| Issue | Likely Cause | DIY Check |
|---|---|---|
| Pump not running | No power or tripped breaker | Check the breaker, plug, and outlet with a lamp or multimeter |
| Pump runs constantly | Stuck or obstructed float, or heavy inflow | Manually lift the float to see if it disengages; clear debris from the float path |
| Intermittent cycling | Shorted switch or wiring issues | Watch float travel and inspect wires for chafing; avoid DIY electrical repairs if unsure |
| Loud grinding noise | Debris in the impeller or bearing failure | Remove the pump (if safe) and inspect the impeller; clear debris and test spin by hand |
| No discharge | Blocked discharge line or closed/malfunctioning check valve | Inspect the discharge pipe for kinks, freezes, or closed valves |
| Motor heats quickly | Excessive load from a clogged impeller | Clean the impeller inlet and run short test cycles |
This quick diagnostic matrix points you to targeted checks and shows when to escalate to professional service, which we cover next.
What Causes a Sump Pump to Run Constantly or Not Turn On?
Constant running or failure to start usually ties back to the float switch, electrical supply, or inlet blockage. A float stuck on the basin wall or trapped in debris can tell the pump to run continuously. Conversely, a tripped breaker or loose wiring can stop the pump from starting. Lift the float by hand — if the pump starts, the float is the likely issue. If the pump still won’t run after checking power and the float, stop and call a licensed technician.
Fixing float alignment, verifying power, and clearing inlet obstructions often restores normal operation. When electrical irregularities persist, don’t attempt risky disassembly — call a professional.
How to Identify and Fix Noises and Other Warning Signs
Sounds like grinding, humming, or rattling are early warning signs. Grinding often means debris in the impeller or failing bearings; humming can be an overloaded motor or blocked intake; rattling may come from loose mounts or pipe contact. Start by isolating power, then inspect the impeller, mounting hardware, and pipes. Clearing debris and tightening mounts solves many problems. If noises continue after those checks, you’re likely looking at motor or bearing replacement and should call a pro.
Addressing these warning signs early reduces the chance of sudden failure and helps you schedule part inspections and replacements before they become emergencies.
What Are the Best Practices to Extend Your Sump Pump’s Lifespan?
Good habits extend pump life: set a regular inspection schedule, maintain specific components, and keep a simple service log so you can spot trends. A practical routine includes monthly visual checks, quarterly operational tests, and an annual professional inspection. Clean and replace worn parts — float switch, check valve, impeller, and discharge lines — before they cause added motor strain. Recording each inspection and any fixes makes future troubleshooting faster and more reliable.
Here’s a quick-reference table of components, maintenance tasks, and recommended frequencies to guide your preventative schedule.
| Component | Maintenance Task | Recommended Frequency |
|---|---|---|
| Float switch | Clean, verify free travel, adjust position | Monthly |
| Check valve | Inspect for backflow and leaks; replace if leaking | Annually |
| Impeller/inlet | Remove debris, inspect for wear, clean housing | Quarterly |
| Discharge pipe | Check for clogs, freezing risk, and secure fittings | Quarterly |
| Battery backup | Test charge level and run under simulated outage | Quarterly to Annually |
Use this component schedule to spread maintenance tasks throughout the year and keep your system dependable.
How Often Should You Inspect and Test Your Sump Pump?
A sensible cadence mixes quick monthly checks with deeper quarterly tests and an annual professional review. Monthly: look in the basin, watch the float, and confirm the discharge is clear. Quarterly: pour water into the pit to trigger the pump and observe start/stop behavior and cycle time. Annually: have a pro check electrical connections, motor health, the check valve, and the discharge layout. This rhythm helps catch small issues before they become emergencies.
Following that pace makes the component-specific tasks below easier to manage and keeps the pump ready for storm season.
How to Maintain Key Components Like Float Switches and Check Valves
Float switches need cleaning, correct mounting, and occasional adjustment so they move freely and trigger at the right level. Watch for biofilm, mineral deposits, or debris that can tangle the float. With power isolated, rinse the float and pivot points and confirm the switch actuates through its full travel; replace the float if water has entered it. Check valves should be inspected for backflow — a leaking valve causes frequent cycling and extra wear, and should be replaced when worn. Proper care of these parts reduces unnecessary cycling and prolongs pump life.
Keeping these components in good shape completes the preventive loop and prepares you to care for battery backups that protect the pump during power outages.
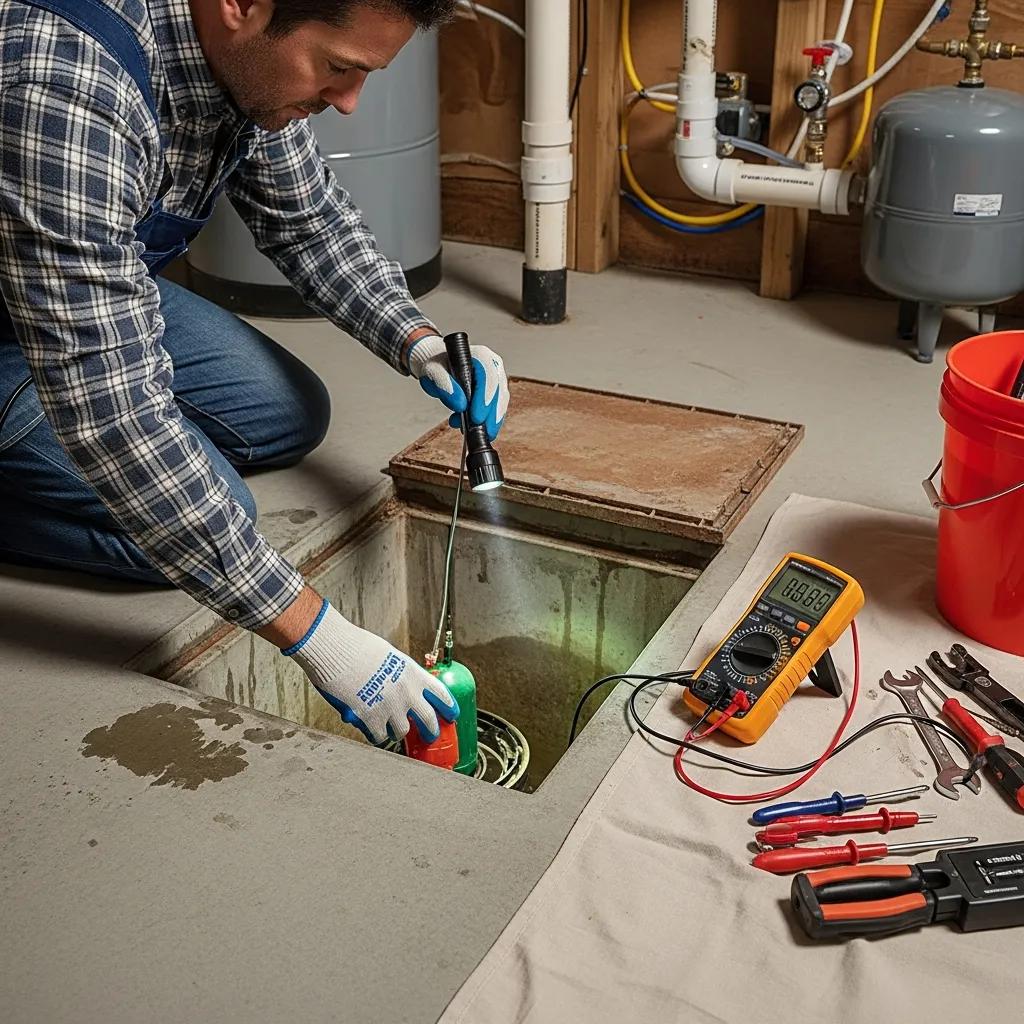
How Do You Maintain and Test a Sump Pump Battery Backup System?
A battery backup gives you redundancy when the grid fails. Maintain it with regular visual checks, voltage and load tests, and timely battery replacement so the backup actually runs the pump when needed. Start with a visual check of the battery and connections, measure voltage, then run a short load test where the backup powers the pump to confirm startup and run capability. Replace batteries proactively before capacity drops too low. Because storms and outages are common here in Michigan, scheduling periodic professional battery inspections is a smart option for homeowners who want certainty.
The table below summarizes common battery types, a simple homeowner test, and expected results to make backup testing repeatable.
| Battery Type | Test Procedure | Expected Result |
|---|---|---|
| Sealed lead-acid (SLA) | Measure open-circuit voltage and perform a short run test under pump load | Voltage near 12.6V at rest; runs pump for rated minutes |
| AGM | Check voltage and perform load run; inspect for swelling | Voltage stable near 12.6V; no physical deformation |
| Deep-cycle flooded | Check electrolyte and specific gravity, then load test | Specific gravity within manufacturer range; pump runs under load |
This chart helps you evaluate a backup battery’s condition and decide whether replacement or a professional check is needed to avoid flood risk during outages.
What Are the Steps to Test and Replace Backup Batteries?
Test backup batteries by isolating the system, cleaning and inspecting terminals, measuring resting voltage, and doing a supervised run test where the backup powers the pump briefly. Confirm the charger is working, disconnect AC to force the backup into service, and note pump startup, run time, and voltage drop. If resting voltage is low, voltage sags excessively under load, or you see swelling or leakage, replace the battery per manufacturer guidance. If you’d rather not handle batteries yourself, schedule a professional battery backup inspection for safe replacement and correct sizing.
These testing and replacement steps show why the backup system is a critical piece of flood prevention.
Why Is Battery Backup Maintenance Vital for Flood Prevention?
Battery backup maintenance matters because power outages often happen during storms that cause heavy water inflow. If the backup isn’t ready, your pump won’t run when grid power fails. A working backup keeps water moving out of the basement during outages and lowers the risk of expensive water damage. Validate the backup before storm season, test it regularly, and get professional help if you don’t have the tools or confidence to test it yourself.
With backup readiness covered, next is knowing when problems need a professional touch to protect your home and safety.
When Should You Call a Professional for Sump Pump Service?
Call a professional when problems involve electrical faults, motor burnout, recurring cycling that simple adjustments don’t fix, major sediment that needs excavation, or burning smells and persistent overheating. Those issues carry safety risks or require tools and parts best handled by licensed technicians. For emergencies or complex repairs, a pro reduces injury risk, limits secondary damage, and restores reliable operation faster than trial-and-error DIY. Use the short decision guide below to know when to call and how to prepare for the visit.
- Pump won’t start after checking power and float — call a professional for possible electrical or motor failure.
- Persistent grinding or loud noise after clearing debris — call a professional to inspect bearings or motor health.
- Repeated cycling despite float adjustment — call a professional to check the check valve and control circuitry.
Which Issues Require Expert Repair or Replacement?
Expert repair is needed for motor failure, serious wiring faults, sealed motor housings with internal damage, heavy sedimentation that impedes operation, and check valve replacements that require modifying the discharge layout. These situations can involve live wiring, heavy lifting, or confined-space work, so licensed technicians are the right choice. Pros provide correct diagnosis, safe part replacement, and load testing that DIY attempts can’t reliably achieve. Document symptoms and the steps you’ve tried to speed diagnosis and repair when the technician arrives.
Before the pro arrives, note unusual noises, cycle patterns, and any tests you ran — that information helps them pinpoint the problem faster.
How Does Frost and Kretsch Plumbing Support Emergency and Routine Services?
Frost and Kretsch Plumbing provides both emergency and routine sump pump services with customer-first guarantees: 24/7 emergency response, transparent pricing, a 100% satisfaction promise, licensed and experienced technicians, and service across Macomb, Oakland, and Wayne counties in Michigan. If you need immediate repair or want an annual professional inspection to complement your DIY routine, call Frost and Kretsch Plumbing at (586) 675-0097 to schedule service or confirm emergency availability. Their local experience and clear pricing help homeowners make informed choices and get systems back to reliable operation quickly.
Professional service is a solid complement to the preventative steps in this guide and gives you a dependable escalation path when DIY isn’t enough.
Frequently Asked Questions
What are the signs that my sump pump needs maintenance?
Watch for unusual noises (grinding, rattling), frequent on/off cycling, failure to start when expected, or water pooling in the basement. Visible debris, corrosion, or a float that doesn’t move freely are also red flags. Catching these issues early prevents bigger problems.
How can I improve the efficiency of my sump pump?
Keep the basin clean, ensure the float switch moves freely, and clear the discharge line of obstructions. Make sure the pump is sized correctly for your basement — an undersized unit works harder and wears faster. Consider a newer, more efficient model if your pump is old or struggles under normal conditions.
What should I do if my sump pump is making strange noises?
Turn off power and inspect for debris in the impeller, loose mounts, or pipe contact. Grinding usually means debris or worn bearings; humming can indicate overload. If clearing debris doesn’t fix it, contact a professional for diagnosis and repair.
How can I prepare my sump pump for winter?
Clear the discharge line of blockages and insulate any exposed piping to reduce freezing risk. Clean the sump basin, test the pump by adding water, and inspect the battery backup if you have one. These steps help prevent winter outages and frozen discharge lines.
What is the average lifespan of a sump pump?
Most sump pumps last between 5 and 15 years depending on usage, maintenance, and unit quality. Regular cleaning and inspections can push a pump toward the longer end of that range. Track performance and plan replacement if the pump shows repeated problems or declining performance.
Can I install a sump pump myself, or should I hire a professional?
Some homeowners can install a sump pump, but a licensed pro is recommended for best results. Professionals ensure proper sizing, safe electrical and plumbing connections, and code compliance. If you’re unsure about wiring or pipe layout, hire a technician to avoid costly mistakes.
Conclusion
Regular sump pump maintenance is the simplest way to avoid costly basement damage and ensure reliable operation when it matters. Follow the cleaning, testing, and troubleshooting steps in this guide to extend your pump’s life and reduce emergency risks. Be proactive: keep a simple maintenance schedule, test backups, and call Frost and Kretsch Plumbing when an issue needs professional attention. For expert help and reliable service, contact Frost and Kretsch Plumbing today.