
Bathroom Plumbing Layout: Essential Design and Installation Considerations
A bathroom plumbing layout determines how water supply, waste lines, and vents are routed to serve toilets, sinks, showers and tubs. Getting the layout right up front prevents leaks, keeps drains reliable, meets code, and avoids pricey rework once finishes go in. This guide breaks down the core layout elements, typical rough‑in measurements, venting and drainage basics, material choices, cost drivers, and practical tips for small bathrooms — with local permitting notes for Macomb, Oakland and Wayne counties. You’ll find standard rough‑in dimensions, a plain explanation of how vents and P‑traps protect the system, guidance on common piping options for remodels, and what to expect when moving fixtures so you can budget and schedule accordingly. Each section includes concise checklists and clear steps to verify measurements before finishing. Planning a remodel or new build? Use this resource to coordinate trades, avoid common mistakes, and know when to call a licensed residential plumber.
What Are the Fundamental Elements of an Optimal Bathroom Plumbing Layout?
An effective plumbing layout balances fixture placement, water supply and waste routing, venting, maintenance access, and shutoff locations so the system works reliably and is easy to service. These parts work together: supply piping delivers water, drain piping removes waste, vents protect trap seals, and access panels or cleanouts let technicians clear problems without demolition. Prioritizing fixture clearances and correct center‑to‑center dimensions prevents interference, preserves ergonomics, and keeps the installation compliant. Early rough‑in planning sets the centerlines and heights that determine cabinet fit, tile patterns and final fixture positioning.
- Fixture locations with centerline measurements and minimum clearances to walls and nearby fixtures.
- Water supply routing with shutoff valves positioned for easy service at each fixture.
- Drain and vent routing sized and sloped to code to promote self‑clearing flow.
- Accessible cleanouts and access panels on main lines and branch drains to simplify maintenance.
These basics form the foundation for the fixture rough‑ins and venting rules that follow. Accurate early layouts minimize surprises during finish work and make coordination with carpenters and tile contractors much smoother.
Which Plumbing Fixtures Require Special Placement and Rough-In Dimensions?
Fixture placement follows standard rough‑in measurements so plumbing lines line up with cabinets and fixtures. Toilets use a center‑to‑wall rough‑in, vanities need drain centerline height and supply spacing that clear the cabinet interior and allow a P‑trap, and showers and tubs require specific drain locations and valve heights plus proper pan slope. Keeping standard tolerances in mind prevents mid‑project changes that can lead to demolition or compromised fixture choices.
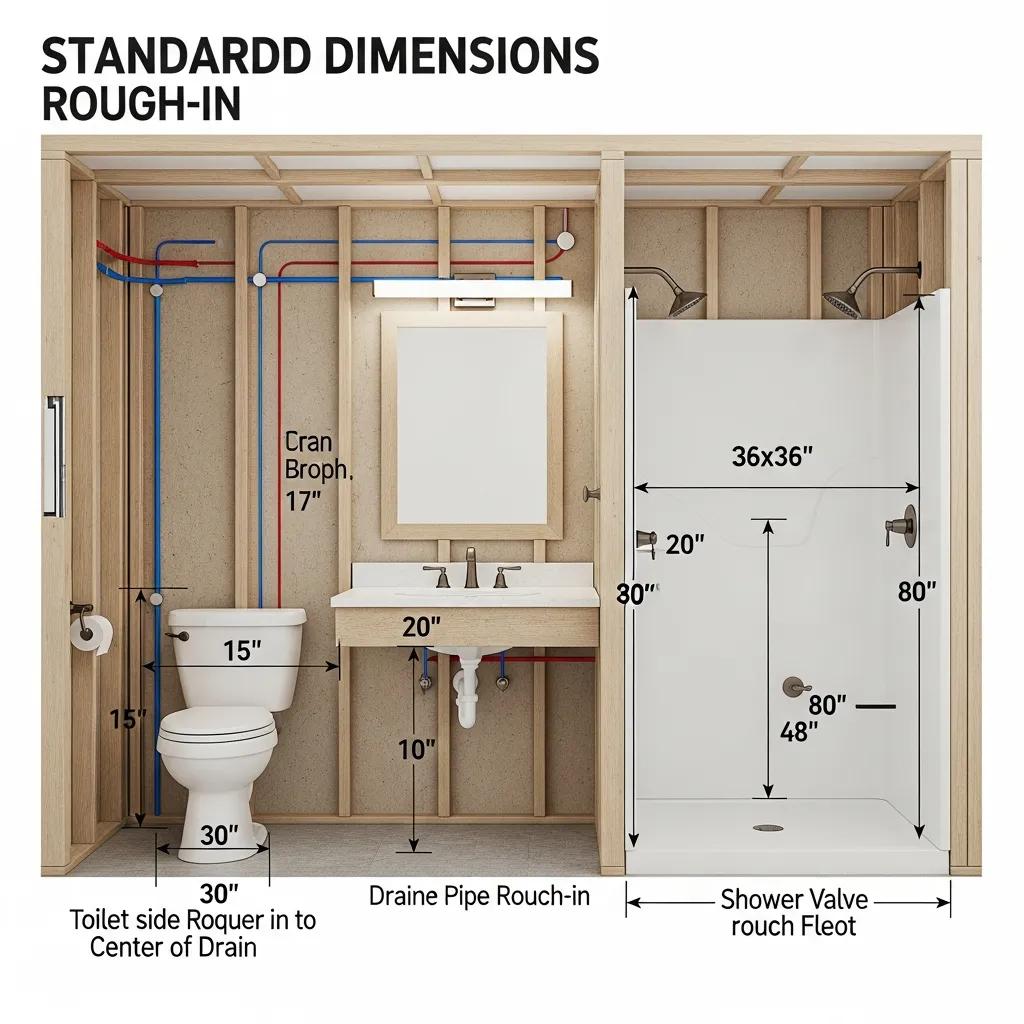
Common rough‑in reference points (planning examples):
- Toilet: centerline to finished wall commonly 12 inches; verify per fixture spec.
- Sink/Vanity: drain centerline typically 18–20 inches from finished wall and 16–20 inches above finished floor to fit cabinet traps.
- Shower: drain centered in stall or offset per pan design; valve commonly 36–48 inches above floor depending on trim and accessibility.
- Bathtub: drain and overflow positions follow the tub manufacturer’s specifications; ensure routing for waste and supply is clear.
These manufacturer standards are starting points — always confirm with your chosen fixtures and a licensed plumber before installing drywall, backer board or tile to avoid mismatches and stay code‑compliant.
How Does Proper Fixture Placement Enhance Bathroom Functionality and Compliance?
Thoughtful fixture placement optimizes circulation, safety and access for maintenance while ensuring the layout meets local clearance and accessibility rules. Placing fixtures with recommended clearances preserves comfort and keeps control valves and shutoffs reachable for routine service. Correct placement reduces trap seal problems, improves drainage performance, and makes future fixture swaps possible without invasive work. In remodels, keeping existing rough‑ins where practical saves cost and time; when relocation delivers a better layout, do it with coordinated planning.
Poor placement often leads to cramped clearances, blocked access panels and noncompliant layouts that trigger permit corrections. Good placement anticipates maintenance tasks and aligns plumbing with cabinetry and electrical work. That forward planning lowers long‑term ownership costs and makes future upgrades — for example changing from a single vanity to a double — far simpler.
| Fixture | Required Rough-In | Notes |
|---|---|---|
| Toilet | Centerline to finished wall (common: 12 in) | Verify fixture spec; ADA and comfort‑height models can alter requirements |
| Sink/Vanity | Drain centerline height and horizontal offset for cabinet depth | Allow space for P‑trap and shutoffs inside the cabinet |
| Shower | Drain center position and valve height relative to curb or curbless entry | Slope to drain minimum 1/4″ per foot; allow valve access for servicing |
| Bathtub | Drain and overflow aligned to tub manufacturer dimensions | Check floor framing and chase access when relocating drains |
This comparison clarifies each fixture’s basic needs so you can match chosen products to the rough‑in plan before finishes go in and avoid costly corrections when fixtures arrive on site.
How Do Plumbing Rough-In Dimensions Impact Bathroom Design and Installation?
“Rough‑in” refers to the initial placement of supply and waste connections that determine where fixtures will sit and how finishes are installed. Rough‑ins set horizontal centerlines and vertical heights for drains and supplies; they affect cabinet layout, tile runs and whether standard fixtures fit without modification. Accurate rough‑ins let finish trades proceed confidently and prevent late‑stage moves like relocating a toilet flange or shower drain after tile is laid.
Standard rough‑in examples help crews coordinate on site:
- Toilet: Standard center‑to‑wall rough‑in is commonly 12 inches; 10 or 14 inches are used for some models.
- Sink/Vanity: Drain and supply centered to fit the vanity cabinet and allow trap clearance.
- Shower/Tub: Drain location and valve set to accommodate pan slope and trim placement.
Verifying rough‑ins before finishing saves time and money and keeps designers and installers aligned. Licensed plumbers use layout diagrams and measurement checkpoints; schedule a professional check before drywall, backer board or tile to reduce the risk of rework and to meet local permitting expectations.
What Are Standard Rough-In Measurements for Common Bathroom Fixtures?
Standard rough‑ins are industry norms most manufacturers design around, but always double‑check each fixture’s technical specs. Toilets commonly use a 12‑inch centerline from the finished wall, though 10‑ or 14‑inch variants exist for tight layouts. Vanities usually expect supply stops and a drain positioned to clear the P‑trap and allow knee space; sinks often place the drain 18–20 inches from the wall. Showers require drain locations that match the pan or tile slope plan, and valves should be located for comfortable reach and trim compatibility.
| Fixture | Standard Measurement | Typical Tolerance |
|---|---|---|
| Toilet | 12 in center‑to‑wall | ±2 in depending on model |
| Sink/Vanity | 18–20 in from wall; drain height per cabinet | ±1–2 in to allow trap access |
| Shower Drain | Centered per pan design | Varies by pan; follow manufacturer guidance |
| Tub Drain | Per tub spec and overflow | Controlled by tub flange and floor framing |
Using these guidelines during rough framing reduces the chance of mismatched fixtures at the finish stage and helps coordinate plumbing with cabinetry installers.
Why Is Accurate Rough-In Planning Critical to Avoid Costly Renovation Errors?
Incorrect rough‑ins often require tile removal, floor excavation or cutting into finished walls — work that quickly multiplies labor and material costs. Common errors include wrong toilet rough‑in spacing, misaligned vanity drains or shower valves set at awkward heights; each can cause additional demolition and scheduling delays. Coordinating rough‑ins with carpenters, electricians and tile setters during framing reduces these risks and keeps your project on schedule.
A best practice is to sign off rough‑in locations with a licensed plumber before finishes go up. That pre‑finish check will surface discrepancies between design and field conditions. Professional verification lowers the chance of expensive mid‑project changes and protects both finish quality and timelines — a small investment that pays off.
What Are the Key Venting and Drainage Requirements for a Functional Bathroom Plumbing System?
Venting and drainage keep traps full of water while allowing drains to flow freely. Vents admit air so flows don’t create negative pressure that siphons traps. P‑traps hold a water seal to block sewer gas. Main stacks collect branch flows and lead to the building sewer, so correct sizing and slope are essential for self‑clearing performance and code compliance. Understanding how these pieces interact protects system function and indoor air quality.
- Properly sized vents for the number and type of fixtures on a branch.
- Minimum slope for gravity drainage (commonly 1/4″ per foot) to avoid solids settling.
- Accessible cleanouts at required intervals to make maintenance and clog clearing easier.
- P‑trap installation that preserves trap seal depth and avoids illegal trap arm lengths.
Following these venting and drainage rules helps prevent sewer odors, slow drains and frequent clogs. The next section explains how the components work together and how to spot venting problems early.
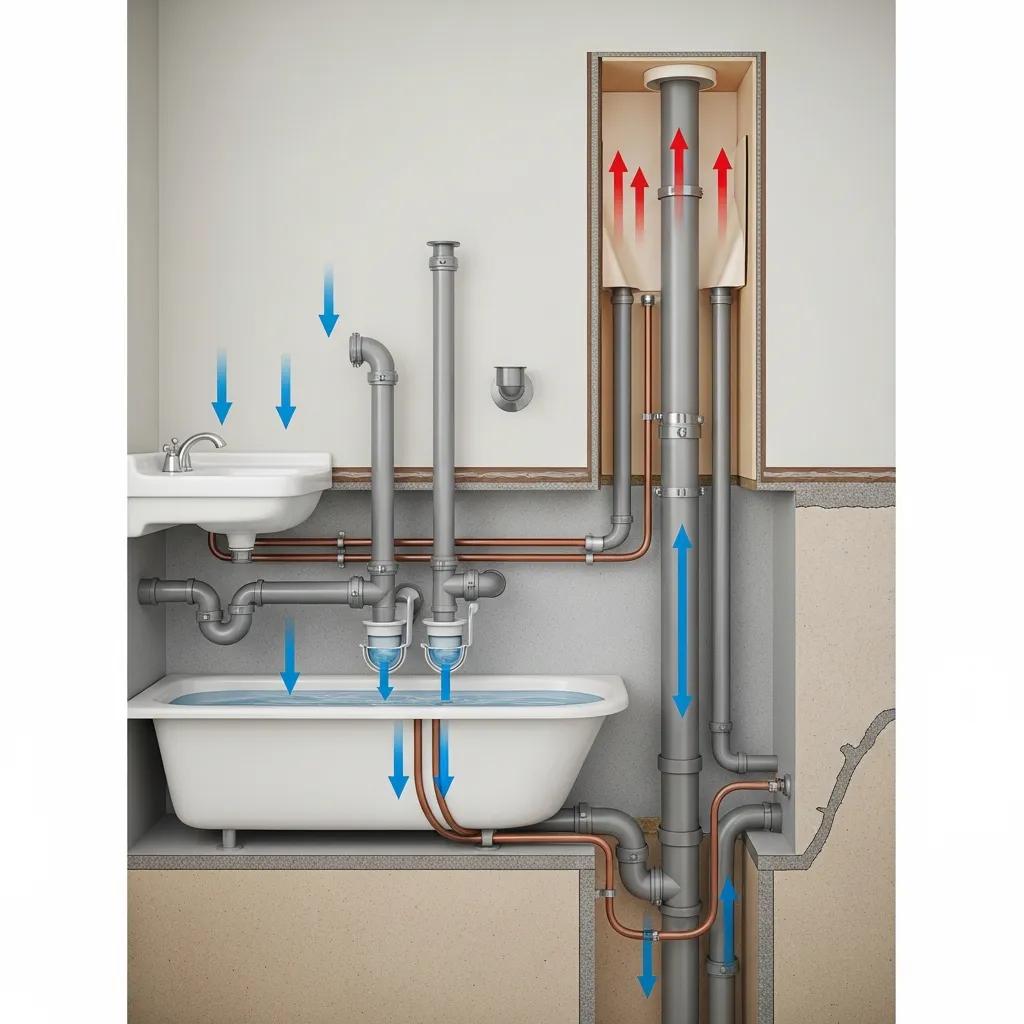
How Do Vent Pipes, P-Traps, and Main Stacks Work Together in Bathroom Plumbing?
P‑traps form a water barrier between fixtures and the drain system to keep sewer gas out of living spaces. Vent pipes connect downstream of traps to the outside or to the main stack, equalizing pressure and stopping trap siphonage during heavy flows. The main stack is the vertical drainage and vent backbone that collects branch flows and routes them safely to the building drain. Correct trap arm lengths, vent placement and stack sizing maintain hydraulic balance and protect trap seals.
Watch for warning signs like gurgling drains, recurring loss of trap seal or sewer odors — these often point to restricted vents or partial blockages. Early diagnosis and repair by a licensed technician prevents further damage and keeps fixtures performing properly.
What Local Plumbing Codes Govern Venting and Drainage in Macomb, Oakland, and Wayne Counties?
Michigan plumbing code provides the baseline rules for venting, trap sizing, slope and cleanout placement. Local municipalities in Macomb, Oakland and Wayne counties may add permitting or inspection requirements. Permits and inspections confirm installations meet sanitation, ventilation and structural standards and record changes to building plumbing risers and sanitary stacks. Because interpretation and enforcement can vary by jurisdiction, consult your local authority early to avoid permit delays or rework.
For remodels, submit plumbing plans that show vent locations, trap configurations and cleanouts to the permitting office, and work with a licensed plumber who knows local practices. That approach smooths inspections and reduces the chance of noncompliance that could require corrective work after installation.
Which Plumbing Materials and Local Codes Should Be Considered for Bathroom Plumbing Layouts?
Material choice affects longevity, installation time and inspector acceptance. Common options are PEX for supply, copper for long‑term durability, and PVC/ABS for drains. Each has tradeoffs: PEX is flexible and speeds remodels but needs protection where exposed; copper is durable and heat‑resistant but more labor‑intensive; PVC/ABS is economical and standard for waste lines with solvent‑weld fittings. Local code or inspector preference can dictate acceptable transitions and required protection or support inside walls and floors.
| Material | Pros / Cons | Best-Use & Code Notes |
|---|---|---|
| PEX | Flexible, fast to install; needs protection where exposed | Ideal for remodel supply lines; follow local rules for manifolds and protection |
| Copper | Durable, corrosion‑resistant; labor‑intensive | Good for long‑term supply systems where soldered joints are acceptable |
| PVC/ABS | Low‑cost drainage solution; solvent‑weld connections | Standard for waste/drain lines; check code for fittings and required transitions |
Material selection also includes compatibility at transitions (for example PEX to copper) and inspector expectations for fasteners, thermal protection and support. Discuss options with a licensed installer to align choices with Michigan plumbing code.
What Are the Advantages of PEX, Copper, and PVC Piping in Bathroom Plumbing?
PEX offers flexible, cost‑effective installs that reduce wall chases and make reroutes in remodels simpler; it also resists freeze damage better than rigid piping and speeds labor. Copper provides long service life and strong heat resistance for hot‑water runs. PVC and ABS are economical for drains, with reliable solvent‑weld joints commonly accepted for residential waste systems.
Pick materials by balancing installation context, expected lifespan and inspector acceptance. For many residential remodels, PEX for supply and PVC for drains is a practical combination that minimizes demolition while meeting code when installed to manufacturer and local requirements.
How Do Michigan Plumbing Codes Affect Bathroom Renovation Projects?
Michigan plumbing codes spell out acceptable venting methods, trap rules, minimum clearances and material allowances, and they define when permits and inspections are required. Local authorities in Macomb, Oakland and Wayne counties enforce these codes through permitting offices and building departments to protect public health and system integrity. Because jurisdictions can interpret code differently, early consultation reduces surprises and speeds approvals.
Hiring a licensed plumber familiar with Michigan code interpretations and local permitting practices streamlines inspections and helps ensure material transitions and venting solutions meet authority expectations. That alignment protects timelines and keeps homeowners from costly remedial work after failed inspections.
What Are the Typical Costs and Budget Considerations for Bathroom Plumbing Remodels?
Plumbing costs depend on scope: simple fixture swaps usually require minimal piping work, while relocating drains or doing a full repipe raises labor and material costs significantly. Access matters — working on a framed floor is far easier than cutting concrete slab, which can add excavation and structural work. Permit fees, inspections and coordination with other trades also affect total cost and schedule.
Primary cost drivers include:
- Fixture relocation: Moving a toilet or shower drain may require cutting floors or underpinning, increasing labor.
- Repiping: Replacing supply lines or performing a whole‑home repipe adds materials and time.
- Venting changes and cleanouts: Modifying vents or adding cleanouts adds pipe, fittings and sometimes access panels.
- Permits and inspections: Local permit fees and required inspections affect timing and add direct costs.
Knowing these factors helps homeowners prioritize work and coordinate trades. The table below shows how common project types influence budgets and decisions.
| Project Type | What Affects Cost | Typical Impact / Example |
|---|---|---|
| Fixture Swap | Minimal piping change, finish work only | Lower cost; short turnaround |
| Fixture Relocation | Access to substrate; slab vs. framed floor | Moderate to high cost if slab work is required |
| Full Repipe | Extent of house piping and material choice | High cost; longer schedule |
| Venting Modification | Routing through walls/roof and meeting code | Moderate cost; may need roof or chase access |
These examples show why verifying rough‑ins and planning with a licensed pro before finishing pays off — accuracy at the rough‑in stage prevents expensive corrective work later.
How Do Fixture Relocation and Installation Influence Overall Plumbing Costs?
Relocating fixtures increases labor and may trigger structural or finish repairs beyond plumbing. Moving a toilet a few inches within a framed floor is often doable, but moving it across a slab or to the opposite side of a bathroom can mean slab cutting, under‑slab piping or new chase construction — each dramatically increasing cost. Similarly, changing a shower drain or tub orientation can require reframing and extra waterproofing that multiplies trade coordination.
Assess feasibility by checking substrate access, existing stack locations and finish scope. When relocation is needed, bundle related work (repiping, vent upgrades) to avoid repeated demolition. That consolidated approach reduces disruption and can save on mobilization costs.
What Transparent Pricing Practices Does Frost and Kretsch Plumbing Offer Homeowners?
Frost and Kretsch Plumbing stands behind transparent pricing for bathroom remodels. We provide clear, upfront estimates and explain which items drive cost — fixture relocation, repiping, permits and access conditions. We encourage homeowners to request an itemized estimate that separates labor, materials and permit fees so budgeting is straightforward.
| Project Type | Example Cost Factors | Budget Influence |
|---|---|---|
| Move Toilet | Floor type, distance, flange changes | High if slab work is required |
| Swap Vanity | Supply/drain adjustments, vanity depth | Low to moderate |
| Repipe | Material choice (PEX/copper), home access | High; long‑term investment |
| Add Cleanout | Location, wall chase, accessibility | Moderate |
This side‑by‑side view helps homeowners see how choices affect the bottom line and why an itemized estimate is critical for planning.
How Can Small Bathroom Plumbing Layouts Maximize Space and Efficiency?
Small bathrooms benefit from layouts that shrink fixture footprints and simplify plumbing runs. Compact fixtures — short‑projection toilets, corner sinks and shallow vanities — free floor space without sacrificing function. Recessing plumbing in chases, using wall‑hung fixtures or choosing a combined tub‑shower with an integrated pan reduces piping complexity and improves circulation. Proper ventilation and moisture control are essential in tight spaces to protect finishes and prevent mold.
- Choose compact fixtures that balance comfort and footprint.
- Plan straight, short supply and drain runs to reduce fittings and leak risk.
- Use recessed medicine cabinets and recessed tank systems where wall depth allows.
These strategies preserve usable floor area and simplify installation — but they require precise rough‑in measurements and coordinated planning with cabinetry and ventilation trades to avoid conflicts during installation.
What Space-Saving Fixtures and Compact Layouts Are Ideal for Small Bathrooms?
Space‑saving choices include compact or corner toilets, narrow‑depth vanities, wall‑hung sinks, and curbless showers with linear drains that manage flow with a smaller footprint. Tankless or point‑of‑use water heaters can reclaim closet space when sized and vented correctly. Selecting fixtures with compatible rough‑ins simplifies installation and keeps service access available behind or beneath units.
When choosing compact fixtures, verify rough‑in requirements to ensure trap and supply routing fits existing cavities. That prevents last‑minute changes that can erode the intended space savings and keeps plumbing aligned with finish plans.
How Does Expert Planning Address Common Challenges in Small Bathroom Plumbing?
Expert planning coordinates plumbing with cabinetry, electrical and ventilation trades to avoid conflicts in tight spaces and maintain serviceability. Pre‑construction mockups, dimensioned layouts and early fixture selection cut the chance of having to move drains or supply lines later. A licensed plumber can spot opportunities to recess piping, use flexible PEX runs, and design venting that fits constrained walls or chases.
Proactive planning also addresses moisture control and ventilation so finishes remain durable and code‑compliant. Bringing a professional in early turns tight quarters into intentional design advantages.
Frost and Kretsch Plumbing provides residential plumbing services from fixture installation and repair to complete home repiping. Our technicians know Macomb, Oakland and Wayne counties and build layouts that meet both functional needs and local code. We offer emergency response, clear pricing and licensed workmanship.
We provide 24/7 emergency service, a 100 percent satisfaction guarantee, and licensed technicians who understand local permitting and inspection processes. If you’d like measurement verification, an itemized estimate, or to schedule service, contact Frost and Kretsch Plumbing to request an on‑site assessment from a licensed technician. Our local experience helps homeowners avoid common remodel pitfalls and ensures installations remain durable, code‑compliant and serviceable for years.
Frequently Asked Questions
What are the common mistakes to avoid during bathroom plumbing renovations?
The most common mistakes are incorrect rough‑in measurements, poor fixture placement and inadequate venting. Skipping verification of rough‑ins can force drains or fixtures to be moved after finishes are installed, which is costly. Ignoring local plumbing codes can lead to failed inspections and rework. Engage a licensed plumber early to confirm measurements, placements and compliance with local rules to reduce the risk of costly errors.
How can homeowners ensure their bathroom plumbing is code-compliant?
To ensure code compliance, learn your local plumbing requirements and work with a licensed plumber who knows municipal interpretations. Obtain the necessary permits and schedule inspections during the project. Submit plans that show vent locations, trap configurations and cleanouts when required. Keeping clear records of all work helps during inspections and for future reference.
What are the benefits of hiring a licensed plumber for bathroom renovations?
Hiring a licensed plumber brings code knowledge, hands‑on experience with complex systems and a record of reliable workmanship. Licensed plumbers spot potential issues early, prevent costly mistakes, and use the right tools and materials for efficient, durable installs. Many offer warranties on work, giving homeowners added confidence in the long‑term performance of their plumbing.
What factors influence the cost of bathroom plumbing renovations?
Costs depend on scope, layout complexity and materials. Simple fixture swaps are fairly inexpensive; moving drains or a full repipe significantly raises labor and material costs. Accessibility (framed floor vs. slab), permit fees, inspections and coordination with other trades all influence the budget. Ask for an itemized estimate so you can see what drives cost and make informed choices.
How can homeowners maximize space in small bathroom layouts?
Maximize space by choosing compact fixtures like corner sinks and wall‑hung toilets, planning straight short plumbing runs, and using recessed storage solutions such as medicine cabinets. Ensure proper ventilation and moisture control to protect finishes. Verify rough‑in dimensions before installation so space‑saving fixtures fit as intended.
What are the advantages of using PEX, copper, and PVC in bathroom plumbing?
Each material has clear advantages: PEX is flexible and quick to install, which is ideal for remodels and reduces wall chases; copper is durable and heat‑resistant for long‑lasting supply lines; PVC/ABS is economical and commonly used for drainage with solvent‑weld joints. The right choice depends on project needs, expected lifespan and local code. A licensed plumber can recommend the best material mix for your renovation.
Conclusion
A well‑planned bathroom plumbing layout is the foundation of a functional, code‑compliant and serviceable bathroom. Understanding rough‑in dimensions, fixture placement and local code requirements helps avoid costly mistakes and streamlines the renovation. Working with a licensed plumber who offers transparent pricing and clear estimates makes the process smoother and protects your investment. Ready to get started? Contact Frost and Kretsch Plumbing to schedule a consultation and on‑site assessment.