How to Find Hidden Water Leaks in Your Home — Expert Signs, Tests, and Solutions
Hidden water leaks happen out of sight — inside walls, under concrete slabs, or buried beneath yards — and they matter because they quietly cause water damage, mold, structural problems, and unexpected bills. This guide explains why hidden leaks escalate costs and health risks, then walks you through practical signs to watch for, safe DIY checks to gather evidence, the professional detection tools pros use, and repair choices that reduce disruption. You’ll learn clear indicators like rising water bills and musty smells, step‑by‑step meter and dye checks you can do at home, the advanced techniques technicians use to pinpoint leaks, and common repair approaches so you can decide whether to keep troubleshooting or call a local expert. After the initial DIY steps we briefly introduce Frost and Kretsch Plumbing as a Michigan resource for inspection and repair, then return to focused advice on detection tools, an easy decision guide for calling a pro, and what drives repair costs. Read on for a practical plan that pairs quick homeowner checks with the professional options that limit invasive work and long‑term expense.
What Are the Common Signs of Hidden Water Leaks?
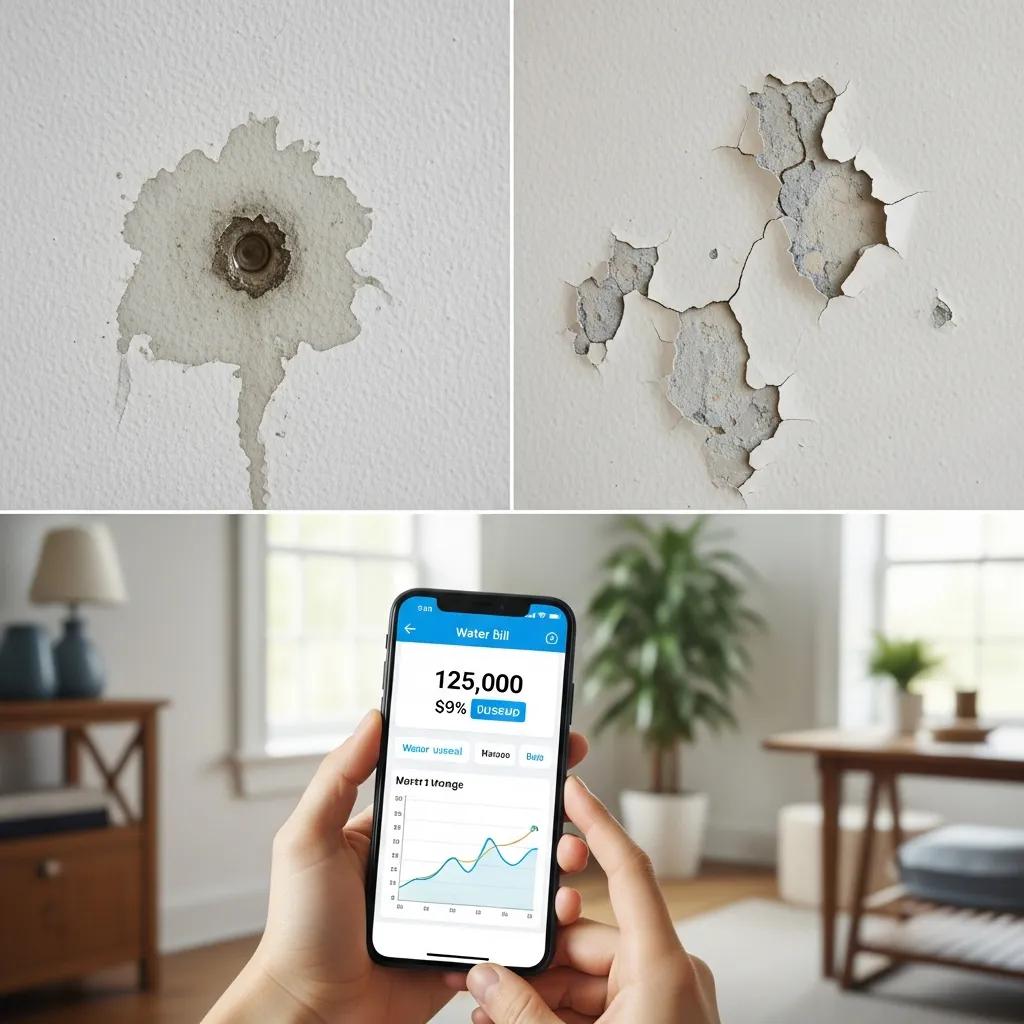
Most hidden leaks show up through secondary clues rather than visible streams. Moisture moves through building materials, so early signs are often indirect—but spotting them quickly reduces damage, mold risk, and foundation or flooring problems. The most reliable clues mix measurable evidence, like an unexpected spike in your water bill, with sensory hints such as musty odors or the sound of running water. Recognizing these signals helps you choose the right DIY checks and decide if the situation needs professional attention.
Below is a quick checklist of the primary signs homeowners should watch for, and why each one matters. If one or more appear together, that’s stronger evidence of an active leak rather than a temporary issue.
- An unexplained, persistent increase in your water bill — a steady rise usually means continuous water loss.
- Wet patches, dark stains, or bubbling/peeling paint on walls and ceilings — these indicate moisture migration or active seepage.
- Musty or moldy odors in closets, basements, or behind walls — a sign of prolonged damp conditions that support mold.
- Hissing, constant running, or dripping sounds when all fixtures are off — a good indicator of pressurized leaks.
- Soft, sagging, or warm spots in floors, and warped baseboards — common with slab or concealed pipe leaks under surfaces.
These observable signs are a good foundation for the targeted tests that follow. If you spot one or more, the water meter check and focused visual inspections are practical next steps to confirm active leakage and estimate potential loss.
How Can a High Water Bill Indicate a Hidden Leak?
A sudden or sustained jump in your water bill is a measurable clue that water is being lost continuously — often from a leak. Pressurized pipes that fail waste gallons every hour, and your municipal meter records that flow. A simple water meter test isolates household use and shows whether the meter is moving when everything is off. That converts a billing mystery into actionable evidence and can help you estimate how large the leak might be.
- Locate your water meter and write down the current reading. Turn off all indoor and outdoor fixtures and appliances that use water.
- Wait 15–60 minutes without using water, then check the meter again — any movement indicates continuous flow and likely a leak.
- To estimate leak size, note meter ticks per minute or gallons per hour and compare to typical household use; if movement continues and you can’t find the source, call a pro.
If the meter doesn’t move but your bill stays high, consider intermittent systems like irrigation or a billing error. If the meter does move, you’ve got strong evidence of a hidden leak and should proceed to more detailed checks or professional detection.
What Visual and Sensory Clues Reveal Hidden Leaks?
Visual and sensory clues show where moisture is traveling and collecting. Stains, bubbling paint, and warped surfaces are signs that water has migrated through materials; musty smells point to mold‑friendly conditions, and audible water sounds reveal pressurized flow. These signals are usually localized and can help you trace a leak’s vertical or horizontal path — for example, a discolored ceiling beneath a bathroom often points to an upstairs source.
When you spot staining or damp areas, a moisture meter or probe (if available) will quantify saturation and map the problem. Elevated readings guide your next steps. If you hear running water when no fixtures are on, follow the sound along walls and floors to narrow the area until you either see the source or collect enough evidence to justify a professional acoustic or camera inspection.
Which Types of Hidden Water Leaks Should Homeowners Know About?
Hidden leaks fall into four main categories — slab, wall, underground/main line, and basement seepage — and each presents different detection challenges and risks. Classifying the type quickly narrows which diagnostic tools to use, estimates likely repair complexity, and highlights related risks like foundation movement or mold. Knowing the common causes helps you judge whether DIY checks are likely to find the issue or whether professional detection will be required.
- Slab leaks: Pipes under concrete slabs. Look for warm floor patches, hairline foundation cracks, or localized floor damage from pressurized water escaping beneath the slab.
- Wall leaks: Pipe failures inside wall cavities that cause staining, peeling paint, or localized mold without obvious pooling outside the wall.
- Underground/main line leaks: Breaks in supply lines under yards or between the meter and the house that create soggy ground, sinkholes, or sudden lawn saturation.
- Basement leaks: Water entering through walls or slab edges due to poor drainage, sump pump failure, or exterior hydrostatic pressure — leading to flooding or persistent dampness.
Classifying the likely type focuses your next diagnostic choices — moisture meters and cameras for wall leaks, acoustic and tracer‑gas techniques for slab and buried issues — so you can decide whether to continue DIY troubleshooting or call a specialist.
What Is a Slab Leak and How Does It Affect Your Home?
A slab leak happens when a supply pipe under a concrete foundation fails, allowing pressurized water to travel beneath the slab and damage flooring, insulation, and structural components. Common signs include warm floor areas, sudden soft spots, unexplained water bill spikes, and hairline foundation cracks. Slab leaks are risky because they can undermine structure and feed hidden mold growth. Visual inspection rarely shows the exact leak point, so specialized detection equipment is often needed.
Because slab repairs can require cutting concrete, professional detection that pinpoints the leak greatly reduces unnecessary demolition and overall cost. Targeted methods — acoustic sensors, thermal imaging, and tracer gas — help limit excavation. Early detection can make less invasive repairs like rerouting or localized pipe replacement feasible, avoiding full slab replacement.
How Do Wall, Underground, and Basement Leaks Differ?
Wall leaks, underground/main line breaks, and basement seepage differ in where the water moves, how they appear, and how invasive repairs usually are. Wall leaks create interior signs but can be hard to access without opening cavities; underground line failures show exterior saturation and usually need non‑invasive locating tools plus excavation to repair; basement leaks often stem from drainage issues and may be fixed with exterior grading or sump solutions but sometimes require excavation or structural repair.
When choosing a detection path, weigh access and invasiveness: wall leaks often respond to camera inspections and small openings, underground leaks usually need acoustic or tracer‑gas locating and excavation, and basement leaks may combine visual checks with hydrostatic testing and drainage evaluation. These distinctions help decide whether to continue DIY checks or hire professionals to avoid unnecessary damage.
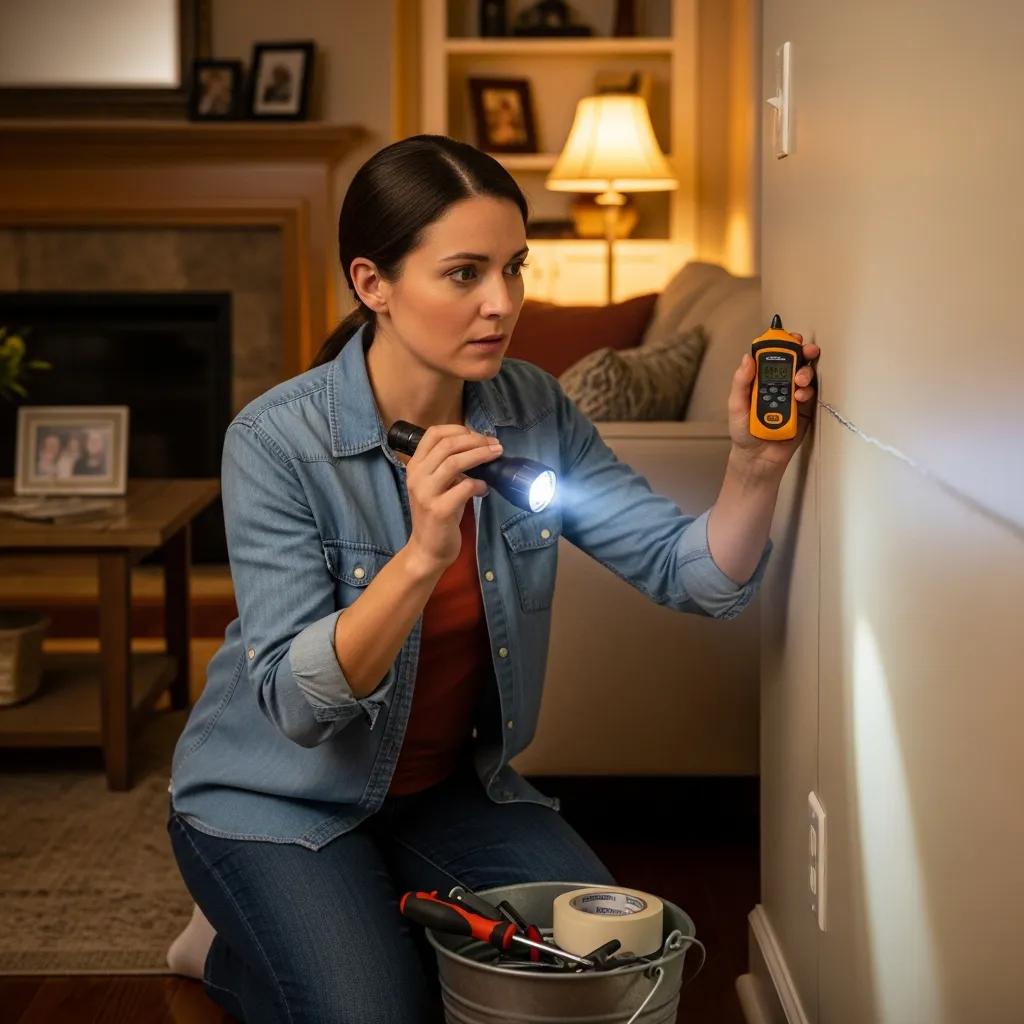
How Can You Perform DIY Leak Detection Before Calling a Plumber?
DIY detection helps homeowners gather evidence and sometimes fix minor issues, but it’s important to be systematic and safe so you don’t miss the source or make damage worse. Start with low‑cost tests — water meter checks, toilet dye tests, and visual inspections of appliances and exposed piping — to confirm continuous flow or find obvious faults. These steps give you solid information to share with a plumber and help avoid premature excavation by narrowing likely leak zones.
Use the quick reference below to pick the right DIY test based on the clues you’ve observed.
| DIY Test | Tools Needed | What It Indicates |
|---|---|---|
| Water meter test | Access to water meter, notepad, timer | Confirms continuous flow and estimates leak rate |
| Toilet dye test | Food coloring or dye tablets | Detects flapper or fill‑valve leaks inside the toilet |
| Visual appliance inspection | Flashlight, wrench, towel | Finds loose fittings, leaking hoses, or valve issues |
| Moisture probe / meter | Moisture meter | Locates saturated materials and maps the affected area |
This table helps prioritize which DIY test to run first. For example, a positive water meter test confirms active leakage and should lead to focused visual checks or documentation for a professional visit.
When you need a more detailed result, use the numbered water meter procedure below to turn a billing concern into diagnostic data:
- Locate and record the meter reading. Make sure all water‑using devices and fixtures — including irrigation — are off.
- Watch the meter for 15–60 minutes. Any movement indicates continuous flow and suggests a leak.
- Repeat the test if automatic systems could have run. Record readings to estimate gallons per hour and compare to your normal usage.
- If the meter confirms continuous flow and you can’t find the source, document visual clues and meter readings to share with a professional for faster pinpointing.
These DIY steps are reliable for catching common issues like running toilets, and they tell you when professional acoustic, thermal, or tracer‑gas detection is warranted to avoid costly guesswork.
How to Use the Water Meter Test to Find Hidden Leaks?
The water meter test is a quick, objective way to detect continuous water flow recorded by your municipal meter. Shut off all fixtures and appliances, record the meter reading, and if the meter advances while everything is off, there’s water flowing somewhere in the supply. The meter test is simple and can estimate leak severity by converting meter movement into gallons per hour to help prioritize urgency.
To be thorough, repeat the test with isolated zones closed (for example, shut the house shutoff valve). If the meter still moves with the house valve closed, the leak may lie between the meter and the house or at the main line. Keep in mind irrigation systems or automatic appliances can skew results, so disable all possible water sources and record your findings for professionals if needed.
What Are Other Simple DIY Methods Like Dye Tests and Visual Inspections?
Beyond the meter test, dye tests and visual inspections are low‑cost ways to find common hidden leaks like running toilets and failed appliance hoses. A toilet dye test uses food coloring or a tablet in the tank to reveal internal leaks when color shows up in the bowl. Visual checks should include under‑sink cabinets, behind washers and dishwashers, around water heaters, and any exposed piping for dripping, corrosion, or loose fittings — often easy fixes.
Tools like a moisture meter or infrared thermometer help flag cooler or warmer zones that indicate moisture migration or active leaks. These DIY methods work well for accessible plumbing and give useful evidence for professionals when leaks hide in walls or under slabs. If these steps don’t find the source but the meter remains active, professional detection is the next logical step to avoid unnecessary demolition.
| Test | Tools Needed | What It Indicates |
|---|---|---|
| Dye toilet test | Food coloring or dye tablet | Internal toilet leak (tank‑to‑bowl) |
| Appliance hose check | Flashlight, wrench, towel | Loose, cracked, or burst hoses at dishwasher/washer |
| Moisture scan | Moisture meter or infrared thermometer | Hidden damp spots under finishes |
Uncover Hidden Leaks: Signs, Detection, and Expert Solutions
Call a professional when the leak risks structural elements, involves a slab or underground main, creates a large bill spike, or when DIY tests confirm continuous flow but you can’t find the source. Professionals use advanced tools that locate leaks non‑invasively and reduce destructive searching. Professional detection protects your home by identifying exact leak points, estimating repair scope, and recommending less‑invasive remediation — often saving time and reducing total repair cost compared with guess‑and‑dig approaches. Knowing when to escalate to a licensed technician helps you avoid compounding damage and gives access to certified repair methods and local experience.
| Method | Accuracy / Best for | Invasiveness / Relative Cost |
|---|---|---|
| Acoustic leak detection | High — pressurized pipes under slabs and in walls | Low invasiveness, moderate cost |
| Thermal imaging | Good — temperature‑differentiated leaks (hot/cold lines) | Non‑invasive, moderate cost |
| Tracer gas | Very high — fine leaks in pressurized lines | Non‑invasive, higher cost |
| Camera inspection | High — inside pipe inspection and blockages | Low invasiveness, moderate cost |
What Advanced Technologies Do Professionals Use for Leak Detection?
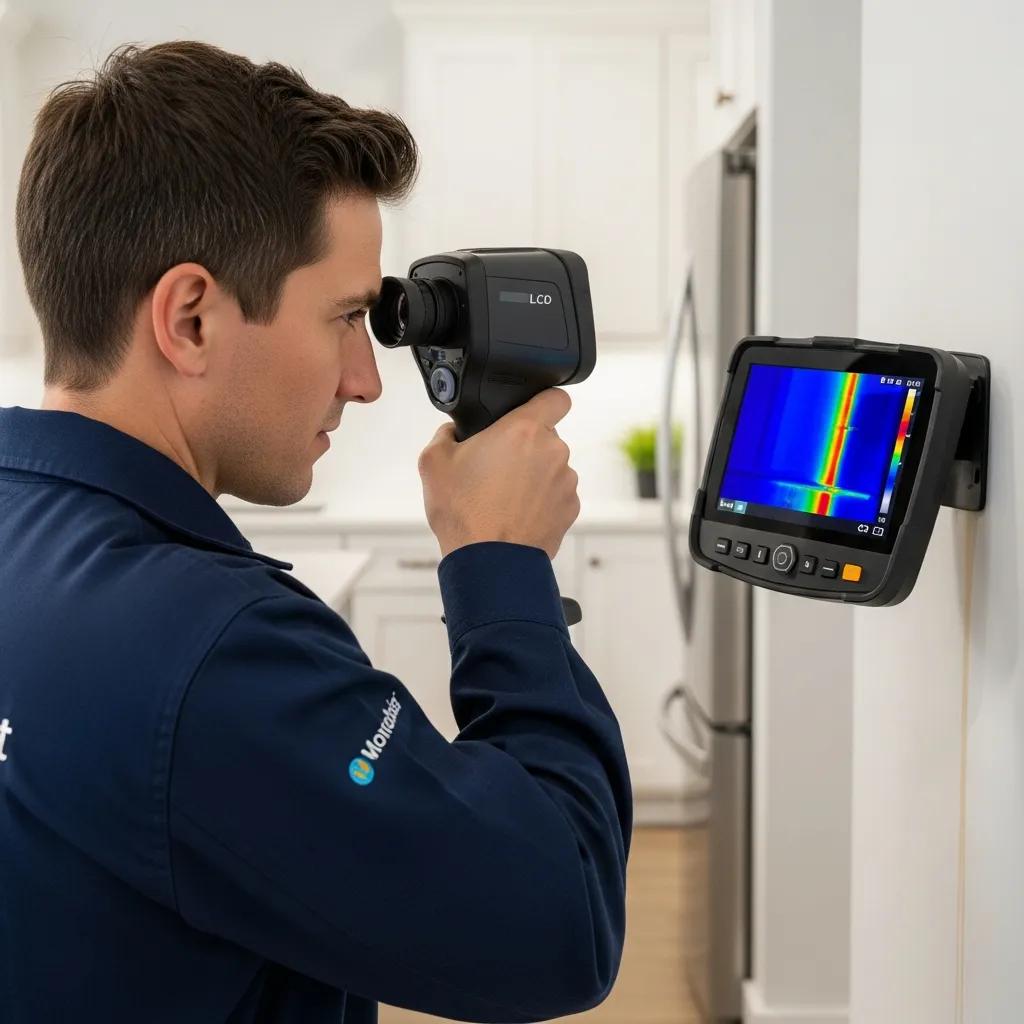
Professional leak detection combines acoustic sensors, thermal imaging, tracer gas, and camera inspections to turn hidden flow into locatable signals. Acoustic detection listens for the unique sounds of pressurized flow through pipes, making it effective for slab and buried leaks. Thermal imaging reveals temperature differences caused by escaping hot or cold water, which helps find active leaks. Tracer gas introduces a safe, detectable gas into the line and samples outside surfaces to pinpoint tiny breaches, and camera inspections send a camera through pipes to visually confirm internal damage or blockages.
Which method a technician chooses depends on pipe material, location, and the type of leak. Acoustic sensors work well on metal or pressurized lines, thermal cameras are useful when there’s a temperature contrast, and tracer gas or cameras are best for complex concealed systems. Picking the right method minimizes invasive work and gives you evidence‑based repair estimates.
How Does Frost and Kretsch Plumbing Provide Expert Leak Detection in Michigan?
At Frost and Kretsch Plumbing, we provide licensed leak detection and repair across Macomb, Oakland, and Wayne counties. Our technicians combine non‑invasive technologies — acoustic sensing, thermal imaging, and video camera inspection — with fast emergency response and transparent pricing. We focus on pinpointing leaks so repairs are targeted, which reduces demolition and restoration costs. We also offer 24/7 emergency service, clear estimates, and a satisfaction guarantee so homeowners know the job will be done right.
If a meter test or your observations point to a hidden leak, contacting a local licensed service like Frost and Kretsch moves you from uncertainty to a clear repair plan. Our local knowledge helps with insurance documentation, prioritizing repairs, and recommending preventative steps suited to Michigan weather and common foundation types.
| Detection Method | Accuracy / Best For | Typical Application |
|---|---|---|
| Acoustic sensing | High / pressurized slabs and buried pipes | Pinpoint leaks beneath slabs or in the yard |
| Thermal imaging | Medium‑high / temperature contrast | Locate hot‑water line failures or cold‑water seepage |
| Camera inspection | High / pipe interiors | Confirm corrosion or blockages before repair |
What Are the Repair Options and Costs Associated with Hidden Water Leaks?
Repair options range from spot pipe replacement and rerouting to epoxy lining, slab patching, or excavation for main‑line repairs. Cost depends on access, pipe material, labor, and the amount of restoration needed. Key cost drivers include whether the leak is under a slab, inside a wall, or in an underground main, the pipe material (copper, PEX, PVC), and whether structural or cosmetic restoration is required. Understanding repair categories helps you set realistic expectations and choose solutions that minimize long‑term disruption.
| Repair Type | Typical Cause / Location | Typical Access Level | Relative Cost Range |
|---|---|---|---|
| Spot pipe replacement | Localized corrosion or a pinhole leak | Low to moderate access | Low to moderate |
| Rerouting / rerun | Multiple failures or inaccessible lines | Moderate access, may avoid slab work | Moderate |
| Epoxy lining / relining | Aging interior corrosion | Low invasiveness if accessible | Moderate |
| Slab repair / excavation | Slab leaks or main line failures | High invasiveness, excavation required | High |
How Is Slab Leak Detection Cost Determined?
Slab leak detection cost depends on access difficulty, the technology required, and whether locating the leak avoids excavation. Precise location reduces repair scope and overall expense. Factors that raise cost include thick slabs, deep or hard‑to‑reach pipes, finished flooring covering the slab, and any impact on structural elements — each increases the time and tools needed. Additional costs may include concrete or flooring restoration and mold remediation, so include those when budgeting repairs.
Because slab work can escalate quickly, precise non‑invasive detection is often the most cost‑effective first step. Limiting concrete cutting to the smallest necessary area and getting a documented professional assessment helps avoid surprises and allows phased repairs to manage restoration costs.
What Are Common Repair Methods and Preventative Maintenance Tips?
Common repair choices include replacing the damaged segment, rerouting supply lines to accessible paths, applying epoxy lining to avoid excavation, or excavating for full main‑line replacement when necessary. The right option balances invasiveness, longevity, and budget. Preventative maintenance reduces leak risk and catches small problems early: inspect hoses and shutoff valves yearly, monitor your water meter regularly, insulate exposed pipes against freezing, and watch for sudden billing changes. Seasonal checks — especially before Michigan winters — help prevent freeze‑related failures and detect leaks early.
- Inspect flexible appliance hoses and shutoff valves annually to catch wear before failure.
- Check the water meter monthly and log typical usage to spot anomalies fast.
- Insulate exposed pipes and maintain good basement drainage to reduce freeze and seepage risk.
| Prevention Action | Frequency | Expected Benefit |
|---|---|---|
| Water meter checks | Monthly | Early detection of continuous leaks |
| Hose and valve inspection | Annually | Prevent appliance leaks and sudden failures |
| Pipe insulation | Pre‑winter | Reduce freeze‑related bursts in cold months |
If you’re ready to move from detection to repair planning, licensed local providers like Frost and Kretsch Plumbing handle slab repair, pipe repair, excavation, and restoration and can give estimates based on precise detection results. A professional assessment after you gather DIY evidence helps produce accurate cost estimates and an actionable repair plan tailored to your home.
Frequently Asked Questions
What are the potential health risks associated with hidden water leaks?
Hidden leaks create damp environments where mold can grow. Mold spores can trigger allergies, asthma attacks, and other respiratory problems — especially in children, older adults, and people with existing health issues. Long‑term dampness also lowers indoor air quality. Address leaks quickly to reduce health risks and limit the extent of mold growth.
How can I prevent hidden water leaks in my home?
Preventing hidden leaks means regular maintenance and simple precautions: inspect hoses and fittings annually, replace aging flexible hoses on appliances, insulate exposed pipes before winter, and monitor your water meter for unusual changes. These steps significantly lower the chance of a sudden leak and help catch small problems early.
What should I do if I suspect a hidden leak but can't find it?
If you suspect a leak but can’t locate it after basic checks, call a professional leak detection service. Technicians use acoustic sensors, thermal imaging, tracer gas, and camera inspections to find leaks without unnecessary demolition. Early professional help can pinpoint the problem and prevent escalating damage and costs.
Are there any DIY methods to check for hidden leaks?
Yes. Start with the water meter test to see if the meter moves when everything is off. Use a toilet dye test to check for tank‑to‑bowl leaks. Visually inspect under sinks, behind appliances, and around water heaters for drips or corrosion. These methods give useful information and may solve simple issues before involving a pro.
How do I know if a leak is serious enough to call a professional?
Call a professional if you see persistent signs like high bills, musty odors, visible dampness, or if DIY tests show continuous flow and you can’t find the source. Also call for suspected slab or main line leaks, or if water is affecting structural elements. Professionals ensure accurate detection and effective repairs that prevent worse damage.
What are the costs associated with repairing hidden water leaks?
Repair costs vary widely depending on location, access, pipe material, and the restoration required. Simple spot repairs can be relatively inexpensive, while slab repairs and main‑line excavations are more costly. Include potential flooring, concrete, and mold remediation costs when budgeting. Getting estimates from licensed professionals gives the clearest expectation for expenses.
Conclusion
Finding and fixing hidden water leaks protects your home, your health, and your wallet. By spotting early signs and running a few simple DIY checks you can catch many issues before they grow. When a leak is hidden, persistent, or affects structural elements, professional leak detection and targeted repairs limit damage and reduce overall cost. Don’t wait for a small problem to become a major expense — contact a trusted local specialist like Frost and Kretsch Plumbing to get a clear plan and fast, reliable repairs.